47th Oi Match Game 6
[Black "Habu Yoshiharu, Oi"]
[White "Sato Yasumitsu, Challenger"]
[Event "47th Oi-sen, Game 6"]
[Date "September 12th and 13rd 2006"]
1.P7g-7f     00:00:00  00:00:00
2.P3c-3d     00:00:00  00:01:00
3.P2g-2f     00:02:00  00:01:00
4.P5c-5d     00:02:00  00:01:00
5.P2f-2e     00:13:00  00:01:00
6.R8b-5b     00:13:00  00:01:00
7.S3i-4h     00:14:00  00:01:00
8.P5d-5e     00:14:00  00:03:00
9.K5i-6h     00:16:00  00:03:00
10.B2b-3c    00:16:00  00:04:00
11.K6h-7h    00:17:00  00:04:00
12.K5a-6b    00:17:00  00:06:00
13.S7i-6h    00:34:00  00:06:00
14.K6b-7b    00:34:00  00:07:00
15.G4i-5h    00:35:00  00:07:00
16.K7b-8b    00:35:00  00:23:00
17.P4g-4f    00:36:00  00:23:00

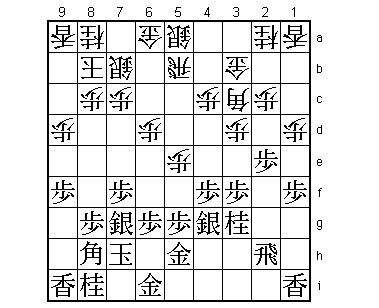
The Gokigen Nakabisha like in game 4. However, Habu's opening
strategy in this game is completely different. In game 4 he
exchanged the pawns on the second file early and the fight
concentrated there. Here, he is challenging the white supremacy
in the center.

18.S7a-7b    00:36:00  00:45:00
19.S4h-4g    00:39:00  00:45:00
20.S3a-4b    00:39:00  00:48:00
21.P3g-3f    00:47:00  00:48:00
22.P9c-9d    00:47:00  00:55:00
23.P9g-9f    00:57:00  00:55:00
24.P6c-6d    00:57:00  01:03:00
25.P1g-1f    01:03:00  01:03:00
26.P1c-1d    01:03:00  01:06:00
27.N2i-3g    01:18:00  01:06:00
28.G4a-3b    01:18:00  01:13:00
29.S6h-7g    02:17:00  01:13:00
30.S4b-5a    02:17:00  01:16:00

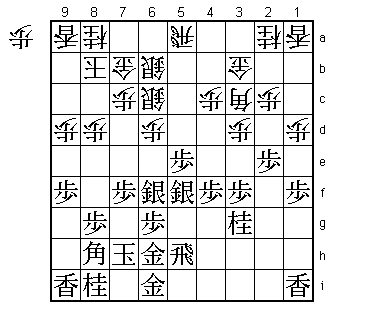
This is a new move. It is unclear if it is good, but it shows that
Sato is prepared to go into untested territory, even with his back
against the wall.

31.S7g-6f    02:42:00  01:16:00
32.S5a-6b    02:42:00  01:20:00
33.G5h-6h    03:08:00  01:20:00
34.S7b-6c    03:08:00  01:57:00
35.R2h-5h    03:39:00  01:57:00
36.G6a-7b    03:39:00  02:24:00
37.P5g-5f    03:57:00  02:24:00

It is clear that Habu wants to end this match in this game. He sometimes
takes the opening stage a little lightly, using much less time than his
opponent, but for his last six moves, he has taken 15, 59, 25, 26, 31
and 18 minutes. He has already used 93 minutes more than Sato.

38.P5ex5f    03:57:00  02:24:00
39.S4gx5f    03:57:00  02:24:00
40.R5b-5a    03:57:00  02:24:00
41.P*5e      05:16:00  02:24:00
42.P8c-8d    05:16:00  02:46:00

It looks a bit strange to play this pawn before pushing the pawn on 7c,
but there is a reason for this. Habu explained after the game that after
42.P7d he intended to start the fight with 43.S4e. If then 44.P4d S5d
S5b, black has B9g next and white cannot play P*5c because Bx6d is a
check. This is why Sato played 42.P8d. If the same variation is then
played, Bx6d is not a check. Both players saw exactly the same thing
here.

43.R5h-2h    05:27:00  02:46:00
44.P7c-7d    05:27:00  02:50:00
45.S6f-5g    05:29:00  02:50:00
46.N8a-7c    05:29:00  02:59:00
47.P6g-6f    05:37:00  02:59:00
48.B3c-4b    05:37:00  04:04:00
49.G6i-5h    05:39:00  04:04:00
50.N2a-3c    05:39:00  04:04:00
51.G5h-6g    05:40:00  04:04:00
52.P3d-3e    05:40:00  04:10:00
53.R2h-2f    05:43:00  04:10:00
54.P*5d      05:43:00  04:12:00
55.P5ex5d    05:46:00  04:12:00
56.R5ax5d    05:46:00  04:12:00
57.P3fx3e    05:46:00  04:12:00
58.P*5e      05:46:00  04:14:00
59.S5f-4g    05:46:00  04:14:00
60.B4b-5c    05:46:00  04:39:00
61.S4g-3f    05:53:00  04:39:00
62.B5c-3a    05:53:00  04:39:00
63.R2f-2h    05:54:00  04:39:00
64.B3a-1c    05:54:00  04:40:00
65.P4f-4e!   06:15:00  04:40:00

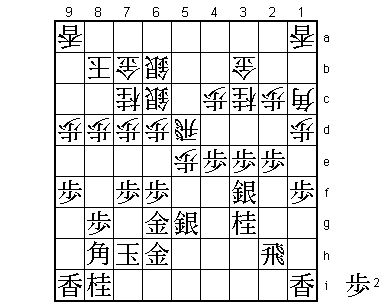
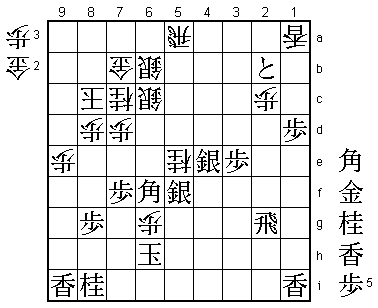
A long period of maneuvering finally comes to an end. Sato thought
that black could not push this pawn. White wants to develop the bishop
and knight and 4e gives the knight a square to move to, while the pawn
on 4e can also be a target for a counter attack with P4d. However, Habu
has seen that he can use this attack to set one up.

66.P4c-4d    06:15:00  04:45:00
67.P1f-1e    06:15:00  04:45:00
68.N3cx4e    06:15:00  04:52:00
69.N3gx4e    06:18:00  04:52:00
70.P4dx4e    06:18:00  04:52:00
71.P1ex1d    06:21:00  04:52:00
72.B1c-2b    06:21:00  04:52:00
73.P9f-9e    06:28:00  04:52:00

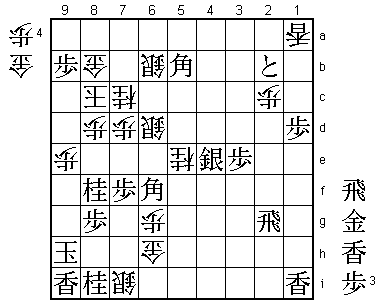
Habu has used the white attack in the center to win a pawn on the edge
and now uses this extra pawn to attack on the opposite side of the board.
White has a lot of pressure in the center, so it is not clear who is
better here, but Habu definitely showed that 65.P4e was possible.

74.P9dx9e    06:28:00  04:53:00
75.P*9b      06:28:00  04:53:00
76.L9ax9b    06:28:00  04:59:00
77.P*9c      06:28:00  04:59:00
78.L9bx9c    06:28:00  05:11:00
79.P*9d      06:28:00  05:11:00
80.L9cx9d    06:28:00  05:11:00
81.N*8f      06:28:00  05:11:00
82.K8b-8c    06:28:00  05:20:00
83.N8fx9d    06:34:00  05:20:00
84.R5d-5a    06:34:00  05:20:00
85.P2e-2d    06:36:00  05:20:00
86.P2cx2d    06:36:00  05:20:00
87.R2hx2d    06:36:00  05:20:00
88.P*2c      06:36:00  06:41:00
89.R2d-2g    06:42:00  06:41:00
90.P6d-6e    06:42:00  06:41:00
91.S3fx4e    06:55:00  06:41:00
92.P6ex6f    06:55:00  06:48:00
93.S5gx6f    06:56:00  06:48:00
94.P*6e      06:56:00  06:48:00
95.S6f-5g    06:57:00  06:48:00
96.N*6f      06:57:00  06:48:00
97.K7h-7i    07:09:00  06:48:00

98.K8cx9d?   07:09:00  07:03:00

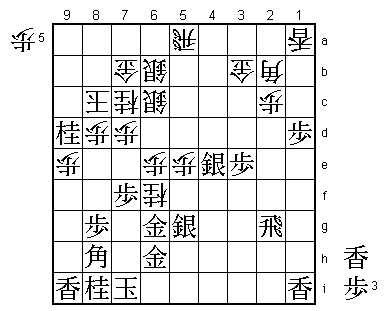
A big mistake. Maybe Sato had visions of the position with the king
on 1f in the previous game. This king was very hard to catch and maybe
Sato thought that he could do the same thing here. An illusion, as
will be clear soon. Taking the knight on 9d makes the black attack
much easier, because in a lot of variations the knight is just blocking
the black pieces. Therefore, taking the knight and then moving back
to 8c, as will happen in the game, is even worse than not moving the
king from 8c at all. Sato should have played 98.P5f here. Then 99.S5gx5f
P*5h P*6d Sx6d L*5d R9a P2d P5i+ Px2c+ +P5h is pretty much a forced line
and now +Px3b fails to P*5e! S4g +Px6h Gx6h R9d (mating threat) P*6g
P5f! Px6f (+Rx2b P5g+) Bx6f and the position is unclear. The reason why
Sato rejected this line was that he feared 99.S4ex5f P*5h R2i and white
must be very careful to keep the pressure in the center. Sato had overlooked
that after R2i he could play P*3g which is good for white.

99.P*4d      07:12:00  07:03:00
100.P5e-5f   07:12:00  07:34:00
101.S5gx5f   07:13:00  07:34:00
102.P*5g     07:13:00  07:43:00
103.P4d-4c+  07:36:00  07:43:00
104.P5g-5h+  07:36:00  07:49:00
105.+P4cx3b  07:38:00  07:49:00
106.K9d-8c   07:38:00  07:51:00

This is the reason why 98.Kx9d was so bad. Black threatens mate, so white
has to defend by moving the king back to 8c, a square where the king was
earlier. Even worse, without the king on 9d, the position of the king on
8c is much weaker than it was before. Unfortunately for Sato, there is no
recovery from this mistake.

107.+P3bx2b  07:39:00  07:51:00
108.N*5e     07:39:00  07:51:00
109.G6gx6f   07:45:00  07:51:00
110.+P5hx6h  07:45:00  07:51:00
111.K7ix6h   07:45:00  07:51:00
112.P6ex6f   07:45:00  07:51:00
113.B8hx6f   07:45:00  07:51:00
114.P*6g     07:45:00  07:55:00

115.K6h-7h!  07:49:00  07:55:00

Habu in terminator mode. It seems difficult to choose a square to move the
king to. Actually, 7h seems to be the most dangerous one, because white has
more checks with the gold. However, Habu saw that escaping into space with
115.K5g is dangerous after 116.G*6e Sx6e Nx6e K4f S*5g Rx5g Nx5g+ because
white has mating threats, while black needs a little more time to get to
the white king. Also, 115.K7g G*6e is not so easy for black. It is important
to keep the knight on 7c out of the attack.

116.G*6h     07:49:00  07:57:00
117.K7h-8h   07:49:00  07:57:00

White has no more moves to continue the attack. Habu is walking a thin line
between safety and danger here, but his judgment can be trusted.

118.G7b-8b   07:49:00  07:59:00
119.P*6d     07:53:00  07:59:00
120.S6cx6d   07:53:00  07:59:00
121.N*8f     07:53:00  07:59:00
122.R5a-9a   07:53:00  07:59:00
123.P*9b     07:53:00  07:59:00
124.R9a-4a   07:53:00  07:59:00
125.B*5b     07:56:00  07:59:00
126.R4ax4e   07:56:00  07:59:00
127.S5fx4e   07:56:00  07:59:00
128.S*7i     07:56:00  07:59:00
129.K8h-9h   07:56:00  07:59:00
Resigns      07:56:00  07:59:00

Black threatens mate with B*6a G*7b G*9d etc. White has no attack and no
defense, so Sato resigned. With this win Habu claimed his 12th Oi title,
the same number of Oi titles the great Oyama has won. Also, this is his
64th title victory and he now shares second place on the all-time list
with Nakahara (leader Oyama won 80 major titles). Sato again came up short
against Habu, losing his fourth title match in a row to Habu, (last year's
Oi and Oza matches, this year's Osho and Oi matches). It must be frustrating
to dominate all other players, only to hit the wall called Habu every time.
