47th Oi Match Game 5
[Black "Sato Yasumitsu, Challenger"]
[White "Habu Yoshiharu, Oi"]
[Event "47th Oi-sen, Game 5"]
[Date "August 30th and 31st 2006"]
1.P7g-7f     00:00:00  00:00:00
2.P3c-3d     00:00:00  00:01:00
3.P2g-2f     00:01:00  00:01:00
4.G4a-3b     00:01:00  00:02:00
5.P2f-2e     00:13:00  00:02:00
6.B2bx8h+    00:13:00  00:05:00
7.S7ix8h     00:13:00  00:05:00
8.S3a-2b     00:13:00  00:05:00
9.S3i-4h     00:17:00  00:05:00
10.S2b-3c    00:17:00  00:12:00
11.P1g-1f    00:21:00  00:12:00
12.S7a-6b    00:21:00  00:29:00
13.P1f-1e    00:24:00  00:29:00
14.P6c-6d    00:24:00  00:35:00
15.P4g-4f    00:24:00  00:35:00
16.S6b-6c    00:24:00  00:36:00
17.S4h-4g    00:24:00  00:36:00
18.P7c-7d    00:24:00  00:41:00
19.P3g-3f    00:27:00  00:41:00
20.G6a-5b    00:27:00  00:46:00
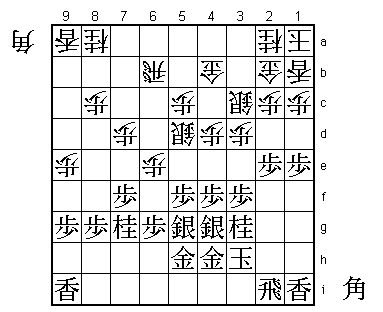
21.R2h-7h    01:02:00  00:46:00

This is not as strange as it looks. One of the common ways to
make use of the extra move in the Kakugawari with tempo loss is
to push the edge pawn to 1e and then change to a Right Side King
formation. In this formation, the problem is often that the king
has no space to run, but with the pawn on 1e there is much more
room for the king to escape from an attack.

22.R8b-7b    01:02:00  01:29:00
23.N2i-3g    01:56:00  01:29:00
24.K5a-4b    01:56:00  01:33:00
25.G4i-3h    01:56:00  01:33:00
26.K4b-3a    01:56:00  01:54:00
27.K5i-4i    01:58:00  01:54:00
28.K3a-2b    01:58:00  02:04:00
29.G6i-5h    02:15:00  02:04:00
30.P4c-4d    02:15:00  02:41:00
31.R7h-7i    02:28:00  02:41:00
32.P9c-9d    02:28:00  02:49:00
33.G3h-4h    02:43:00  02:49:00
34.P9d-9e    02:43:00  03:09:00
35.K4i-3h    02:43:00  03:09:00
36.S6c-5d    02:43:00  03:14:00
37.P5g-5f    02:57:00  03:14:00
38.L1a-1b    02:57:00  03:23:00
39.S8h-7g    03:10:00  03:23:00
40.P6d-6e    03:10:00  03:26:00
41.R7i-2i    03:16:00  03:26:00
42.R7b-6b    03:16:00  03:26:00
43.S7g-6h    03:20:00  03:26:00
44.G5b-4b    03:20:00  03:30:00
45.S6h-5g    03:24:00  03:30:00
46.K2b-1a    03:24:00  03:33:00
47.N8i-7g    03:34:00  03:33:00
48.G3b-2b    03:34:00  03:43:00

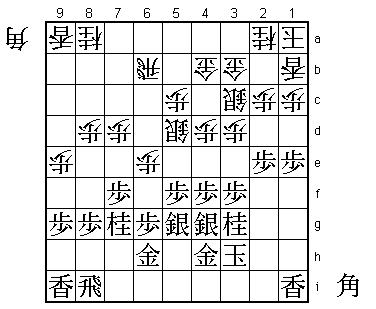
49.G5h-6h    03:53:00  03:43:00

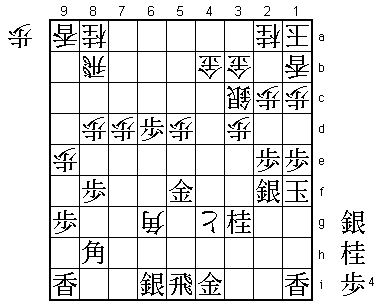
The sealed move and more or less expected. However, Sato seriously
considered a bold attack here: 49.B*5a R5b Bx4b+ Rx4b G*6d. The simple
threat is Gx5c and if white defends, then Nx6e is also possible. Even
though Sato could not see how this would be bad for him, he rejected
the attack because of its simplicity: "If I lose after that, it would
be quite embarrassing". Still, Takeichi (6-dan) pointed out that there
was another attack he could have tried here: 49.P4e Px4e P5e Sx5e Nx4e
S3c-4d P*4f! and it is difficult for white to keep his pieces together.
Both Habu and Sato admitted after the game that this was indeed an attack
worth considering.

50.G2b-3b    03:53:00  03:46:00
51.R2i-8i    04:00:00  03:46:00
52.P8c-8d!   04:00:00  04:19:00

Easy to overlook, but very strong. Pushing the pawn on the file where the
opponent rook just moved to is difficult to do, but it is important to
stop black from pushing the pawn to 8e. In that case, it would be almost
impossible for white to attack.

53.P8g-8f    04:18:00  04:19:00
54.R6b-8b    04:18:00  04:21:00

White threatens N7c next, after which black no longer has any attacking
options. Sennichite is not unlikely in that position, but Sato wants more
than that with the black pieces, so he has to attack now.

55.P5f-5e    04:40:00  04:21:00
56.S5dx5e    04:40:00  04:28:00
57.N7gx6e    04:40:00  04:28:00
58.B*5d!     04:40:00  05:01:00

Combined with the next move, this is the perfect counter. Habu was not
happy that he had been forced into a waiting game earlier, but when the
position is heating up, he is ready for battle.

59.P6g-6f    05:04:00  05:01:00
60.P3d-3e!   05:04:00  05:04:00

The head of the knight is the weak point in the black position.

61.P*5f      05:12:00  05:04:00
62.S5e-6d    05:12:00  05:06:00
63.B*2g      05:22:00  05:06:00
64.P7d-7e    05:22:00  05:33:00
65.P3fx3e    05:29:00  05:33:00
66.B5dx2g+   05:29:00  05:33:00
67.K3hx2g    05:29:00  05:33:00
68.P7ex7f    05:29:00  05:33:00
69.R8i-2i    05:33:00  05:33:00
70.B*6c!     05:33:00  05:45:00

Again another good combination by Habu.

71.B*3f      05:41:00  05:45:00
72.P5c-5d!   05:41:00  05:45:00

By blocking the bishop the exchange of bishops is no longer possible,
so the bishop on 3f becomes a target for attack next.

73.P4f-4e    05:45:00  05:45:00
74.P*3d      05:45:00  06:19:00
75.S5g-4f    05:58:00  06:19:00
76.P3dx3e    05:58:00  06:24:00
77.S4fx3e    05:58:00  06:24:00
78.P*3d      05:58:00  06:24:00
79.S3e-2f    05:59:00  06:24:00
80.S6dx6e    05:59:00  06:34:00
81.P6fx6e    05:59:00  06:34:00
82.N*3e      05:59:00  06:34:00

White has a strong attack, but Sato still had hopes that he would be
able to weather the storm.

83.K2g-1f    06:13:00  06:34:00
84.N3ex4g+   06:13:00  06:40:00
85.B3fx4g    06:13:00  06:40:00
86.P7f-7g+   06:13:00  06:41:00
87.P6e-6d    06:29:00  06:41:00
88.B6c-7d    06:29:00  06:44:00
89.G6hx7g    06:40:00  06:44:00
90.P4dx4e    06:40:00  06:45:00
91.G7g-6f    06:40:00  06:45:00
92.P4e-4f    06:40:00  06:47:00
93.B4g-6i    06:40:00  06:47:00
94.S*4g      06:40:00  06:59:00
95.G4h-4i    06:50:00  06:59:00

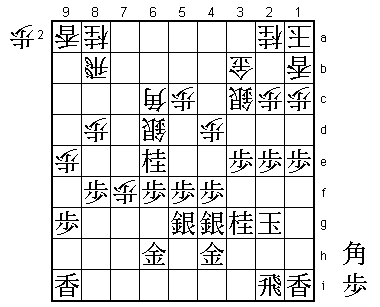
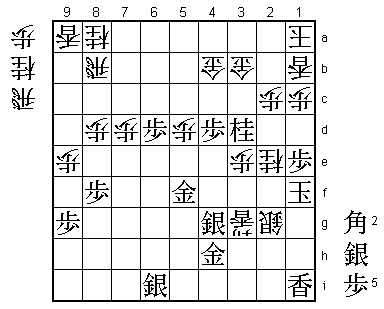
96.P*6g!!    06:50:00  07:11:00

Highlight of the game. It seems like white has trouble to keep his attack
going. For example, 96.Sx5f+ is answered by 97.G7e and black turns the
tables. The point of 96.P*6g is that after 97.Gx6g, white can play 98.Sx5f+.

97.R2i-2h    07:10:00  07:11:00

Defends against the pawn promotion on 6h and moves the rook from the
diagonal of the bishop, so this looks like the perfect reply.

98.P6g-6h+   07:10:00  07:12:00
99.R2hx6h    07:10:00  07:12:00
100.S4gx5f+  07:10:00  07:12:00

The point. 101.G7e fails to +S5g and white either wins the rook or promotes
the bishop.

101.R6h-7h   07:10:00  07:12:00
102.P*7c     07:10:00  07:12:00
103.R7hx7d   07:12:00  07:12:00
104.P7cx7d   07:12:00  07:12:00
105.G6fx5f   07:12:00  07:12:00
106.R*7i     07:12:00  07:12:00
107.S*7h     07:36:00  07:12:00
108.P4f-4g+  07:36:00  07:16:00
109.B*8h     07:36:00  07:16:00
110.R7ix6i+  07:36:00  07:17:00
111.S7hx6i   07:36:00  07:17:00
112.B*6g     07:36:00  07:18:00
113.R*5i     07:37:00  07:18:00

Again it seems that Sato has managed to stop the attack. For example, after
114.P*4h G3i +Px3g Sx3g the fork N*4g is answered by R5g, attacking the bishop.

114.P*4h     07:37:00  07:24:00
115.G4i-3i   07:37:00  07:24:00
116.B6g-8i+! 07:37:00  07:24:00

Wrong direction of play, but very strong. If the bishop on 8h moves, +Px3g
Sx3g N*4g is possible because R5g no longer attacks the white bishop. Sato
had completely overlooked this unnatural move.

117.B8hx3c+  07:49:00  07:24:00
118.N2ax3c   07:49:00  07:30:00
119.S*3f     07:49:00  07:30:00
120.+P4gx3g  07:49:00  07:40:00
121.S2fx3g   07:49:00  07:40:00
122.P3d-3e   07:49:00  07:42:00

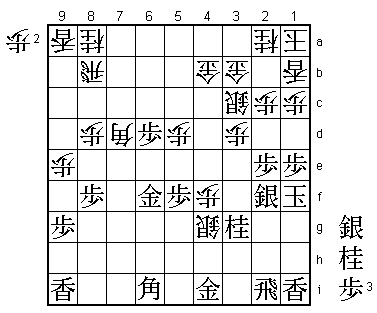
This pawn cannot be taken because of N*4g. With the attacking base on 3e,
the white attack is unstoppable, despite Sato's desperate struggles.

123.S3f-4g   07:51:00  07:42:00
124.+B8ix9i  07:51:00  07:46:00
125.G3ix4h   07:54:00  07:46:00
126.+B9i-4d  07:54:00  07:47:00
127.S3g-2f   07:57:00  07:47:00
128.N*3d     07:57:00  07:48:00
129.S*2g     07:59:00  07:48:00
130.N3dx2f   07:59:00  07:50:00
131.S2gx2f   07:59:00  07:50:00
132.S*3d     07:59:00  07:50:00
133.R5i-2i   07:59:00  07:50:00
134.B*4c     07:59:00  07:51:00
135.N*3g     07:59:00  07:51:00
136.L*3f     07:59:00  07:53:00
137.P*4e     07:59:00  07:53:00
138.L3fx3g+  07:59:00  07:53:00
139.P4ex4d   07:59:00  07:53:00
140.S3dx2e   07:59:00  07:53:00
141.S2fx2e   07:59:00  07:53:00
142.B4cx2e   07:59:00  07:53:00
143.R2ix2e   07:59:00  07:53:00
144.N3cx2e   07:59:00  07:53:00
145.N*3d     07:59:00  07:53:00
146.S*2g     07:59:00  07:53:00
Resigns      07:59:00  07:53:00

Mate after 147.Kx2e N*3c K2f (K3e R*3f Sx3f +Lx3f) R*3f Sx3f +Lx3f K1g S*1g.
Habu was not happy after the game because he felt that he had lost the opening
battle, but this was a very important win for him after losing two straight,
especially with the white pieces. Instead of having to face the possibility of
losing his Oi title, he can now try and defend the title with the black pieces
in the next game.
