47th Oi Match Game 4
[Black "Habu Yoshiharu, Oi"]
[White "Sato Yasumitsu, Challenger"]
[Event "47th Oi-sen, Game 4"]
[Date "August 22nd and 23rd 2006"]
1.P7g-7f     00:00:00  00:00:00
2.P3c-3d     00:00:00  00:02:00
3.P2g-2f     00:01:00  00:02:00
4.P5c-5d     00:01:00  00:03:00
5.P2f-2e     00:12:00  00:03:00
6.R8b-5b     00:12:00  00:03:00

It is unclear if Habu and Sato have been consciously thinking
about the shogi fans following their games, but they have been
playing a different opening in every game of this match so far.
This time Sato has picked the Gokigen Nakabisha.

7.G6i-7h     00:14:00  00:03:00
8.P5d-5e     00:14:00  00:41:00
9.P2e-2d     00:32:00  00:41:00
10.P2cx2d    00:32:00  00:41:00
11.R2hx2d    00:32:00  00:41:00
12.P5e-5f    00:32:00  00:47:00
13.P5gx5f    00:33:00  00:47:00
14.R5bx5f    00:33:00  00:47:00
15.K5i-6i    00:34:00  00:47:00
16.G4a-3b    00:34:00  00:47:00
17.S3i-4h    00:44:00  00:47:00
18.K5a-6b    00:44:00  00:51:00
19.P6g-6f    00:53:00  00:51:00
20.S3a-4b    00:53:00  01:01:00
21.S7i-6h    02:22:00  01:01:00
22.R5f-5a    02:22:00  01:07:00
23.P4g-4f    02:22:00  01:07:00
24.K6b-7b    02:22:00  01:17:00
25.S4h-4g    02:23:00  01:17:00
26.K7b-8b    02:23:00  02:16:00
27.K6i-7i    02:27:00  02:16:00
28.S7a-7b    02:27:00  02:16:00
29.B8h-7g    02:28:00  02:16:00
30.B2b-3c    02:28:00  02:23:00
31.R2d-2h    02:39:00  02:23:00
32.B3c-4d    02:39:00  02:24:00
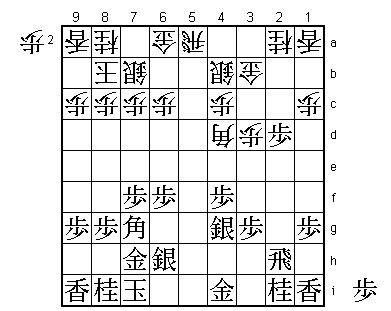
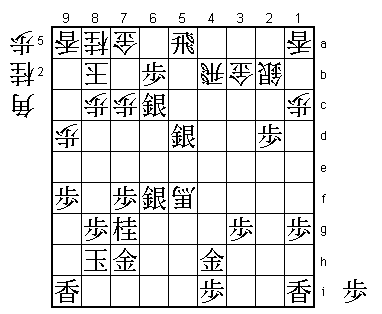
33.P*2d!?    03:35:00  02:24:00

With the end of the first day not far off, it was expected that
both players would finish the building of their formations and
start the fight on the second day. However, Habu decides to take
the opportunity for an ealier start of the hostilities and after
56 minutes played 33.P*2d. Whether this move is good or bad is
hard to judge, but it is always a good idea to try and put your
opponent off-balance at this level.

34.P*2f      03:35:00  03:07:00

The weak of heart would consider 34.P*2b here, but there is not
a professional that would play such a move unless it was forced.

35.P6f-6e    03:38:00  03:07:00
36.B4dx7g+   03:38:00  03:11:00
37.N8ix7g    03:38:00  03:11:00
38.B*2g      03:38:00  03:12:00
39.G4i-4h    03:40:00  03:12:00
40.B2g-5d+   03:40:00  03:15:00
41.R2hx2f    03:43:00  03:15:00

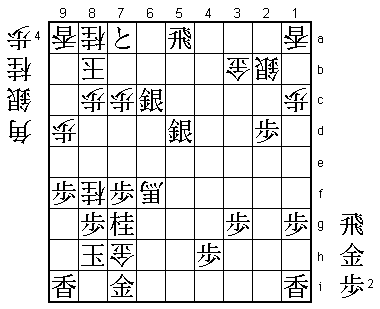
Habu has gotten what he played for. The rook is active, he has
won a pawn and black still has the bishop in hand. On the other
hand, white has made a promoted bishop. However, it is hard to
see what white can do with this bishop. The general opinion in
the press room was that Habu had the advantage here.

42.+B5d-4d   03:43:00  03:18:00
43.R2f-2h    04:18:00  03:18:00

The sealed move. An interesting thing happened at the start of
the second day. When it was time to open the envelope with the
sealed move, the chief arbiter Tsukada was nowhere to be seen.
In the end, the vice-arbiter Sanada had to open the envelope and
start the second day, something he had never done before. He admitted
he was quite nervous about making a mistake. It turned out that
Tsukada had overslept and when he later appeared in the press room
he looked very embarrassed.

44.P*2f      04:18:00  03:20:00
45.S4g-3f?!  04:35:00  03:20:00
46.S4b-3c    04:35:00  04:55:00
47.P4f-4e    05:02:00  04:55:00
48.+B4d-6b   05:02:00  05:00:00
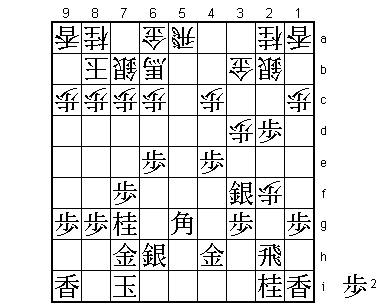
49.B*5g?!    06:00:00  05:00:00
50.S3c-2b!   06:00:00  05:30:00

The game has turned a little weird. Moves like 45.S3f and 49.B*5g
look strange and when someone who is learning the game plays moves
like this you try to correct this by pointing out that it is not
good to move pieces away from the king and that a bishop has a lot
of potential as a piece in hand and should not be dropped to hastily.
The truth is that Habu is stuck for moves a little and seems to be
trying to confuse Sato a little with moves that look bad, but are
maybe not necessarily so. Sato responds in kind with 50.S2b, which
is also strange because this silver was on the good square 4b just
a little while ago and now has taken two steps away from the king.
The point of this silver maneuver is that the silver defends 2c if
the rook later takes the pawn on 2f. Also, the square 3c is now free
to bring the knight on 2a into play.

51.K7i-8h    06:02:00  05:30:00
52.N2a-3c    06:02:00  05:30:00
53.P9g-9f    06:04:00  05:30:00
54.P9c-9d    06:04:00  05:34:00
55.S6h-6g    06:11:00  05:34:00
56.P4c-4d    06:11:00  05:59:00
57.R2hx2f    06:12:00  05:59:00
58.P4dx4e    06:12:00  05:59:00
59.R2f-2h    06:12:00  05:59:00
60.P4e-4f!   06:12:00  06:05:00

Fine play by Sato. He has take three consecutive moves to move the
pawn from 4c to 4f where it is now a perfect attack base. Black
cannot take this pawn because 61.Bx4f R5i+ P*4i +R5a gives white
the perfect tandem of promoted rook and promoted bishop. The difference
with black's rook and bishop is too big to have hope for survival.

61.P*5f      06:19:00  06:05:00
62.R5a-4a    06:19:00  06:11:00

Now white strongly threatens P3e, so black has to do something quick.

63.P*4d      06:26:00  06:11:00
64.+B6bx4d   06:26:00  06:17:00
65.P*4e      06:27:00  06:17:00
66.+B4d-5c   06:27:00  06:22:00
67.B5gx4f    06:27:00  06:22:00
68.P3d-3e    06:27:00  06:22:00
69.B4fx3e    06:34:00  06:22:00
70.+B5cx3e   06:34:00  06:56:00
71.S3fx3e    06:34:00  06:56:00
72.R4ax4e    06:34:00  06:58:00
73.S3e-3d    07:02:00  06:58:00
74.B*3i      07:02:00  07:03:00
75.S3dx4e    07:04:00  07:03:00
76.B3ix2h+   07:04:00  07:03:00
77.P6e-6d    07:06:00  07:03:00
78.N3cx4e    07:06:00  07:05:00
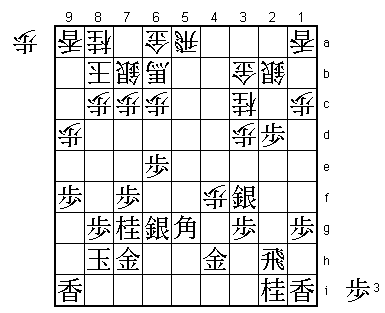
79.B*5d      07:08:00  07:05:00

This threatens the gold on 3b, the knight on 4e and also attacks
6c. White seems to be in trouble here, but Sato is not worried at all.

80.S*5b!     07:08:00  07:07:00

This silver drop makes the white position very strong and gives
white time to bring the promoted bishop on 2h into play.

81.B5dx4e?!  07:15:00  07:07:00

Probably better was 81.Bx3b+ +B3i G5h N5g+ but Habu hated to move
the bishop in the wrong direction, so he decided to take the knight
instead.

82.R*4b!     07:15:00  07:33:00

Another strong defensive drop by Sato. Habu can no longer avoid
losing serious material.

83.P6dx6c+   07:29:00  07:33:00
84.S7bx6c    07:29:00  07:39:00
85.B4ex6c+   07:38:00  07:39:00
86.S5bx6c    07:38:00  07:39:00

White is now a bishop for a knight up. The right way to play such a
position is to make the game last longer, in which case the material
advantage will become important. However, Sato is running out of time
and sees no way to avoid a mutual attack in which material might not
be a factor. White is winning, but has to be careful...

87.P*4c      07:38:00  07:39:00
88.R4bx4c    07:38:00  07:47:00
89.P*4i      07:39:00  07:47:00
90.S6c-7b    07:39:00  07:51:00
91.N*6d      07:43:00  07:51:00
92.P*6f      07:43:00  07:59:00
93.N6dx7b+   07:46:00  07:59:00
94.G6ax7b    07:46:00  07:59:00
95.S6gx6f    07:46:00  07:59:00
96.+B2hx2i   07:46:00  07:59:00
97.S*5d      07:46:00  07:59:00
98.R4c-4b    07:46:00  07:59:00
99.S*6c      07:51:00  07:59:00
100.G7b-7a   07:51:00  07:59:00
101.R*5a     07:52:00  07:59:00
102.+B2ix5f  07:52:00  07:59:00
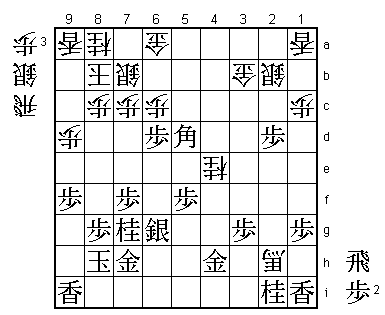
103.P*6b?    07:53:00  07:59:00

Sato is in byoyomi and the lack of time has forced him to let Habu
in. Here Habu misses his opportunity to turn the tables. If he would
have played 103.S5c+ here, he would have made it very difficult for
Sato. The threat is Rx7a+ (Kx7a G*7b leads to mate) and black is now
also indirectly threatening the bishop on 5f. For example, 104.+Bx7h
Kx7h B*4e P*6g G*6a +Sx4b Gx5a +Sx5a Bx6c G*6a and even after analyzing
the position for a long time in the post-mortem no win for Sato could
be found.

104.P*6a!    07:53:00  07:59:00

Great defense. If black takes this pawn, there is definitely no mate.

105.P6bx6a+  07:53:00  07:59:00
106.N*8f     07:53:00  07:59:00

This is a simple mating threat, but there is no defense.

107.G7h-7i   07:57:00  07:59:00
108.+B5fx6f  07:57:00  07:59:00
109.+P6ax7a  07:57:00  07:59:00
110.R4bx4h+  07:57:00  07:59:00
111.P4ix4h   07:57:00  07:59:00
112.G*7h     07:57:00  07:59:00
Resigns      07:58:00  07:59:00

Mate after 113.Gx7h Nx7h+ Kx7h S*6g or 113.K9g N*8e Nx8e S*8h Gx8h +Bx8h
K8f B*6d N*7e +Bx7g K9g G*8f. Quite a long mate and remarkable that Sato
had seen this in byoyomi when playing 104.P*6a. A very good win for Sato
with the white pieces. He is now back in this match completely, winning
two games after losing the first two games. He has black in the next game
and every opportunity to seize the momentum. Habu has to find a way to stop
the rot, but he has shown in the Osho match earlier this year that he is at
his best when the pressure is really on.
