47th Oi Match Game 3
[Black "Sato Yasumitsu, Challenger"]
[White "Habu Yoshiharu, Oi"]
[Event "47th Oi-sen, Game 3"]
[Date "August 3rd and 4th 2006"]
1.P7g-7f 00:01:00 00:00:00
2.P8c-8d 00:01:00 00:01:00
3.S7i-6h 00:02:00 00:01:00
4.P3c-3d 00:02:00 00:02:00
5.P6g-6f 00:02:00 00:02:00
6.S7a-6b 00:02:00 00:05:00
7.P5g-5f 00:02:00 00:05:00
8.P5c-5d 00:02:00 00:08:00
9.S3i-4h 00:02:00 00:08:00
10.S3a-4b 00:02:00 00:27:00
11.G4i-5h 00:02:00 00:27:00
12.G4a-3b 00:02:00 00:29:00
13.G6i-7h 00:02:00 00:29:00
14.K5a-4a 00:02:00 00:41:00
15.K5i-6i 00:02:00 00:41:00
16.P7c-7d 00:02:00 00:42:00
17.G5h-6g 00:02:00 00:42:00
18.G6a-5b 00:02:00 00:45:00
19.S6h-7g 00:03:00 00:45:00
20.S4b-3c 00:03:00 00:51:00
21.B8h-7i 00:03:00 00:51:00
22.B2b-3a 00:03:00 00:52:00
23.P3g-3f 00:03:00 00:52:00
24.P4c-4d 00:03:00 00:53:00
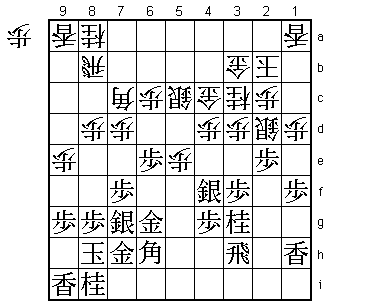
25.S4h-3g 00:09:00 00:53:00
The yagura opening. Habu and Sato have been playing Kakugawari
with tempo loss and Furibisha against each other lately, so
somehow the yagura feels fresh. 25.S3g is the most popular way
of playing for black.
26.B3a-6d 00:09:00 00:58:00
27.B7i-6h 00:09:00 00:58:00
28.G5b-4c 00:09:00 01:05:00
29.K6i-7i 00:09:00 01:05:00
30.K4a-3a 00:09:00 01:11:00
31.K7i-8h 00:09:00 01:11:00
32.K3a-2b 00:09:00 01:12:00
33.S3g-4f 00:11:00 01:12:00
34.S6b-5c 00:11:00 01:31:00
35.N2i-3g 00:15:00 01:31:00
36.P9c-9d 00:15:00 01:39:00
37.P2g-2f 00:19:00 01:39:00
38.S3c-2d 00:19:00 01:40:00
39.P1g-1f 00:20:00 01:40:00
40.P1c-1d 00:20:00 01:42:00
41.L1i-1h 00:25:00 01:42:00
42.B6d-7c 00:25:00 02:46:00
43.R2h-3h 00:30:00 02:46:00
44.P9d-9e 00:30:00 02:49:00
45.P6f-6e 00:41:00 02:49:00
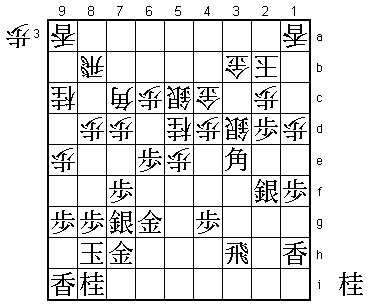
46.N2a-3c 00:41:00 02:57:00
Here 46.P8e is played more often, but two months earlier in the
Kio preliminary game between Shima and Senzaki, 46.N3c was also
played. Senzaki won that game convincingly with white.
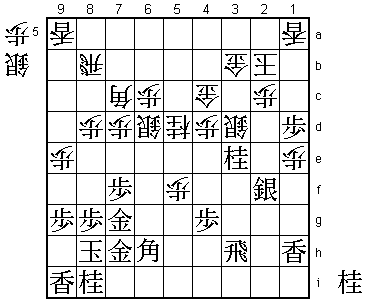
47.P5f-5e 01:34:00 02:57:00
48.P5dx5e 01:34:00 03:03:00
49.P2f-2e! 01:43:00 03:03:00
This is an important improvement of the way Shima played it.
In the Shima-Senzaki game, it followed 49.P1e Px1e P2e Nx2e
Nx2e Sx2e P3e N*5d. This is similar to what follows next, but
because of P1e Px1e, the white silver can retreat into a very
strong silver crown castle by S1d and later S2c. Sato wants to
attack the silver on 2e.
50.N3cx2e 01:43:00 03:06:00
51.N3gx2e 01:43:00 03:06:00
52.S2dx2e 01:43:00 03:07:00
53.P3f-3e 01:44:00 03:07:00
54.N*5d 01:44:00 03:43:00
55.S4f-3g 02:07:00 03:43:00
56.P3dx3e 02:07:00 03:47:00
57.B6hx3e 02:40:00 03:47:00
58.N8a-9c 02:40:00 03:50:00
59.S3g-2f 02:44:00 03:50:00
60.S2e-3d 02:44:00 04:26:00
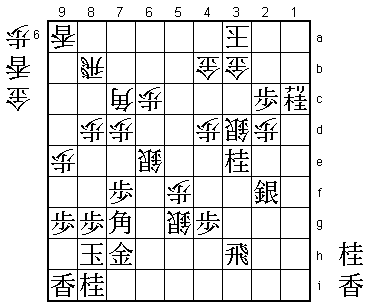
61.P*2d! 03:13:00 04:26:00
The sealed move and even Habu seemed surprised when the envelope
was opened. The simple 61.B6h seemed the only move. After the game
Habu admitted that he completely overlooked this possibility.
It seems like black is just giving away a pawn, but the point is
that after 62.Px2d P6d, white wants to take with the bishop, but
then Bx2d threatens promotion on 5a. Therefore, white has to take
the pawn on 6d with the silver, blocking the bishop's diagonal.
However, there is no way Habu can get out of this variation.

62.P2cx2d    03:13:00  04:28:00
63.P6e-6d    03:15:00  04:28:00
64.S5cx6d    03:15:00  04:33:00
65.B3ex2d    03:17:00  04:33:00
66.P*2c      03:17:00  04:33:00
67.B2d-6h    03:18:00  04:33:00
68.N9c-8e    03:18:00  04:33:00
69.P1f-1e    03:19:00  04:33:00
70.P1dx1e    03:19:00  04:50:00
71.P*1d      03:57:00  04:50:00
72.N8ex7g+   03:57:00  05:12:00
73.G6gx7g    04:10:00  05:12:00
74.P5e-5f    04:10:00  05:12:00
75.N*3e!     05:13:00  05:12:00
Looks bad, blocking the path of both rook and bishop, but Sato has
calculated this correctly. Habu again seemed surprised and took 91
minutes for his reply, not counting the hour lunch break that was
sandwiched between. Again, he has no way to out.

76.G4c-4b    05:13:00  06:43:00
77.L1hx1e    06:08:00  06:43:00
78.P*1b      06:08:00  06:45:00
79.N*2e      06:08:00  06:45:00
80.S*5g      06:08:00  07:09:00

More or less desperate counter attack. 80.P*3c fails to Nx2c+ Sx2c
P1c+ and the white position collapses.

81.B6h-5i!   06:32:00  07:09:00

It is important to play the bishop here, so that S6e can be answered
by B3g.

82.N5d-6f    06:32:00  07:11:00
83.P1d-1c+   07:03:00  07:11:00
84.P1bx1c    07:03:00  07:11:00
85.P*2d      07:03:00  07:11:00
86.N6fx7h+   07:03:00  07:30:00
87.G7gx7h    07:03:00  07:30:00
88.P2cx2d    07:03:00  07:30:00
89.L1ex1c+   07:03:00  07:30:00
90.L1ax1c    07:03:00  07:30:00
91.P*2c      07:03:00  07:30:00
92.K2b-3a    07:03:00  07:30:00
93.N2ex1c+   07:04:00  07:30:00
94.S6d-6e    07:04:00  07:30:00
95.B5i-7g!   07:22:00  07:30:00
Again a good move by Sato. This seems to invite the white attack with
96.L*6f, but with the lance on 6f, black can afford to give white a
knight in hand. If the square 6f is open for a knight drop, this would
be too dangerous. It seems that black will now cruise to victory, but
Sato wasn't really sure about his position here.

96.L*6f      07:22:00  07:31:00
97.P2c-2b+   07:26:00  07:31:00
98.G3bx2b    07:26:00  07:35:00
99.+N1cx2b   07:26:00  07:35:00
100.K3ax2b   07:26:00  07:35:00
101.N*4f     07:26:00  07:35:00
102.S5gx4f=  07:26:00  07:39:00
103.P4gx4f   07:26:00  07:39:00
104.G*3b     07:26:00  07:39:00
105.L*2c     07:45:00  07:39:00
106.K2b-3c   07:45:00  07:44:00

After the game, Sato pointed out that he was worried about 106.K3a.
Habu was very surprised, but looking more closely, had to admit that
things are not so easy. For example, 106.R1h K4a R1a+ P*3a L2b+ P5g+
and Sato said he didn't really know how to continue. However, further
analysis showed that black can play Lx3a+ Gx3a S*2b and the black
attack is faster.

107.R3h-1h   07:47:00  07:44:00
108.P4d-4e   07:47:00  07:44:00
109.B7gx6f   07:49:00  07:44:00
110.S6ex6f   07:49:00  07:51:00
111.G*5d     07:49:00  07:51:00
112.S3d-4c   07:49:00  07:53:00
113.N3ex4c+  07:52:00  07:53:00
114.G4bx4c   07:52:00  07:53:00
115.L*3g     07:53:00  07:53:00
116.P*3d     07:53:00  07:53:00
117.L3gx3d   07:53:00  07:53:00
118.K3cx3d   07:53:00  07:53:00
119.R1h-3h   07:56:00  07:53:00
120.K3dx2c?! 07:56:00  07:54:00

Only after this move, Sato felt sure he would win the game. He was
still worried about the position after 120.P*3f. Then if 121.Rx3f
Kx2c Gx4c Gx4c S*4d like in the game, white can play N*6d! which
is a mating threat, while white is not threatening mate. Again,
further analysis showed that black can still win after G*3c K1b S*2c
K1d R3h! which defends against the white mating threat while threatening
mate. Still, Habu could have put some pressure on Sato had he played
120.P*3f instead of 120.Kx2c.

121.G5dx4c   07:56:00  07:54:00
122.G3bx4c   07:56:00  07:54:00
123.S*4d     07:56:00  07:54:00
Resigns      07:56:00  07:59:00
A very good win by Sato, who seemed to be in control throughout this
game and looking at more and analyzing deeper than his opponent. He is
back in this match and the way he did it will give him great confidence.
He will need that, because he will have the white pieces in the next game.