47th Oi Match Game 2
[Black "Habu Yoshiharu, Oi"]
[White "Sato Yasumitsu, Challenger"]
[Event "47th Oi-sen, Game 2"]
[Date "July 27th and 28th 2006"]
1.P7g-7f 00:00:00 00:00:00
2.P3c-3d 00:00:00 00:01:00
3.P2g-2f 00:01:00 00:01:00
4.P4c-4d 00:01:00 00:01:00
5.P2f-2e 00:04:00 00:01:00
6.B2b-3c 00:04:00 00:01:00
7.S3i-4h 00:04:00 00:01:00
8.R8b-2b 00:04:00 00:01:00
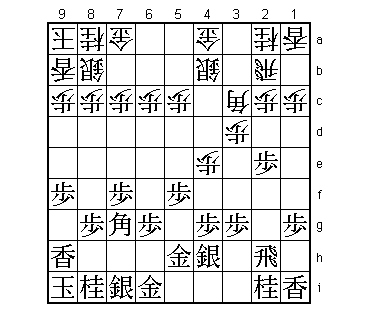
9.K5i-6h 00:23:00 00:01:00
10.K5a-6b 00:23:00 00:01:00
11.K6h-7h 00:26:00 00:01:00
12.K6b-7b 00:26:00 00:01:00
13.G4i-5h 00:44:00 00:01:00
14.S3a-4b 00:44:00 00:03:00
15.P9g-9f 00:55:00 00:03:00
16.K7b-8b 00:55:00 00:15:00
17.P5g-5f 01:00:00 00:15:00
18.L9a-9b 01:00:00 00:38:00
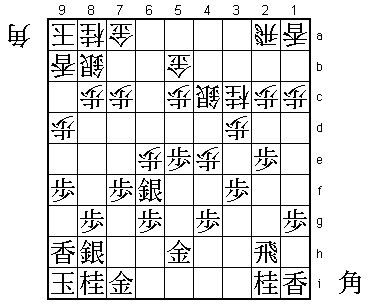
The anaguma is a surprise, because Sato has been playing very
positively, especially against Habu. The anaguma often leads
to a waiting game, hoping for a mistake by the opponent and
then winning in the counter attack with the stronger castle.
However, Sato has thought of a positive way to play the anaguma
with the furibisha side.
19.B8h-7g 01:08:00 00:38:00
20.K8b-9a 01:08:00 00:38:00
21.K7h-8h 01:08:00 00:38:00
22.S7a-8b 01:08:00 00:38:00
23.L9i-9h 01:26:00 00:38:00
24.G6a-7a 01:26:00 00:57:00
25.K8h-9i 01:26:00 00:57:00
26.P4d-4e!? 01:26:00 01:25:00
Offering the exchange of the bishop is against the general rule
that the furibisha side should aim at exchanging rooks, while the
ibisha side should aim at exchanging bishops. Sato has obviously
prepared this at home and concluded that with the anaguma and opposing
rook, there is no problem to exchange bishops. With a bishop in hand,
there are all kinds of options to move forward. No waiting game by
white in this game.
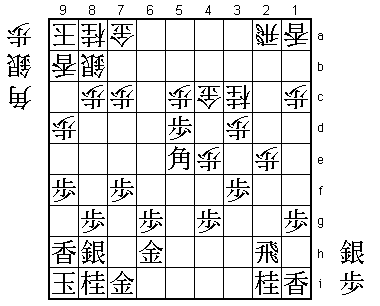
27.B7gx3c+ 01:51:00 01:25:00
Of course, Habu doesn't back off.
28.N2ax3c 01:51:00 01:29:00
29.S7i-8h 01:51:00 01:29:00
30.P9c-9d 01:51:00 01:45:00
31.S4h-5g 01:52:00 01:45:00
32.S4b-4c 01:52:00 02:04:00
33.P3g-3f 02:04:00 02:04:00
34.G4a-5b 02:04:00 02:05:00
35.S5g-6f 02:08:00 02:05:00
36.R2b-2a 02:08:00 02:16:00
37.G6i-7i 02:20:00 02:16:00
38.P6c-6d 02:20:00 02:39:00
39.P5f-5e 03:14:00 02:39:00
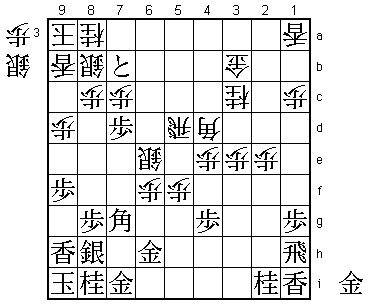
40.P6d-6e!? 03:14:00 03:28:00
This doesn't look like a pawn sacrifice, but like giving a pawn
for free. Everybody in the press room expected Habu to take this
pawn quickly, but that is not what happened. He took 58 minutes
in this position and then sealed the move. Chief arbiter
Katsuura (9-dan) expressed the thoughts of everyone: "I know what
move is in the envelope: there can't be anything else than Sx6e".

41.S6f-5g    04:12:00  03:28:00

Habu made Katsuura eat his words, but things are not so simple.
After 41.Sx6e 42.R6a the professionals in the press room thought
that black had a good position after 43.N7g, but Habu said that
he was very worried about weakening the anaguma like this and was
not confident that his position was good after N7g. Sato seemed to
agree, as both players had mainly thought about retreating with
43.S5f after R6a. Then 44.B*3a R2f B8d+ P2d Px2d Rx2d +B7d G5g
+Bx5f Gx5g R6g+ B*7h +Rx4g threatens (among other things) P*6g
and seems good for white. This is the reason why Habu didn't
take the pawn on 6e.

42.G5b-4b    04:12:00  04:29:00
43.G5h-6h    04:34:00  04:29:00
44.S4c-4d    04:34:00  04:31:00
45.S5g-5f    04:45:00  04:31:00
46.P6e-6f    04:45:00  04:34:00
47.B*7g      04:50:00  04:34:00
48.P2c-2d    04:50:00  05:10:00
49.B7gx6f    05:51:00  05:10:00
50.P2dx2e    05:51:00  05:12:00
51.P5e-5d    05:51:00  05:12:00
52.G4b-4c    05:51:00  05:12:00
53.S5f-5e    05:51:00  05:12:00
54.S4dx5e    05:51:00  05:15:00
55.B6fx5e    05:52:00  05:15:00
56.P5cx5d?   05:52:00  06:07:00

Obvious move against the threat Px5c+ Gx5c Bx3c+, but an important
mistake. As Sato pointed out after the game, 56.B*2d was correct.
This defends the knight on 3c and also attacks the anaguma. For example,
57.B7g Gx5d P3e P4f Px4f R4a Px3d Bx4f R4h P*4g Rx4g Rx4e and the
position is unclear. Bx6h+ is a strong threat which is probably best
resolved by Rx4f Rx4f, but when white gets a rook in hand black can get
into serious trouble, especially if white can prolong the game. The shape
of G5d-P5c is usually bad, but in this case very effective against
bishops attacking the anaguma (squares 4d and 5c are the focal points
if the white pawn is on 5d instead of 5c).

57.B5e-6f    05:57:00  06:07:00
58.B*6d      05:57:00  06:12:00
59.R2h-1h    06:05:00  06:12:00
60.G4c-4b    06:05:00  06:17:00
61.P3f-3e    06:09:00  06:17:00
62.R2a-2d    06:09:00  06:18:00
63.S*4d      06:24:00  06:18:00

Sato underestimated the strength of this move. Black has a clear
advantage now.

64.P*6e      06:24:00  06:45:00
65.B6f-7g    06:28:00  06:45:00
66.S*5e      06:28:00  07:02:00
67.S4dx5e    06:36:00  07:02:00
68.P5dx5e    06:36:00  07:02:00
69.S*5d      06:37:00  07:02:00
70.S*7d      06:37:00  07:15:00
71.P6g-6f    06:42:00  07:15:00
72.P6ex6f    06:42:00  07:26:00
73.P*6e      06:44:00  07:26:00
74.P3dx3e    06:44:00  07:30:00
75.P6ex6d    07:05:00  07:30:00
76.R2dx5d    07:05:00  07:30:00
77.P7f-7e    07:05:00  07:30:00
78.S7d-6e    07:05:00  07:32:00
79.P6d-6c+   07:05:00  07:32:00
80.P5e-5f    07:05:00  07:33:00
81.B*2a      07:16:00  07:33:00
82.S*3b      07:16:00  07:36:00
83.B2ax3b+   07:16:00  07:36:00
84.G4bx3b    07:16:00  07:36:00
85.S*7b      07:16:00  07:36:00
86.G7ax7b    07:16:00  07:51:00
87.+P6cx7b   07:16:00  07:51:00
88.B*4d      07:16:00  07:51:00
89.P7e-7d!   07:25:00  07:51:00
The decisive move. The black bishop that was passively waiting on
7g, now enters into the attack, which becomes unstoppable. Strong
castle and unstoppable attack, the game is over.

90.P7cx7d    07:25:00  07:58:00
91.B7g-8f    07:28:00  07:58:00
92.P7d-7e    07:28:00  07:58:00
93.B8fx7e    07:35:00  07:58:00
94.R5d-7d    07:35:00  07:58:00
95.+P7bx8b   07:35:00  07:58:00
96.K9ax8b    07:35:00  07:58:00
97.G*8e      07:35:00  07:58:00
98.R7d-7a    07:35:00  07:58:00
99.S*5c      07:36:00  07:58:00
100.P5f-5g+  07:36:00  07:59:00
101.G6hx5g   07:39:00  07:59:00
102.P*7h     07:39:00  07:59:00
103.G7ix7h   07:42:00  07:59:00
104.P*5f     07:42:00  07:59:00
105.S5cx4d=  07:42:00  07:59:00
106.P5fx5g+  07:42:00  07:59:00
107.B7e-5c+  07:42:00  07:59:00
108.P6f-6g+  07:42:00  07:59:00
109.+B5cx7a  07:42:00  07:59:00
110.K8bx7a   07:42:00  07:59:00
111.R*5b     07:42:00  07:59:00
Resigns      07:42:00  07:59:00
Sato has been unable to find a place to resign. Black threatens
mate with B*5c and if G*7b then the simple Rx3b+ is winning.
On the other hand, even if white plays +Px7h then after Rx7h
black is still absolutely safe. Sato again showed positive play
in this game, but after the opening he was outplayed by Habu who
takes a 2-0 lead. Sato now must win the next game to keep this
match interesting.