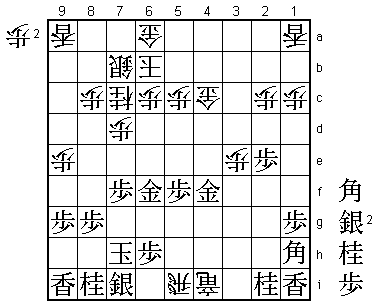
47th Oi Match Game 1
[Black "Sato Yasumitsu, Challenger"]
[White "Habu Yoshiharu, Oi"]
[Event "47th Oi-sen, Game 1"]
[Date "July 12th and 13rd 2006"]
1.P7g-7f     00:00:00  00:00:00
2.P3c-3d     00:00:00  00:02:00
3.P2g-2f     00:02:00  00:02:00
4.P4c-4d     00:02:00  00:09:00
5.P2f-2e     00:05:00  00:09:00
6.B2b-3c     00:05:00  00:10:00
7.S3i-4h     00:05:00  00:10:00
8.P9c-9d     00:05:00  00:13:00
9.G4i-5h     00:11:00  00:13:00
10.R8b-4b    00:11:00  00:32:00
11.K5i-6h    00:11:00  00:32:00
12.S3a-3b    00:11:00  00:40:00
13.K6h-7h    00:11:00  00:40:00
14.S3b-4c    00:11:00  00:41:00
15.P5g-5f    00:17:00  00:41:00
16.S7a-7b    00:17:00  00:43:00
17.S4h-5g    00:34:00  00:43:00
18.P9d-9e    00:34:00  00:45:00
19.P3g-3f    00:49:00  00:45:00
20.K5a-6b    00:49:00  00:59:00
21.P3f-3e    00:55:00  00:59:00
22.R4b-3b    00:55:00  01:14:00
23.P4g-4f    01:00:00  01:14:00
24.P3dx3e    01:00:00  01:24:00
25.P4f-4e    01:02:00  01:24:00
26.G4a-5b    01:02:00  01:26:00
27.P4ex4d    01:03:00  01:26:00
28.S4c-3d    01:03:00  01:28:00
29.R2h-4h    01:06:00  01:28:00
30.R3b-4b    01:06:00  01:30:00
31.S5g-4f    01:08:00  01:30:00
32.P*4g      01:08:00  01:33:00
33.R4hx4g    02:12:00  01:33:00
34.B3cx4d    02:12:00  01:41:00
35.B8hx4d    03:13:00  01:41:00
36.R4bx4d    03:13:00  01:43:00
37.B*2b      03:18:00  01:43:00
38.R4d-7d    03:18:00  02:29:00
39.R4g-4h    03:28:00  02:29:00
40.B*3c      03:28:00  02:46:00
41.B2bx3c+   03:29:00  02:46:00
42.N2ax3c    03:29:00  02:46:00
43.B*6e      03:30:00  02:46:00
44.B*8d      03:30:00  02:46:00
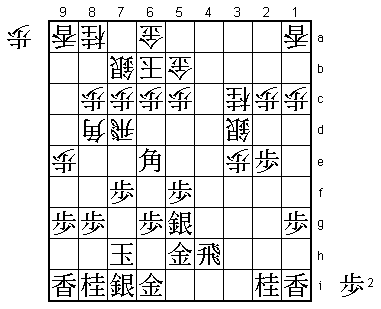
45.S4f-5g!   04:20:00  02:46:00

A long theoretical battle to start this Oi match. This was the
sealed move and it is also the first move that has not been played
in professional practice before. Sato has prepared well, because
it seems that black now gets the advantage. White is attacking, but
his attack seems to be running out of steam.

46.N3c-4e    04:20:00  03:20:00
47.S5g-6f    04:50:00  03:20:00
48.R7d-6d    04:50:00  03:27:00
49.B6e-3b+   04:54:00  03:27:00
50.R6dx6f    04:54:00  03:39:00
51.P6gx6f    04:54:00  03:39:00
52.B8dx6f    04:54:00  03:39:00
53.R4h-4g    04:58:00  03:39:00
54.S*5g      04:58:00  04:23:00
55.R*3a      05:22:00  04:23:00
56.S5gx5h=   05:22:00  05:03:00
57.G6ix5h    05:22:00  05:03:00
58.G*5g      05:22:00  05:03:00
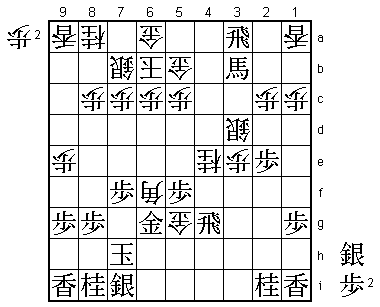
59.G5h-6g!   05:39:00  05:03:00

Great defense. After 60.Gx4g Gx6f white has no good attack with
the rook, while black is threatening a devastating S*8b. Also,
after 60.Gx6g Rx6g Bx9i+ G*8b black has an unstoppable attack.
If black manages to drop something on 8b, white is lost. These
variations made Sato very confident about his position here.
After the game, he admitted that he was so sure that black was
better here that he was very surprised that the position actually
appeared on the board.

60.B6f-9c!   05:39:00  05:14:00

Habu shows that there is still a little life left in his attack.
This defends the weak point 8b and also leaves the attacking pieces
on the board.

61.R4g-2g?   06:14:00  05:14:00

Habu had feared 61.Gx5g Nx5g+ R4a+ G5b-5a G*8b! which is winning
for black after Bx8b +Rx5a etc. Further analysis showed that after
G*8b white still can play Gx4a +Bx4a R*4h P*6h Rx4a+ and even though
the position is very difficult, white might even be winning. Sato
never even considered such a wild approach. After all, he thought
the black position was already very good and playing quiet, solid
moves would be good enough to win. The difference between Habu and
Sato: Habu is always looking for possibilities to get to the enemy
king.

62.G5gx6g    06:14:00  05:15:00
63.R2gx6g    06:16:00  05:15:00
64.N4e-5g+   06:16:00  05:16:00
65.R6g-6e    06:22:00  05:16:00
66.S3d-4c    06:22:00  05:25:00
67.+B3b-2b   06:31:00  05:25:00
68.G*3b      06:31:00  05:33:00
69.+B2bx3b   06:38:00  05:33:00
70.S4cx3b    06:38:00  05:33:00
71.R3ax3b+   06:39:00  05:33:00
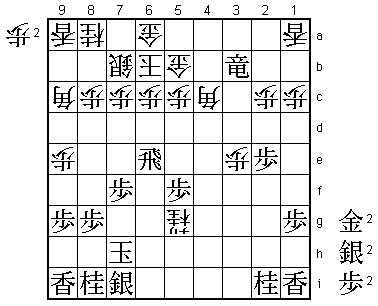
72.B*4c!     06:39:00  05:58:00

If brilliance is the ability to transcend rules, Habu shows time and
time again that he is brilliant. 72.B*4c is obviously the wrong move,
as black can get out of the fork with tempo by capturing this bishop.
The right move is of course 72.B*5d, but there is an important snag:
72.B*5d R3e Bx3b Rx3b+ and the unpromoted rook on 6e has become a
promoted rook on 3b. Habu wants to keep the unpromoted rook on the
board to attack it later. This sounds simple enough, but the problem
is that after 72.B*4c +Rx4c Gx4c it is black to move and with four
generals and a bishop in hand there is bound to be some good move.
Handing over the initiative to your opponent when he has a pile of
pieces in hand is too scary to contemplate even for the strongest
shogi professionals. That Habu plays this anyway is the reason he
is the best, maybe even the best of all time. But hold your applause,
we are not done yet with Habu magic...

73.+R3bx4c   06:46:00  05:58:00
74.G5bx4c    06:46:00  05:58:00
75.P*6h      06:48:00  05:58:00

Despite a hand full of pieces, Sato can't find a good attacking plan.

76.R*3i      06:48:00  06:02:00
77.B*1h?     07:01:00  06:02:00

A mistake, but very hard to see. The best move was probably the unlikely
77.S*2h. Why this unlikely move is good will be explained after the next
move.

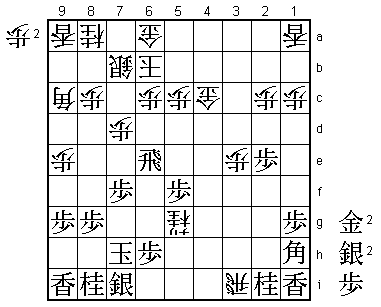
78.P7c-7d!   07:01:00  06:24:00

Here is another one of Habu's magic moves. One of the most difficult
professional concepts to learn for amateur player is the ability to leave
your opponent the initiative when there is nothing he can do with it.
Habu does this twice in one game and twice he takes Sato completely off
guard. By leaving the rook on 6e through 72.B*4c, this rook is now a
target for attack. Black has to act quickly, because otherwise white
brings the knight into the attack with N7c and the attack that seemed
to have run out of steam is suddenly unstoppable. For example, 79.S*2h
R3h+ G*3i +R5h G*6i N7c! Gx5h (if the rook moves sideways, white wins
with +N6g) Nx6e and the attack on the gold on 5h is still in the position.
Now it is also clear why 77.S*2h was better than B*1h. If we now have the
same development (78.R3h+ G*3i +R5h G*6i) there is no N7c as a follow-up.
Therefore, it seems that white has to settle for 78.Rx2i+ G*3i +N6g Rx6g
Bx3i+ Sx3i +Rx3i and black still has everything to play for. When asked
after the game about 77.S*2h, both players responded with disbelief.
Be this as it may, the difference in this game may have been the ability
of Habu to play moves that are not normal, while Sato wasn't able to the
same thing.

79.S*4f?     07:56:00  06:24:00

Sato spent 55 minutes on the losing move, but it only makes things worse.
Still, the damage has already been done.

80.R3i-4i+   07:56:00  06:42:00
81.S4fx5g    08:09:00  06:42:00
82.B9cx5g+   08:09:00  06:42:00
83.G*6g      08:09:00  06:42:00
84.+B5g-4f   08:09:00  06:50:00
85.G*3g      08:09:00  06:50:00
86.N8a-7c    08:09:00  06:52:00
87.R6e-6f    08:09:00  06:52:00
88.S*6e      08:09:00  06:52:00
89.G3gx4f    08:09:00  06:52:00
90.S6ex6f    08:09:00  06:52:00
91.G6gx6f    08:09:00  06:52:00
92.R*5i      08:09:00  06:52:00
Resigns      08:09:00  06:52:00

The only reasonable defense against this double rook attack is 93.S*8h,
but then R6i+ K7g Rx4f+ leaves black without hope, so Sato resigned here.
Losing from a position he thought was very good for him, if not winning,
must have been a serious psychological blow for Sato. Can he recover in
time for the second game in which he has the white pieces?
