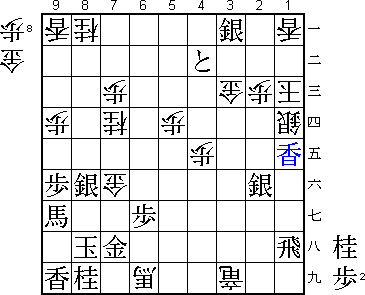
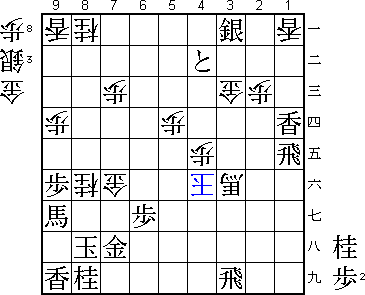
46th Oza Match Game 4
Black: Tanigawa, Challenger
White: Habu, Oza
46th Oza-sen, Game 4, October 6th 1998
1.P7g-7f           0/0          0/0
2.P8c-8d           0/0          1/1
3.P2g-2f           2/2          0/1
4.G4a-3b           0/2          3/4
5.G6i-7h           0/2          0/4
6.P8d-8e           0/2          3/7
7.B8h-7g           0/2          0/7

With his second chance to win the Oza title, Tanigawa goes to one of his
specialties, the Kakugawari (Bishop Exchange). He is almost invincible in
this opening.

8.P3c-3d           0/2          0/7
9.S7i-8h           1/3          0/7
10.S3a-4b          0/3          1/8
11.B7gx2b+         1/4          0/8
12.G3bx2b          0/4          0/8
13.S8h-7g          0/4          0/8
14.S7a-6b          0/4          3/11
15.S3i-3h          1/5          0/11
16.P6c-6d          0/5          1/12
17.P4g-4f          3/8          0/12
18.S6b-6c          0/8          2/14
19.S3h-4g          1/9          0/14
20.G2b-3b          0/9          1/15
21.P1g-1f          6/15         0/15
22.P1c-1d          0/15         3/18
23.K5i-6h          4/19         0/18
24.S6c-5d          0/19         10/28
25.G4i-5h          4/23         0/28
26.K5a-4a          0/23         10/38
27.P3g-3f          3/26         0/38
28.K4a-3a          0/26         1/39
29.N2i-3g          3/29         0/39
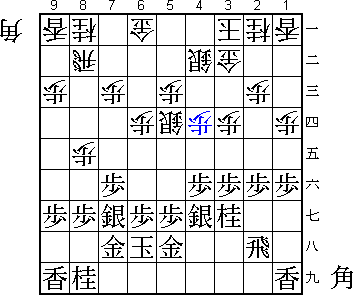
30.P4c-4d?         0/29         15/54

A bad mistake. The scary thing about shogi is that a natural looking move in
the opening can lead to a quick disaster when played at the wrong time. Here
is an example of this. The correct move would have been 30.G5b.

31.L1i-1g          56/85        0/54
32.S4b-3c          0/85         30/84
33.R2h-1h          3/88         0/84
34.S3c-2d          0/88         4/88
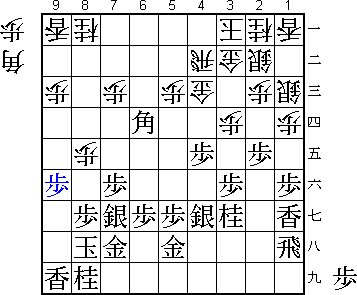
35.P4f-4e          9/97         0/88

Now white problems become very clear. If 36.Px4e then B*4d, so white cannot
take this pawn.

36.S5d-4c          0/97         18/106

Painful.

37.B*5e!           50/147       0/106

Strong. White has to keep on putting his pieces on hopeless squares to stay
alive.

38.R8b-4b          0/147        50/156
39.P2f-2e          48/195       0/156
40.S2d-1c          0/195        23/179
41.B5ex6d          10/205       0/179
42.G6a-5b          0/205        1/180
43.P4ex4d          1/206        0/180
44.S4cx4d          0/206        1/181
45.P*4e            0/206        0/181
46.S4d-3c          0/206        18/199
47.K6h-7i          1/207        0/199

With simple moves, Tanigawa has forced all the white pieces on bad squares
where it is very hard to get away from. Now white has no moves to improve his
position, black calmly castles his king.

48.S3c-2b          0/207        10/209
49.K7i-8h          2/209        0/209
50.G5b-4c          0/209        11/220
51.P9g-9f          2/211        0/220

52.P9c-9d          0/211        26/246
53.R1h-4h          7/218        0/246
54.G4c-5d          0/218        4/250
55.B6d-4f          0/218        0/250
56.B*2f            0/218        10/260
57.R4h-1h          1/219        0/260
58.P*4d            0/219        1/261
59.P4ex4d          2/221        0/261
60.N2a-3c          0/221        0/261
61.P5g-5f          35/256       0/261
62.G5dx4d          0/256        12/273
63.S4g-3h          1/257        0/273
64.G4d-5d          0/257        1/274
65.P*4g            2/259        0/274
66.K3a-2a          0/259        3/277
67.P5f-5e          4/263        0/277
68.G5d-6e          0/263        0/277
69.P5e-5d          1/264        0/277
70.P5cx5d          0/264        5/282
71.P1f-1e          0/264        0/282
72.P1dx1e          0/264        0/282
73.P3f-3e          0/264        0/282
74.P*4e            0/264        3/285
75.B4f-6h          1/265        0/285
76.R4b-4d          0/265        0/285
77.P*5c            1/266        0/285
78.S1c-1d          0/266        3/288

White has to allow black to make a promoted pawn near his king. This ensures
black strong attack later on. White has to hurry to make any kind of fight
of it.

79.P5c-5b+         0/266        0/288
80.P3dx3e          0/266        0/288
81.G5h-4h          14/280       0/288
82.N3cx2e          0/280        1/289

Black still has an overwhelming position, but white somehow has managed to
wriggle some of his pieces free and take some initiative. There are no comments
for the black moves up to this point, but it seems like black might have had
some way to attack earlier.

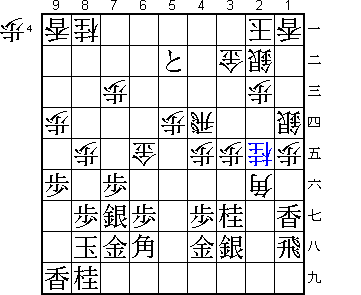
83.N3gx2e?         1/281        0/289

This is a mistake that makes the position more interesting for white. After
Lx1e black could have won quickly, even though the variations are a bit
difficult: a) Sx1e Nx2e Bx4h+ Bx3e or b) N1g+ Lx1d Rx1d S2g +Nx2g Rx1d Lx1d
R*6a both are winning for black. Tanigawa: "There were many possible moves
and I got confused".

84.B2fx4h+         0/281        0/289
85.S3h-2g          0/281        0/289
86.+B4hx4g         0/281        2/291
87.N*3c            7/288        0/291
88.S2bx3c          0/288        0/291
89.N2ex3c+         0/288        0/291
90.G3bx3c          0/288        0/291
91.B6hx3e          2/290        0/291
92.R4d-3d          0/290        0/291
93.B3e-5c+         0/290        0/291
94.N*8f!           0/290        2/293

Sets up a strong counter attack. Objectively black might still be winning, but
the position is now too close for black's comfort.

95.P8gx8f          0/290        0/293
96.P8ex8f          0/290        0/293
97.P*3e            0/290        0/293
98.+B4g-6i         0/290        0/293
99.+B5cx8f         0/290        0/293
100.R3dx3e         0/290        0/293
101.S2g-2f         0/290        0/293
102.N*7d           0/290        0/293

103.+B8f-9g        6/296        0/293
104.R3e-3i+        0/296        1/294
105.P*2b           0/296        0/294
106.K2ax2b         0/296        1/295
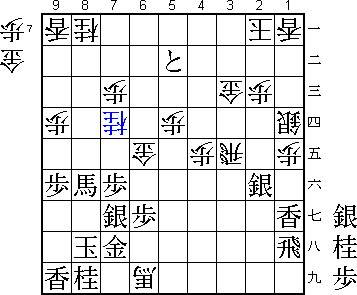
107.+P5b-4b?       2/298        0/295

Under pressure from the clock (only two minutes left), Tanigawa makes a
decisive mistake. Things could still have worked out well after 107.S*3a
K2a Lx1e P*8f Sx8f Gx7f Lx1d is the vital position. Does white have a mate
or not? Very hard to see with only a few minutes on the clock, but after
+Bx7h Rx7h P*8g +Bx8g Gx8g Kx8g +Rx8i G*8h G*9g Kx9g N*8e K8g G*7g Sx7g
Nx7g+ Kx7g B*5i S*6h S*8f K7f +Rx7h K6e +R7e K5d R*6d K5c Bx2f+ K4b
black escapes and wins.

108.P*8f           0/298        0/295
109.S7gx8f         0/298        0/295
110.G6ex7f         0/298        1/296
111.S*3a           0/298        0/296
112.K2b-1c         0/298        0/296
113.L1gx1e         0/298        0/296

114.N7dx8f!        0/298        2/298

As so often, Habu is very cool under pressure. It looks like black is
threatening mate, but Habu has just enough time to calculate that he can
escape.

115.L1ex1d         0/298        0/298
116.K1c-2d         0/298        0/298
117.S*3e           0/298        0/298
118.+R3ix3e        0/298        0/298
119.S2fx3e         0/298        0/298
120.K2dx3e         0/298        0/298
121.R*3i           0/298        0/298
122.+B6i-3f        0/298        0/298
123.R1h-1e         0/298        0/298
124.K3e-4f         0/298        0/298
Resigns            1/299        0/298
Time:              04:59:00     04:58:00

A hard blow for Tanigawa, who was in complete control for most of the game,
but could not finish the job. The momentum has now shifted to Habu, who after
two losses in the first two games seemed to be dead and buried. A deciding
game 5 is needed to name this year's Oza title holder.
