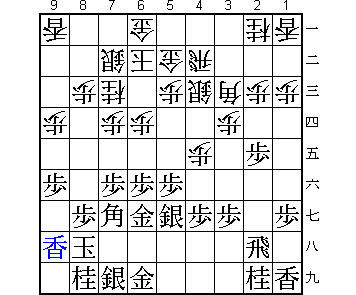
46th Oza Match Game 3
Black: Habu, Oza
White: Tanigawa, Challenger
46th Oza-sen, Game 3, September 30th 1998
1.P7g-7f 0/0 0/0
2.P3c-3d 0/0 3/3
3.P2g-2f 1/1 0/3
4.P4c-4d 0/1 0/3
5.P2f-2e 2/3 0/3
6.B2b-3c 0/3 0/3
7.S3i-4h 1/4 0/3
8.R8b-4b 0/4 3/6
9.K5i-6h 2/6 0/6
10.S7a-7b 0/6 4/10
11.K6h-7h 0/6 0/10
12.P9c-9d 0/6 1/11
13.P5g-5f 20/26 0/11
14.G4a-5b 0/26 22/33
15.G4i-5h 10/36 0/33
16.S3a-3b 0/36 7/40
17.P9g-9f 23/59 0/40
18.K5a-6b 0/59 14/54
19.S4h-5g 1/60 0/54
20.P6c-6d 0/60 8/62
21.B8h-7g 9/69 0/62
22.P7c-7d 0/69 53/115
23.K7h-8h 1/70 0/115
24.N8a-7c 0/70 1/116
25.P6g-6f 0/70 0/116
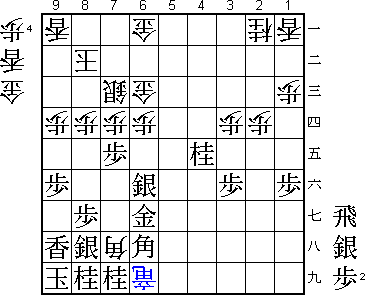
26.P4d-4e 0/70 25/141
27.G5h-6g 19/89 0/141
28.S3b-4c 0/89 27/168
29.L9i-9h 44/133 0/168
Habu needs to win this game or the match is over, while Tanigawa would like
to shut out the match as fast as possible. The importance of this game shows.
Both players play very carefully in the opening, using a lot of time for a
one day game. Habu decides to play the anaguma despite having pushed his
edge pawn to 9f. This is a weakness that may cost black, so it is no wonder
Habu took 44 minutes for the decision.
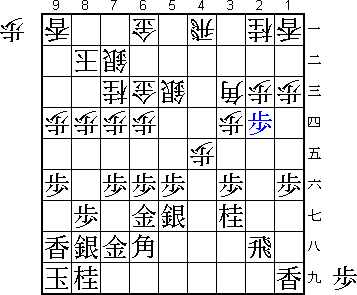
30.S4c-4d 0/133 33/201
One can not call this a bad move, but Tanigawa regretted that he had played it.
He thought long about the variation 30.N8e B6h P6e K7h Px6f Sx6f P*6e Sx6e
B9i+ P8f +Bx9h Px8e L*8g N*8h, but decided that it was too risky. However,
after 30.S4d becomes a slow strategic battle. With less than two hours left on
the clock and Habu having almost three hours, Tanigawa felt that slowing down
the game was the wrong decision.
31.P3g-3f 25/158 0/201
32.P5c-5d 0/158 1/202
33.K8h-9i 39/197 0/202
34.K6b-7a 0/197 6/208
35.S7i-8h 0/197 0/208
36.G5b-6c 0/197 0/208
37.G6i-7h 39/236 0/208
38.K7a-8b 0/236 1/209
39.P1g-1f 1/237 0/209
40.P8c-8d 0/237 5/214
41.B7g-6h 7/244 0/214
42.P5d-5e 0/244 7/221
43.P5fx5e 0/244 0/221
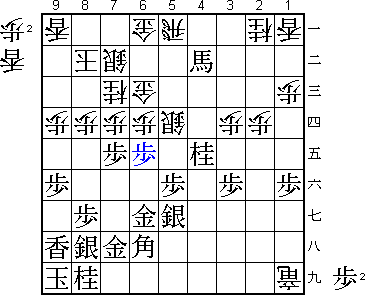
44.S4dx5e 0/244 0/221
45.P*5f 0/244 0/221
46.S5e-4d 0/244 0/221
47.N2i-3g 0/244 0/221
48.R4b-4a 0/244 6/227
49.P4g-4f 3/247 0/227
50.P4ex4f 0/247 2/229
51.S5gx4f 0/247 0/229
52.P*4e 0/247 0/229
53.S4f-5g 0/247 0/229
54.S4d-5c 0/247 1/230
55.P2e-2d 3/250 0/230
56.B3cx2d 0/250 3/233
57.R2hx2d 0/250 0/233
58.P2cx2d 0/250 0/233
59.B*3b 0/250 0/233
60.R4a-3a 0/250 14/247
61.B3b-4c+ 0/250 0/247
62.R*4i 0/250 8/255
63.P7f-7e 1/251 0/255
64.R4ix1i+ 0/251 6/261
65.N3gx4e 6/257 0/261
66.S5c-5d 0/257 2/263
67.+B4c-4b 0/257 0/263
68.R3a-5a 0/257 0/263
It seems that black has gotten the advantage with the rook against bishop
exchange and the following 59.B*3b which promoted the bishop. Also, white
has not been able to develop the knight and lance on 1a and 2a and the dragon
on 1i is on the king's diagonal and always in danger of being captured by
a bishop check. Still, with the gold on 7h black's anaguma is not very strong
and taking the rook on 5a would be too risky. Black has the better position,
but the difference is very small, especially with both players having only
about 40 minutes for the rest of the game.
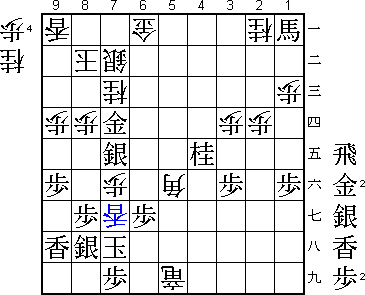
69.P6f-6e? 19/276 0/263
Looks good, but is wrong. After 69.Px7d N8e B8f L*6b P7c+ Sx7c P*7i (diagram)
black's anaguma suddenly has become very strong.
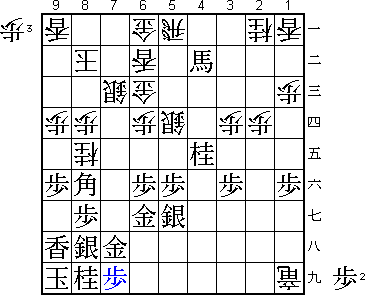
Habu thought he was in trouble here and decided that developing the silver
on 5g was the only way to get back in the game.
70.S5dx6e 0/276 4/267
71.S5g-6f 5/281 0/267
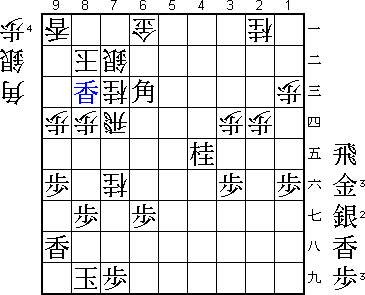
72.L*7f? 0/281 14/281
It is a dangerous time for a player who, after being under pressure for
a while, suddenly gets back the initiative. Mistakes often happen at this
psychological turning point. Here Tanigawa could have played 72.Sx5f +Bx5a
Sx6g+ +Bx7c Sx7c Gx6g B*7h N*7i +R6i (diagram), which is very good for white.
It is unusual for Tanigawa to show his disappointment, but here it was clear
that he would have liked to play this position again.

73.G6gx7f          0/281        0/281
74.S6ex7f          0/281        0/281
75.P7ex7d          0/281        0/281
76.G6cx7d          0/281        0/281
77.P*7e            1/282        0/281
78.G*6g            0/282        1/282
79.L*7i            1/283        0/282
80.G6gx7h          0/283        4/286
81.L7ix7h          0/283        0/286
82.P*7g            0/283        0/286
83.S6fx7g          4/287        0/286
84.S7fx7g+         0/287        1/287
85.B6hx7g          0/287        0/287
86.G7dx7e          0/287        3/290
87.+B4bx6d         0/287        0/290
88.P*7f            0/287        0/290
89.B7gx1a+         1/288        0/290
90.+R1ix8i         0/288        0/290
91.K9ix8i          0/288        0/290
92.G*7d            0/288        0/290
93.+B6dx7e!        1/289        0/290

Pressed for time, both players show their brilliant endgame skills. Tanigawa
does everything to turn the tables, but Habu is in his perfect endgame mode.
This horse sacrifice is the only move to win.

94.G7dx7e          0/289        0/290
95.S*6d            0/289        0/290
96.R5ax5f          0/289        1/291
97.S6dx7e          0/289        0/291
98.R5f-5i+         0/289        0/291
99.P*7i            6/295        0/291
100.S*6g           0/295        0/291
101.G*7d           0/295        0/291
102.S6gx7h+        0/295        0/291
103.K8ix7h         0/295        0/291
104.B*5f           0/295        0/291
105.P*6g           0/295        0/291
106.L*7g           0/295        1/292
107.S8hx7g!        0/295        0/292

This looks very dangerous, but after 107.K8i Bx7d Sx7d N*9g! Lx9g G*7h K9h
Gx8h black is mated.

108.+R5i-5h        0/295        0/292
109.K7h-8i         0/295        0/292
110.B5fx7d         0/295        0/292
111.R*8h!          0/295        0/292

The game-winner. After the natural 111.S8h? N*7g Sx7g Px7g+ +Bx7g N8e black
loses.

112.P7fx7g+        0/295        0/292
113.R8hx5h         0/295        0/292
114.S*6h           0/295        0/292
115.+B1ax7g        0/295        0/292
116.S6hx7g+        0/295        0/292
117.S7ex7d         0/295        0/292
118.G*8h           0/295        0/292
119.R5hx8h         0/295        0/292
120.+S7gx8h        0/295        0/292
121.K8ix8h         0/295        0/292
122.R*7e           0/295        0/292
123.B*6c           1/296        0/292
124.N*7f           0/296        1/293
125.K8h-8i         0/296        0/293
126.R7ex7d         0/296        2/295
127.L*8c           1/297        0/295
Resigns            0/297        0/295
Time:              04:57:00     04:55:00

Mate after 128.Kx8c Bx7d+ Kx7d S*7e Kx7e S*6f K7d L*7e K8c G*7d K9b G*8c etc.
A long variation, but very straightforward.
In this game Habu showed that he can still play a perfect endgame under
pressure, something that we have not seen that much from him lately. He will
need more of that to keep his Oza title, because he is still 2-1 down.