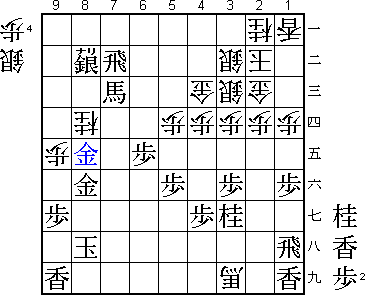
46th Oza Match Game 2
Black: Tanigawa, Challenger
White: Habu, Oza
46th Oza-sen, Game 2, September 21st 1998
1.P7g-7f           0/0          0/0
2.P8c-8d           0/0          0/0
3.G6i-7h           4/4          0/0
4.G4a-3b           0/4          3/3
5.S7i-6h           3/7          0/3
6.P3c-3d           0/7          1/4
7.P6g-6f           0/7          0/4
8.S7a-6b           0/7          1/5
9.P5g-5f           0/7          0/5
10.P5c-5d          0/7          1/6
11.S3i-4h          1/8          0/6
12.K5a-4a          0/8          1/7
13.K5i-6i          0/8          0/7
14.S3a-4b          0/8          0/7
15.G4i-5h          1/9          0/7
16.G6a-5b          0/9          1/8
17.S6h-7g          3/12         0/8
18.S4b-3c          0/12         1/9
19.B8h-7i          0/12         0/9
20.B2b-3a          0/12         0/9
21.P3g-3f          2/14         0/9
22.P4c-4d          0/14         1/10
23.G5h-6g          3/17         0/10
24.G5b-4c          0/17         4/14
25.B7i-6h          26/43        0/14
26.P7c-7d          0/43         8/22
27.K6i-7i          7/50         0/22
28.P9c-9d          0/50         4/26
29.K7i-8h          30/80        0/26
30.P9d-9e          0/80         5/31
31.P2g-2f          7/87         0/31
32.S6b-7c          0/87         5/36
33.P2f-2e          25/112       0/36
34.P7d-7e          0/112        19/55
35.P7fx7e          21/133       0/55
36.B3ax7e          0/133        0/55
37.P6f-6e          0/133        0/55
38.K4a-3a          0/133        17/72
39.S4h-5g          1/134        0/72
40.K3a-2b          0/134        0/72
41.S5g-6f          0/134        0/72
42.B7e-4b          0/134        0/72
43.B6h-4f          1/135        0/72
44.R8b-9b          0/135        0/72
45.N2i-3g          13/148       0/72
46.P6c-6d          0/148        68/140
47.P6ex6d          12/160       0/140
48.S7cx6d          0/160        1/141
49.P*6e            0/160        0/141
50.S6d-7c          0/160        0/141
51.P1g-1f          1/161        0/141
52.P1c-1d          0/161        17/158
53.P*7e            21/182       0/158
54.P*7d            0/182        12/170

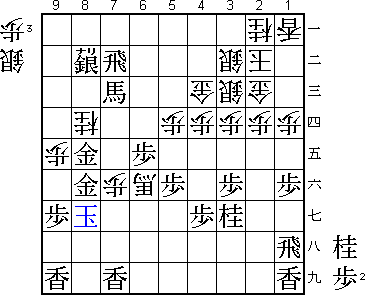
After some early struggles, this is where the game really begins. It looks like
white has the initiative here. Tanigawa has chosen an uncharacteristic
defensive position.

55.P7ex7d          4/186        0/170
56.S7cx7d          0/186        0/170
57.P*7e!?          0/186        0/170

A brave pawn sacrifice. Tanigawa plays to contain white's pieces. Again, this
is more like Oyama than Tanigawa.

58.S7dx7e          0/186        0/170
59.S6fx7e          0/186        0/170
60.B4bx7e          0/186        0/170
61.S7g-6f          0/186        0/170
62.B7e-4b          0/186        0/170
63.S*8c!?          1/187        0/170

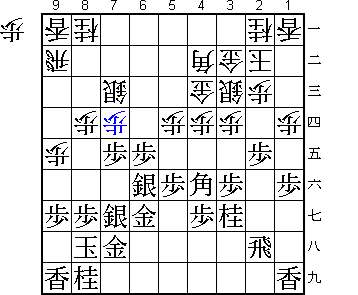
Tanigawa must have felt that there was nothing else after 54.P*7d. This silver
is going to pick up a lance, but it will stuck in the corner of the board. The
problem with this position is that white has three pawns in hand and so has
a very strong looking edge attack. Tanigawa has decided that stopping this
easy attacking plan is the top priority here.

64.R9b-9c          0/187        0/170
65.S8c-8b=         0/187        0/170

No choice. The natural 65.S7d+ (to play B8b+ next) gives black major problems
after 66.P3e!. This counter is very important in this game.

66.R9c-8c          0/187        1/171
67.S8bx9a=         0/187        0/171
68.P8d-8e          0/187        3/174
69.G6g-7g          2/189        0/174
70.P8e-8f?         0/189        10/184

A natural move that Habu regretted very much. The idea is 71.Px8f S*7e Sx7e
Bx7e S*6f Bx6f Gx6g Rx8f, but black can counter strongly in this variation.
Instead of 70.P8f, again 70.P3e would have been best. It takes some courage
to play this move that weakens white's king position. After 70.Bx3e black
can no longer play S8b+ and the silver will be stuck on 9a forever. And
after 70.P2d Sx2d L*2g Px3f white has good chances to contain black's attack.
It is interesting that in this game Tanigawa could play a dangerous looking
move that contained Habu's attack and played it (S*8c). On the other hand,
Habu passes up the chance to play a dangerous looking containment move.
Did courage win this game for Tanigawa?

71.P8gx8f          1/190        0/184
72.S*7e            0/190        0/184

73.S6fx7e          21/211       0/184
74.B4bx7e          0/211        0/184
75.P2e-2d!         0/211        0/184

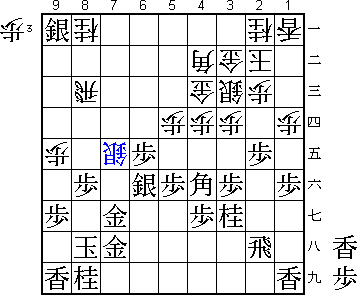
Black ignores the white promotion threat and goes for the attack. Well timed,
but the situation is not as clear as Habu feared.

76.P2cx2d?         0/211        34/218

Only this is the decisive mistake. The best fighting chance was 76.Sx2d. Habu
did not want to play this move because after 76.Sx2d S8b+ R8d S*8e B3i+
black could take with the rook on 2d. However, after Rx2d Px2d Sx8d P*7f
Gx7f P*8g Kx8g R*4i white has the double threat of Rx8i+ and Rx4g+ (forking
king and bishop). Because of this, black can not take the silver on 2d and has
to play R1h after B3i+. Now there is a big difference between the white king
position here and the white king position in the game. It seemed Habu only
looked at 76.Sx2d S8b+ R8d S*8e Rx8e Px8e B3i+ Rx2d Px2d P*2c which is bad
for white.

77.P*2c            1/212        0/218
78.G3bx2c          0/212        10/228
79.S9a-8b+         1/213        0/228
80.R8c-8d          0/213        0/228
81.S*8e            1/214        0/228
82.B7e-3i+         0/214        0/228
83.R2h-1h          19/233       0/228
84.R8dx8e          0/233        5/233
85.P8fx8e          0/233        0/233
86.N8a-9c          0/233        0/233
87.R*7b            3/236        0/233

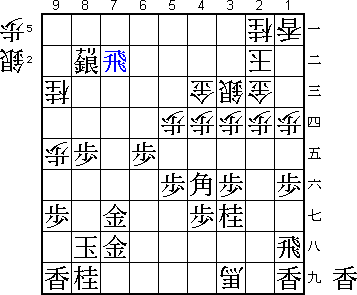
The king looks very naked against this rook drop that both attacks and
defends. All because of 76.Px2d.

88.S*3b            0/236        9/242

This is not a solid defense, but white has no choice. If 88.S*4b then B6d
is too strong.

89.B4f-7c+         24/260       0/242
90.N9cx8e          0/260        5/247
91.G7g-8f          3/263        0/247
92.P*7g            0/263        6/253
93.N8ix7g          8/271        0/253
94.N8ex7g+         0/271        8/261
95.G7hx7g          0/271        0/261
96.P*7f            0/271        1/262
97.G7gx7f          0/271        0/262
98.N*8d            0/271        0/262
99.G7f-8e!         8/279        0/262

Cool move. After 100.+B6f K9h S*7g black looks in trouble, but then +Bx8d!
kills white's attack (if +Bx8d then Rx7g+).

100.P*7f           0/279        11/273
101.L*7i           2/281        0/273
102.+B3i-6f        0/281        17/290
103.K8h-8g         0/281        0/290
Resigns            0/281        0/290
Time:              04:41:00     04:50:00

After 104.+Bx9i Gx8d, 104.P7g+ Lx7g or 104.S*8h Rx8h white can not continue his
attack.
