46th Oi Match Game 7
[Black "Sato Yasumitsu, Challenger"]
[White "Habu Yoshiharu, Oi"]
[Event "46th Oi-sen, Game 7"]
[Date "September 21st and 22nd 2005"]
1.P7g-7f 00:00:00 00:00:00
2.P3c-3d 00:00:00 00:03:00
3.P2g-2f 00:00:00 00:03:00
4.G4a-3b 00:00:00 00:04:00
5.G6i-7h 00:02:00 00:04:00
6.P8c-8d 00:02:00 00:07:00
7.P2f-2e 00:02:00 00:07:00
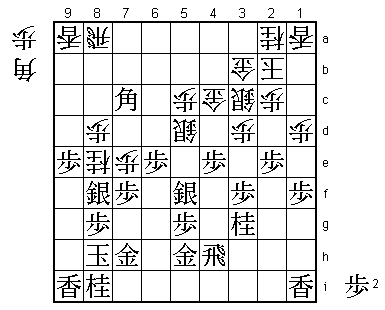
8.B2bx8h+ 00:02:00 00:08:00
The furigoma gave Sato the black pieces. This was the fifth time the
pawns were tossed in the summer matches between Habu and Sato (Kisei, Oi
and Oza). In all cases the tokins came up in majority, giving the black
pieces to the challenger. Habu selects the Kakugawari with tempo loss,
not the first time they play this opening. The game now follows the first
game of the Kisei match for a long time, with the important difference that
Habu was black in that game.
9.S7ix8h 00:02:00 00:08:00
10.S3a-2b 00:02:00 00:09:00
11.S3i-3h 00:14:00 00:09:00
12.S2b-3c 00:14:00 00:13:00
13.P1g-1f 00:33:00 00:13:00
14.P1c-1d 00:33:00 00:21:00
15.P4g-4f 00:41:00 00:21:00
16.S7a-7b 00:41:00 00:32:00
17.S3h-4g 00:41:00 00:32:00
18.P6c-6d 00:41:00 00:33:00
19.K5i-6h 00:41:00 00:33:00
20.S7b-6c 00:41:00 00:36:00
21.G4i-5h 00:43:00 00:36:00
22.K5a-4b 00:43:00 00:41:00
23.S4g-5f 00:45:00 00:41:00
24.G6a-5b 00:45:00 00:46:00
25.P6g-6f 00:49:00 00:46:00
26.P7c-7d 00:49:00 00:52:00
27.S8h-7g 00:50:00 00:52:00
28.S6c-5d 00:50:00 00:52:00
29.K6h-7i 00:52:00 00:52:00
30.K4b-3a 00:52:00 00:59:00
31.P3g-3f 00:52:00 00:59:00
32.P9c-9d 00:52:00 01:04:00
33.P9g-9f 00:52:00 01:04:00
34.P4c-4d 00:52:00 01:39:00
35.N2i-3g 00:52:00 01:39:00
36.G5b-4c 00:52:00 01:48:00
37.K7i-8h 01:30:00 01:48:00
38.N8a-7c 01:30:00 02:09:00
39.R2h-4h 02:01:00 02:09:00
40.K3a-2b 02:01:00 03:05:00
41.P4f-4e 02:09:00 03:05:00
42.N7c-8e 02:09:00 03:09:00
43.S7g-8f 02:15:00 03:09:00
44.P6d-6e 02:15:00 03:13:00
45.B*7c 02:46:00 03:13:00
46.R8b-8a 02:46:00 03:28:00
47.P4ex4d 03:07:00 03:28:00
48.S3cx4d 03:07:00 03:35:00
49.P*4e 03:15:00 03:35:00
50.S4d-3c 03:15:00 03:40:00
51.P6fx6e 03:16:00 03:40:00
52.P9d-9e 03:16:00 03:58:00
53.P9fx9e 03:34:00 03:58:00
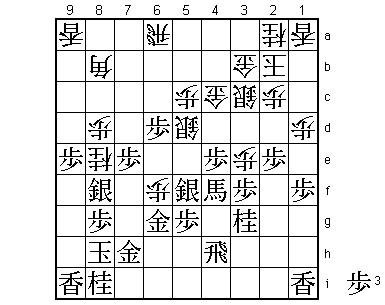
The sealed move and the position is still identical to the Kisei match
game. Following a game for such a long time is not unusual, but in the
recent games between Habu and Sato, new early opening ideas have been
the rule rather than the exception. Therefore, this development is a
little unexpected.
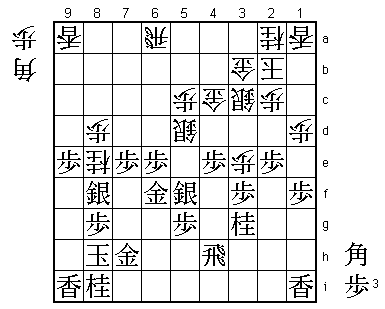
54.P7d-7e 03:34:00 03:59:00
55.P7fx7e?   04:18:00  03:59:00

Sato is the one who plays differently. In the Kisei match Habu played
55.Sx7e and won a difficult and close endgame. After the game, Sato said
that that he always intended to play differently, but he had also to admit
that this was not the position to change the moves. On the surface, Px7e
doesn't look bad. Of course there is the danger of drops on 7f or 6f, but
with the silver still on 8f the black position is stronger against a pawn
drop on 7g and an edge attack. 56.B*6f seems like a strong move, but after
57.S7g the bishop gets in trouble.

56.P3d-3e    04:18:00  04:45:00

Changing the focus of attack to the other side of the board.

57.B7c-4f+   04:24:00  04:45:00

If black manages to make this promoted bishop work, he will get the advantage.

58.B*8b      04:24:00  04:47:00

Looks dangerous, but when the bishops are exchanged white has the threat
of Px3f, so this is possible.

59.P6e-6d    04:36:00  04:47:00

Sato is having nothing of the bishop exchange and he is probably right:
59.+Bx8b Rx8b B*7c R7b B4f+ (black has to defend 3f, so no time to take
the lance) B*6f looks good for white. Taking on 3f is still possible and
the rook on 7b is also ready to attack. Still, 59.P6d gives white another
opportunity to activate his pieces.

60.R8a-6a    04:36:00  04:47:00

Now the pawn on 6d is difficult to defend.

61.G5h-6g    05:16:00  04:47:00
62.P*6f!     05:16:00  04:57:00
Unexpected, but strong. In the press room only 62.Bx6d was analyzed. Then
63.+Bx6d Rx6d B*7c and when the rook moves Bx8d+ Px3f leads to a difficult
position.
63.G6gx6f 05:20:00 04:57:00
64.B8bx6d 05:20:00 04:57:00
65.+B4fx6d 05:21:00 04:57:00
66.R6ax6d 05:21:00 04:57:00
The point of 62.P*6f now becomes clear. With the gold hanging on 6f, B*7c
is not possible. The really difficult move still has to come, though...
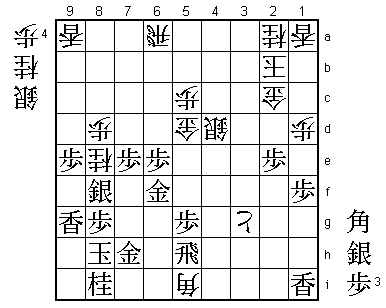
67.P*6e 05:21:00 04:57:00
68.R6d-6a! 05:21:00 04:57:00
Innocent (maybe even weak) looking move, but brilliant. Black has three pawns
and a bishop in hand, which seems to give him all kind of attacking possibilities
like P2d, P4d and/or B*5b. Not a position in which to give the initiative to the
opponent and even Sato thought that there must be something for black here. There
isn't and Habu was the only one to make the correct judgment here. Because of the
threat Px3f and the hanging gold on 6f, black can do nothing with the initiative
in this position.

69.P2e-2d    05:28:00  04:57:00
70.P2cx2d    05:28:00  05:25:00
71.P*2c      05:35:00  05:25:00
72.G3bx2c    05:35:00  05:27:00
73.P*2e      06:16:00  05:27:00
74.B*5i!     06:16:00  05:54:00

Painful drop. Games between Habu and Sato are often decided at the very end, but
here Habu already felt that he was winning.

75.R4h-3h    06:17:00  05:54:00

With the rook tied to defensive duties, the black attack loses all its power.

76.P*9h      06:17:00  06:03:00
77.L9ix9h    06:19:00  06:03:00
78.P3ex3f    06:19:00  06:04:00
79.P2ex2d    06:26:00  06:04:00
80.G2cx2d    06:26:00  06:11:00
81.P*2e      06:32:00  06:11:00
82.G2d-2c    06:32:00  06:15:00
83.P4e-4d    06:33:00  06:15:00
84.S3cx4d    06:33:00  06:15:00
85.S5f-4e    06:33:00  06:15:00
86.P*9g      06:33:00  06:29:00
87.L9hx9g    06:33:00  06:29:00
88.P3fx3g+   06:33:00  06:49:00
89.S4ex5d    06:33:00  06:49:00
90.G4cx5d    06:33:00  06:49:00
91.R3h-5h    06:33:00  06:49:00
It seems like winning this position is still difficult, but Habu again shows why
he is stronger than anybody else.

92.P*7g!     06:33:00  06:52:00

Looks like overdoing it, but Habu knows what he is doing.

93.N8ix7g    06:34:00  06:52:00
94.B5ix7g+   06:34:00  06:54:00
95.G7hx7g    06:34:00  06:54:00
96.N8ex7g+   06:34:00  06:55:00
97.S8fx7g    06:34:00  06:55:00
98.N*8e      06:34:00  06:57:00

Black has sacrificed the bishop, but the tokin on 3g makes sure that the black
king has no escape route.

99.B*4c      06:36:00  06:57:00
100.N8ex7g+  06:36:00  07:02:00
101.K8hx7g   06:36:00  07:02:00
102.N*8e     06:36:00  07:02:00
103.K7g-7f   06:36:00  07:02:00
104.S*7g     06:36:00  07:03:00
105.S*6g     06:37:00  07:03:00
106.G5d-5e   06:37:00  07:10:00
107.P7e-7d   06:48:00  07:10:00
108.S7gx6f+  06:48:00  07:12:00
109.S6gx6f   06:48:00  07:12:00
110.G5ex6f   06:48:00  07:12:00
111.K7fx6f   06:48:00  07:12:00
112.S*7g     06:48:00  07:12:00
113.K6f-7e   06:48:00  07:12:00
114.S*6f     06:48:00  07:12:00
115.K7ex8d   06:48:00  07:12:00
116.G*9c     06:48:00  07:12:00
Resigns      06:48:00  07:12:00
Again Sato plays on until the mate is almost too simple: 117.K7c G*6b K8b (K6d G6c)
G9b or 117.Kx8e P*8d K9f G*8e. A bit of a disappointing finish to an exciting match,
as this game was all Habu from the moment the moves were different from the first
game of the Kisei match. Habu shows a lot of nerve and fighting spirit to come back
from 2-0 and 3-2 down in this match with his 11th Oi title as reward.