46th Oi Match Game 6
[Black "Habu Yoshiharu, Oi"]
[White "Sato Yasumitsu, Challenger"]
[Event "46th Oi-sen, Game 6"]
[Date "September 12th and 13th 2005"]
1.P7g-7f     00:00:00  00:00:00
2.P8c-8d     00:00:00  00:01:00
3.S7i-6h     00:02:00  00:01:00
4.P3c-3d     00:02:00  00:01:00
5.S6h-7g     00:02:00  00:01:00

Habu plays almost every opening these days, but when he is in trouble,
he likes to go back to basics: the Yagura opening. After the Meijin and
the Kisei match, this is the third time that he plays the Yagura in a
game that he must win to keep the match alive. He won both the Meijin
and the Kisei games to take these matches to the final game (which he
lost in both cases).

6.S7a-6b     00:02:00  00:02:00
7.P5g-5f     00:04:00  00:02:00
8.G4a-3b     00:04:00  00:05:00
9.S3i-4h     00:10:00  00:05:00
10.K5a-4a    00:10:00  00:05:00
11.G6i-7h    00:19:00  00:05:00
12.P5c-5d    00:19:00  00:08:00
13.K5i-6i    00:21:00  00:08:00
14.S3a-4b    00:21:00  00:08:00
15.G4i-5h    00:22:00  00:08:00
16.P7c-7d    00:22:00  00:09:00
17.P6g-6f    00:24:00  00:09:00
18.S6b-5c    00:24:00  00:22:00
19.B8h-7i    00:57:00  00:22:00
20.P5d-5e    00:57:00  00:59:00
21.P5fx5e    01:02:00  00:59:00
22.B2bx5e    01:02:00  00:59:00
23.B7i-4f    01:02:00  00:59:00
24.B5ex4f    01:02:00  02:14:00
25.P4gx4f    01:02:00  02:14:00
26.P4c-4d    01:02:00  02:15:00
27.G5h-6g    01:14:00  02:15:00
28.G6a-5b    01:14:00  02:39:00
29.S4h-4g    01:40:00  02:39:00
30.G5b-4c    01:40:00  02:42:00
31.K6i-7i    01:50:00  02:42:00
32.K4a-3a    01:50:00  02:43:00
33.S4g-5f    03:39:00  02:43:00

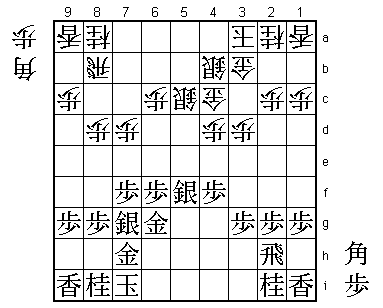
Opening theory says that the exchange of the bishops is good for black. The
pawns on the 2nd and 3rd row are still on their original squares and with
bishops in hand this is an advantage, because the rook on 2h can move freely
without allowing a bishop drop. In contrast, the white rook is tied to the 8b
spot, because moving it would allow B*8c. Therefore, 33.S5f is especially
effective, as white can not counter the pressure in the center with the rook.
Sato didn't explain his choice of opening after the game, so it is unclear
whether he made a mistake, or if he just wasn't convinced the white position
was bad. True enough, the difference seems to be small, but the initiative is
with black throughout this game.

34.K3a-2b    03:39:00  04:08:00
35.K7i-8h    03:49:00  04:08:00

35.P4e is also an attacking option, but too dangerous with the king still on 7i.

36.S4b-3c    03:49:00  04:13:00
37.P2g-2f    04:08:00  04:13:00
38.S5c-6d    04:08:00  04:29:00
39.P6f-6e    04:21:00  04:29:00
40.S6d-5c    04:21:00  04:30:00
41.P3g-3f    04:21:00  04:30:00
42.N8a-7c    04:21:00  06:02:00
43.N2i-3g    05:29:00  06:02:00
44.S5c-5d    05:29:00  06:10:00
45.S7g-6f    05:29:00  06:10:00
46.B*5i      05:29:00  06:18:00
47.N3g-2e    05:31:00  06:18:00
48.B5i-3g+   05:31:00  06:35:00
49.R2h-1h    05:33:00  06:35:00
50.+B3gx4f   05:33:00  06:39:00
51.P*5e      05:47:00  06:39:00
52.S5d-4e    05:47:00  06:39:00
53.S5fx4e    05:47:00  06:39:00
54.+B4fx4e   05:47:00  06:39:00
55.N2ex3c+   05:57:00  06:39:00
56.N2ax3c    05:57:00  06:51:00
57.B*5a      06:12:00  06:51:00
58.S*6b      06:12:00  06:54:00
59.S*8c      06:12:00  06:54:00
60.S6bx5a    06:12:00  06:55:00
61.S8cx8b=   06:12:00  06:55:00
62.N7c-8e    06:12:00  07:00:00
63.S*5d      06:27:00  07:00:00
64.G4cx5d    06:27:00  07:22:00
65.P5ex5d    06:27:00  07:22:00
66.B*4i      06:27:00  07:22:00
67.R*4a      06:38:00  07:22:00
68.P1c-1d    06:38:00  07:22:00
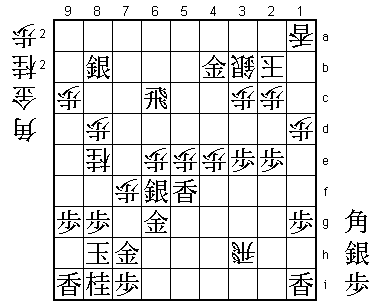
69.G*6h!     06:39:00  07:22:00

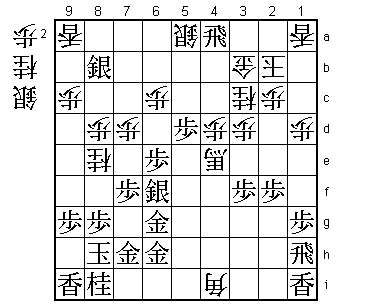
Now the difference in king position is very clear. The first comment by Sato
after the game was: "The king was weak...". With this gold drop the black
king position is an iron wall and the double threat Rx5a+ and P5c+ can only
be defended by one move.

70.S5a-5b    06:39:00  07:27:00
71.R4ax9a+   06:41:00  07:27:00
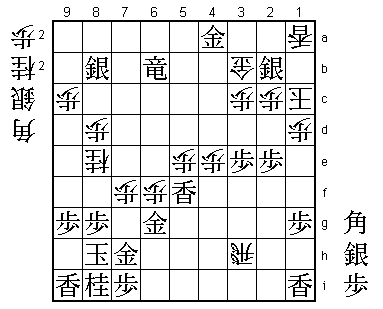
72.P6c-6d?   06:41:00  07:47:00

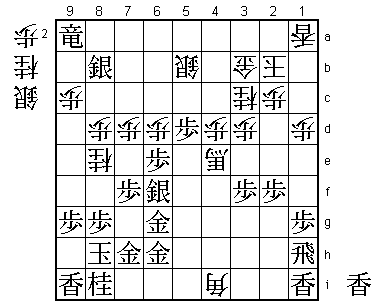
The move any professional would play, but wrong. Correct was 72.N*5e. Then
73.Sx5e +Bx5e K9h and both Sato and Habu stopped analyzing here. Giving a
check that just chases the king further away from the danger area is bad
style. Furthermore, going for the formation S6f-G6g with P6d is the most
natural way of playing. Finally, 72.P6d is connected with 70.S5b and therefore
fits in the flow of play. However, there is a hidden opportunity for white
after K9h: Bx6g+ G6hx6g S*6i G7i P*5h! which threatens mate after G*8h next.
When Habu saw this position, he could not hide his surprise: "Ah, that threatens
mate...". Instead of P*5h, the more often seen S*5h would be easily countered
with G6g-6h. Even if black defends against the mating threat, white has the
strong S*7g as well, so there seems to be no defense. Black has to find something
after Bx6g+, but the post-mortem analysis did not come up with something better
than sennichite.

73.P5d-5c+   07:19:00  07:47:00
74.S5bx5c    07:19:00  07:47:00
75.L*5f      07:19:00  07:47:00
76.P*5e      07:19:00  07:54:00
77.S6fx5e    07:23:00  07:54:00
78.P7d-7e    07:23:00  07:57:00
79.R1h-4h    07:32:00  07:57:00
80.B4ix6g+   07:32:00  07:57:00
81.G6hx6g    07:32:00  07:57:00
82.P7ex7f    07:32:00  07:57:00
83.B*4a      07:38:00  07:57:00
84.G*3a      07:38:00  07:58:00

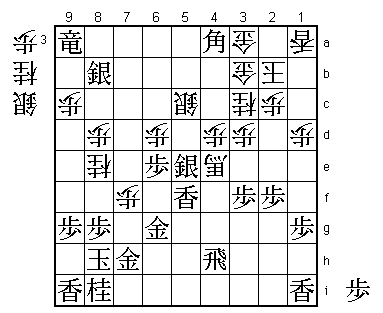
Sato regretted this move. Better is 84.N*7e first and only after G6f the defensive
drop G*3a. Then black has nothing better than Bx7d+ and there is still a long fight
ahead.

85.S5e-6f!   07:40:00  07:58:00

Attack on the silver on 5c and defense of the vital square 7g. Black is winning.

86.P*5e      07:40:00  07:59:00
87.B4ax3b+   07:53:00  07:59:00
88.G3ax3b    07:53:00  07:59:00
89.G*2a      07:53:00  07:59:00
90.K2b-1c    07:53:00  07:59:00
91.R4hx4e    07:53:00  07:59:00
92.P4dx4e    07:53:00  07:59:00
93.+R9a-4a   07:53:00  07:59:00
94.R*4b      07:53:00  07:59:00
95.B*3a      07:54:00  07:59:00
96.K1c-2d    07:54:00  07:59:00
97.+R4ax3b   07:54:00  07:59:00
98.R4bx3b    07:54:00  07:59:00
99.B3ax5c+   07:54:00  07:59:00
100.R*3h     07:54:00  07:59:00
101.S*4c     07:56:00  07:59:00
102.B*4f     07:56:00  07:59:00
103.S4cx3d+  07:57:00  07:59:00
104.K2d-1c   07:57:00  07:59:00
105.+B5c-3e  07:57:00  07:59:00
106.B4fx3e   07:57:00  07:59:00
107.P3fx3e   07:57:00  07:59:00
108.S*1b     07:57:00  07:59:00
109.+S3dx3c  07:59:00  07:59:00
110.B*6i     07:59:00  07:59:00
111.P*7i     07:59:00  07:59:00
112.S1bx2a   07:59:00  07:59:00
113.+S3cx3b  07:59:00  07:59:00
114.S2ax3b   07:59:00  07:59:00
115.N*2e     07:59:00  07:59:00
116.B6ix2e+  07:59:00  07:59:00
117.P2fx2e   07:59:00  07:59:00
118.P6dx6e   07:59:00  07:59:00
119.R*6c     07:59:00  07:59:00
120.P*3c     07:59:00  07:59:00
121.B*3a     07:59:00  07:59:00
122.S*2b     07:59:00  07:59:00
123.B3ax2b+  07:59:00  07:59:00
124.K1cx2b   07:59:00  07:59:00
125.G*4b     07:59:00  07:59:00

Black has had a on position for a long time now, but Sato refuses to give up.
Rather than resign gracefully which is the way top professionals usually finish
their games, he seems to have decided to play on until he is mated. Trying to win
until the final move is more important than thinking about appearances. 125.G*4b
should have been the final blow, though. There is no reasonable way to defend anymore.
However, Sato still refuses to let it go.

126.G*2a     07:59:00  07:59:00
127.B*5d     07:59:00  07:59:00
128.B*4a     07:59:00  07:59:00
129.G4bx4a   07:59:00  07:59:00
130.P6ex6f   07:59:00  07:59:00
131.R6c-6b+  07:59:00  07:59:00
132.K2b-1c   07:59:00  07:59:00
133.B5dx3b+  07:59:00  07:59:00
134.G2ax3b   07:59:00  07:59:00
135.S*2b     07:59:00  07:59:00
Resigns      07:59:00  07:59:00

10 moves after 125.G*4b, Sato finally resigns. The mate is very simple: 136.K1b S*1c,
136.Kx2b B*3a K2a S*2b or 136.Gx2b +Rx2b Kx2b B*3a etc. For the third match in a row,
Habu wins a Yagura game to take the match to the final game. The last two times he
didn't fare well. It is hard to imagine that someone like Habu will lose three matches
in a row in the final game. On the other hand, it was hard to imagine that Habu would
lose two matches in a row in the final game...
