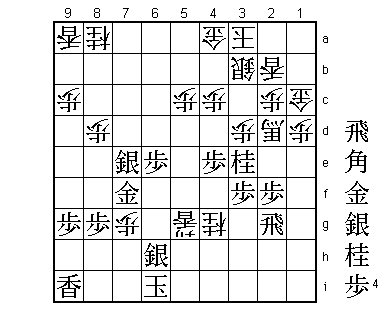
46th Oi Match Game 5
[Black "Sato Yasumitsu, Challenger"]
[White "Habu Yoshiharu, Oi"]
[Event "46th Oi-sen, Game 5"]
[Date "September 5th and 6th 2005"]
1.P7g-7f     00:00:00  00:00:00
2.P8c-8d     00:00:00  00:03:00
3.S7i-6h     00:00:00  00:03:00
4.P3c-3d     00:00:00  00:04:00
5.S6h-7g     00:00:00  00:04:00
6.S7a-6b     00:00:00  00:06:00
7.P5g-5f     00:00:00  00:06:00
8.P5c-5d     00:00:00  00:14:00
9.S3i-4h     00:00:00  00:14:00
10.G6a-5b    00:00:00  00:27:00
11.B8h-7i    00:11:00  00:27:00
12.S3a-3b    00:11:00  00:29:00
13.P3g-3f    00:14:00  00:29:00
14.K5a-4b    00:14:00  00:57:00
15.P2g-2f    00:43:00  00:57:00
16.S6b-5c    00:43:00  01:20:00
17.P2f-2e    00:43:00  01:20:00
18.K4b-3a    00:43:00  01:21:00
19.G6i-7h    01:00:00  01:21:00
20.P6c-6d    01:00:00  01:41:00
21.P2e-2d    02:14:00  01:41:00
22.P2cx2d    02:14:00  01:41:00
23.B7ix2d    02:14:00  01:41:00
24.P*2c      02:14:00  01:41:00
25.B2d-6h    02:14:00  01:41:00
26.S5c-4d    02:14:00  02:45:00
27.N2i-3g    02:52:00  02:45:00
28.P5d-5e    02:52:00  03:05:00
29.P5fx5e    02:54:00  03:05:00
30.G5b-4b    02:54:00  03:07:00
31.K5i-6i    03:06:00  03:07:00
32.R8b-5b    03:06:00  04:17:00
33.P1g-1f    03:36:00  04:17:00
34.P6d-6e    03:36:00  04:34:00
35.G4i-5h    04:16:00  04:34:00
36.S4dx5e    04:16:00  05:01:00

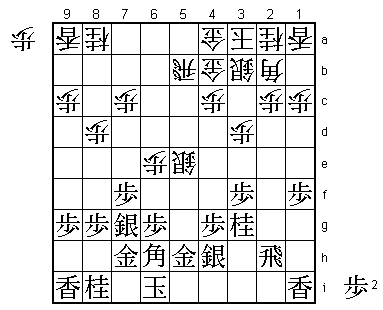
This game started as a Yagura opening, but Habu has tried a new build-up
and at first glance, white seems to be doing pretty good. 36.Sx5e threatens
P*5f followed by P6f and black will be overwhelmed in the center.

37.P*5f!     04:17:00  05:01:00

This move in itself is too simple for praise, but as part of a hard to find
plan that completely surprised Habu it is definitely worth an exclamation mark.

38.S5e-4d    04:17:00  05:02:00

Of course 38.Sx5f fails to P*5g, so this is the only move.

39.P4g-4f!   05:07:00  05:02:00

Part two of Sato's plan: a pawn sacrifice.

40.R5bx5f    05:07:00  05:12:00
41.P4f-4e    05:10:00  05:12:00
42.S4d-5c    05:10:00  05:21:00
43.P1f-1e!   05:10:00  05:21:00

This is what Sato had in mind all the time. The white king is well protected
on the left side, but the edge is weak. Too weak, as Habu admitted after the
game.

44.P7c-7d    05:10:00  05:26:00
45.P1e-1d    05:27:00  05:26:00
46.P1cx1d    05:27:00  05:30:00
47.P*1c      05:27:00  05:30:00
48.B2bx1c    05:27:00  05:47:00
49.B6hx1c+   05:29:00  05:47:00
50.L1ax1c    05:29:00  05:47:00
51.N3g-2e    05:49:00  05:47:00
52.P7d-7e    05:49:00  05:54:00

The edge attack is very strong and black has the advantage. However, Habu
doesn't give up so easily and is trying to build up a counter attack.

53.S4h-4g    06:06:00  05:54:00
54.B*3g      06:06:00  06:07:00
55.R2h-2i    06:32:00  06:07:00
56.P*5g      06:32:00  06:19:00
57.G5h-6h?   06:46:00  06:19:00

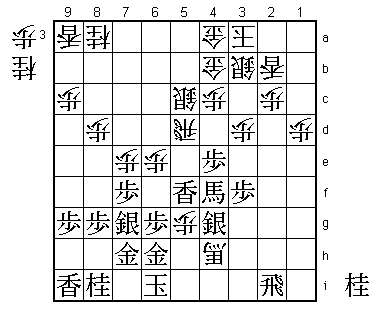
White's attack seems pretty strong, but Sato could have made it easier upon
himself here with 57.Sx5f Px5h+ Kx5h P*5g Kx5g G*4f K6h Gx5f K7i Px7f Sx7f
B5e+ P*1e and black has a big advantage. 57.G5h-6h is based on an oversight
in a very deep analysis by Sato that actually appears on the board.

58.R5f-5d    06:46:00  06:32:00
59.N2ex1c+   06:47:00  06:32:00
60.N2ax1c    06:47:00  06:32:00
61.L1ix1d    06:47:00  06:32:00
62.P*1b      06:47:00  06:33:00
63.L1dx1c+   06:47:00  06:33:00
64.P1bx1c    06:47:00  06:33:00
65.P*1d      06:47:00  06:33:00
66.P1cx1d    06:47:00  06:45:00
67.L*5f      06:48:00  06:45:00
68.B3g-4h+   06:48:00  06:49:00
69.B*1c      06:49:00  06:49:00
70.L*2b      06:49:00  07:13:00
71.B1c-4f+   06:51:00  07:13:00

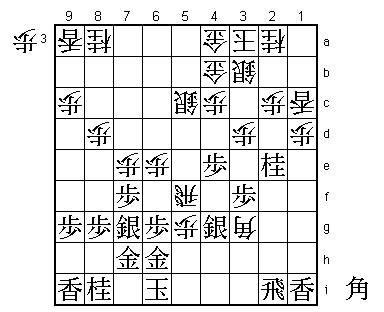
In his analysis at the 57th move, Sato thought that he had a huge, maybe
winning advantage here. He had not analyzed deep enough. It is unclear when
he saw Habu's next move, but it must have been an unpleasant surprise.

72.N*5e!     06:51:00  07:14:00

The promoted bishop on 4f must defend the silver on 4g or there is a fork on
king and rook. This was Sato's blind spot. He is a bit lucky that this
oversight doesn't change much. Black is still ahead.

73.L5fx5e    07:04:00  07:14:00
74.R5dx5e    07:04:00  07:14:00
75.R2i-2h    07:07:00  07:14:00
76.+B4hx4g   07:07:00  07:18:00
77.+B4fx4g   07:07:00  07:18:00
78.L*5d      07:07:00  07:18:00
79.K6i-7i!   07:15:00  07:18:00

This early king escape slows down the white attack considerably.

80.P7ex7f    07:15:00  07:18:00
81.S7gx7f    07:15:00  07:18:00
82.P5g-5h+   07:15:00  07:18:00
83.G6hx5h    07:17:00  07:18:00
84.P*7g      07:17:00  07:19:00
85.N8ix7g    07:17:00  07:19:00
86.R5ex5h+   07:17:00  07:20:00
87.+B4gx5h   07:19:00  07:20:00
88.L5dx5h+   07:19:00  07:20:00
89.R2hx5h    07:19:00  07:20:00
90.B*4f      07:19:00  07:20:00
91.B*6h      07:21:00  07:20:00
92.B4fx6h+   07:21:00  07:32:00
93.G7hx6h    07:22:00  07:32:00
94.P*5g      07:22:00  07:32:00
95.R5hx5g    07:25:00  07:32:00
96.P*7e      07:25:00  07:36:00
97.N*1c      07:26:00  07:36:00
98.G*1a      07:26:00  07:37:00

Takeichi (6-dan) commented that even though this defends against R*1a, only
few professionals would play this move. Freely dropping the gold here is
almost certain to kill the white attack. Takeichi said he would definitely
have played something like G4b-5b here to open an escape route for the king.
It is a token of Habu's burning desire to win that he plays the move that
causes his opponent the most headaches rather than the most natural move.

99.N7gx6e    07:29:00  07:37:00
100.P*5b     07:29:00  07:37:00
101.N6ex5c+  07:33:00  07:37:00
102.P5bx5c   07:33:00  07:37:00
103.P*1b     07:37:00  07:37:00
104.G1ax1b   07:37:00  07:37:00
105.N*2e     07:37:00  07:37:00
106.S*7g!    07:37:00  07:39:00

A little piece of Habu magic. 106.Gx7f Px7f and the white attack suddenly
gains speed again.

107.L*3c!    07:40:00  07:39:00

Well judged. Because of the mating threat (R*2a), white can't ignore this.

108.G4bx3c   07:40:00  07:40:00
109.N2ex3c+  07:41:00  07:40:00
110.B*8h     07:41:00  07:40:00
111.K7i-8i   07:41:00  07:40:00
112.S7g-7h+  07:41:00  07:41:00
113.K8ix7h   07:45:00  07:41:00
114.B8hx3c+  07:45:00  07:41:00
115.S7fx7e?  07:50:00  07:41:00

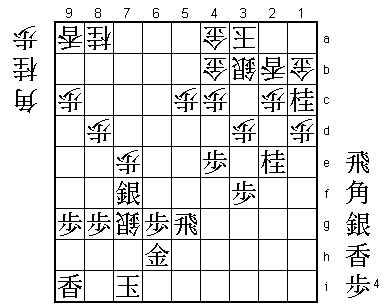
A mistake. Correct was 115.B*6f +Bx6f Px6f and the sideways working of the
rook makes it impossible to get to the black king. Again, Sato is lucky that
this mistake has no direct influence on the outcome of the game. He just
needs to be a little more careful.

116.P*7g     07:50:00  07:47:00
117.K7h-6i   07:50:00  07:47:00
118.L*5e     07:50:00  07:47:00
119.R5g-2g   07:51:00  07:47:00
120.N*6e     07:51:00  07:47:00
121.P6g-6f!  07:53:00  07:47:00

Coolly played. Now black is able to hold off the white attack.

122.N*7f     07:53:00  07:51:00
123.P6fx6e   07:53:00  07:51:00
124.+B3c-1e  07:53:00  07:51:00
125.P*2f     07:58:00  07:51:00
126.+B1e-2d  07:58:00  07:51:00
127.G6h-6g   07:58:00  07:51:00
128.G1bx1c   07:58:00  07:51:00
129.G6gx7f   07:58:00  07:51:00
130.L5e-5g+  07:58:00  07:53:00
131.N*3e     07:58:00  07:53:00
132.N*4g     07:58:00  07:53:00
133.S*6h     07:59:00  07:53:00
Resigns      07:59:00  07:53:00

This ends the white attack, for example 133.+Lx6h Kx6h and there is no
continuation. White has also no proper defense, so Habu resigned here.
Sato seemed to be in trouble after losing two games in a row, but this
game he showed he has not completely lost the form that brought him to
three title matches with Habu. He needs only one more win from two games
to take the Oi title from Habu.
