46th Oi Match Game 3
[Black "Sato Yasumitsu, Challenger"]
[White "Habu Yoshiharu, Oi"]
[Event "46th Oi-sen, Game 3"]
[Date "August 2nd and 3rd 2005"]
1.P2g-2f     00:00:00  00:00:00
2.P8c-8d     00:00:00  00:02:00
3.P2f-2e     00:00:00  00:02:00
4.P8d-8e     00:00:00  00:02:00
5.G6i-7h     00:00:00  00:02:00
6.G4a-3b     00:00:00  00:04:00
7.P2e-2d     00:02:00  00:04:00
8.P2cx2d     00:02:00  00:19:00
9.R2hx2d     00:02:00  00:19:00
10.P*2c      00:02:00  00:19:00
11.R2d-2h    00:02:00  00:19:00
12.P3c-3d    00:02:00  00:25:00
13.S3i-3h    00:03:00  00:25:00
14.P8e-8f    00:03:00  00:28:00
15.P8gx8f    00:03:00  00:28:00
16.R8bx8f    00:03:00  00:28:00
17.P*8g      00:03:00  00:28:00
18.R8f-8d    00:03:00  00:28:00
19.P7g-7f    00:12:00  00:28:00
20.P9c-9d    00:12:00  00:51:00
21.P9g-9f    00:14:00  00:51:00
22.S7a-6b    00:14:00  01:01:00
23.P4g-4f    00:14:00  01:01:00
24.P6c-6d    00:14:00  01:02:00
25.S3h-4g    00:15:00  01:02:00
26.S6b-6c    00:15:00  01:03:00
27.S4g-5f    00:16:00  01:03:00
28.S6c-5d    00:16:00  01:06:00

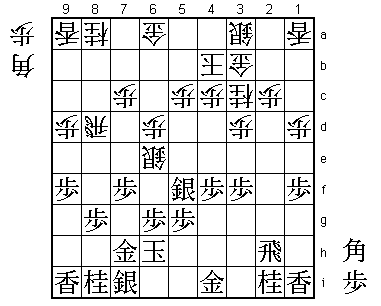
The double reclining silver Aigakari opening is very old, but the
way the rooks are placed is very modern. Black has retreated the
rook to 2h, which is a very flexible position, limiting white's
options, because there is no rook to attack with a bishop now.

29.P1g-1f    00:16:00  01:06:00
30.P1c-1d    00:16:00  01:14:00
31.B8h-7g    00:21:00  01:14:00
32.B2b-3c    00:21:00  01:24:00
33.B7gx3c+   01:21:00  01:24:00
34.N2ax3c    01:21:00  01:24:00
35.K5i-6h    01:21:00  01:24:00
36.K5a-4b    01:21:00  02:32:00
37.P3g-3f    02:35:00  02:32:00
38.S5d-6e    02:35:00  03:24:00

It is unclear if this move is good or bad, but the reasons for it
are easy to understand. Black's main ideas in this position are to
pester the rook with B*6f combined with an attack on the head of the
white knight with P3e. 38.S6e deals with both of these threats if
white plays 39.Sx6e Px6e because then the rook is defending 3d.

39.S5f-4g    02:59:00  03:24:00

Sato retreats the silver, keeping the threat of P3e alive.

40.S6ex7f    02:59:00  04:43:00

Forced, as white has to free the pawn on 6d quickly to play P6e and
defend the pawn on 3d. The theme of this game now will be whether this
silver on 7f can play an active role in the white attack or not.

41.S7i-8h    03:15:00  04:43:00

The alternative is 41.P3e. Sato didn't like 42.Px3e B*6f R8b Px3d Sx8g=
but this is far from easy. Actually, Habu wasn't at all convinced that
this is good for white and intended to play 42.B*4d S8h Bx3e instead.
Sato is famous for his deep analysis of positions, but seemed to have
discarded an interesting looking move too early here.

42.P6d-6e    03:15:00  04:55:00
43.G4i-5h    03:25:00  04:55:00
44.S3a-2b    03:25:00  05:03:00
45.P8g-8f    04:53:00  05:03:00
46.B*7e      04:53:00  05:10:00
47.P8f-8e    04:59:00  05:10:00
48.S7fx8e    04:59:00  06:06:00
49.P3f-3e    05:04:00  06:06:00
50.P3dx3e    05:04:00  06:09:00
51.B*6c      05:05:00  06:09:00
52.P9d-9e    05:05:00  06:33:00
53.P9fx9e    05:57:00  06:33:00
54.P*9h      05:57:00  06:34:00
55.L9ix9h    05:57:00  06:34:00
56.P*9g      05:57:00  06:34:00
57.N8ix9g    05:58:00  06:34:00
58.S8e-7d    05:58:00  06:34:00
59.P*8e      05:59:00  06:34:00
60.R8d-8b    05:59:00  06:34:00
61.B6c-1h+   05:59:00  06:34:00
62.P*9f      05:59:00  06:35:00
63.P*7f      06:01:00  06:35:00
64.B7e-6d    06:01:00  06:42:00
65.P*3d      06:01:00  06:42:00
66.P9fx9g+   06:01:00  06:49:00
67.S8hx9g    06:03:00  06:49:00
68.N8a-9c    06:03:00  06:54:00

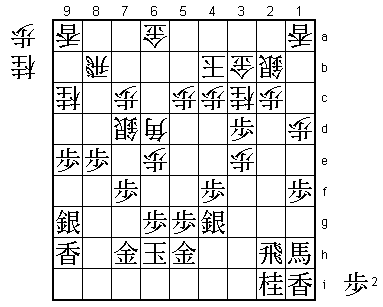
Sato was quite happy with his position until he saw this move. Here he
realized that the bishop on 6d is more valuable than the promoted bishop
on 1h. Nx8e is a big threat and it is not easy to defend against it.
For example, bringing the promoted bishop into play with 69.N*8f (if the
silver on 7d moves, black has +B6c), white has the strong counter 70.N*5d
which blocks the bishop, threatens the strong attack P6f and also gives
white the option of Nx8e next.

69.P3dx3c+   06:34:00  06:54:00
70.G3bx3c    06:34:00  07:02:00
71.N*5f      06:44:00  07:02:00
72.B6d-5e    06:44:00  07:02:00
73.+B1h-4e   06:44:00  07:02:00
74.B5e-9i+   06:44:00  07:02:00

Now black is in trouble, but Sato doesn't give up that easily.

75.P*3d      06:44:00  07:02:00
76.G3c-3b    06:44:00  07:02:00
77.S9g-8h    06:49:00  07:02:00
78.+B9ix9h   06:49:00  07:02:00
79.+B4e-5e   06:49:00  07:02:00
80.R8bx8e    06:49:00  07:09:00
81.P*8g      06:49:00  07:09:00
82.G6a-6b    06:49:00  07:11:00
83.N2i-3g    06:58:00  07:11:00
84.P*9f      06:58:00  07:23:00
85.N3g-4e    06:58:00  07:23:00
86.N*4a      06:58:00  07:23:00
87.P9e-9d    07:02:00  07:23:00
88.P9f-9g+   07:02:00  07:28:00
89.P9dx9c+   07:03:00  07:28:00
90.+P9gx8h   07:03:00  07:31:00
91.G7hx8h    07:04:00  07:31:00
92.+B9hx8g   07:04:00  07:32:00
93.G8hx8g    07:09:00  07:32:00
94.R8ex8g+   07:09:00  07:32:00
95.P*8h      07:09:00  07:32:00
96.G*7h      07:09:00  07:33:00
97.K6h-5i    07:09:00  07:33:00
98.+R8g-9h   07:09:00  07:33:00
99.K5i-4h    07:26:00  07:33:00
100.+R9h-8i  07:26:00  07:35:00
101.R2h-3h   07:30:00  07:35:00
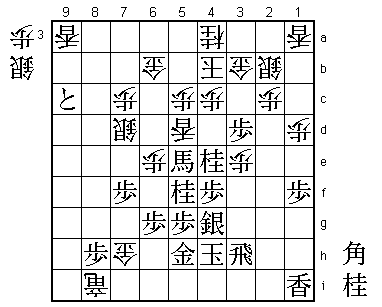
102.L*5d?!   07:30:00  07:38:00

It is unclear where Habu could have played it better, but this lance
drop gives Sato a golden opportunity. It looks like the decisive move,
since moving the promoted bishop is answered by +Rx1i and white wins
easily.

103.P3d-3c+? 07:45:00  07:38:00

Sato took 15 minutes of his remaining 30 minutes, but misses his chance.
Correct was 103.+Bx2b Gx2b P3c+ Nx3c N*3d K5b (K5a S*4b K6a Nx5c+ reveals
the reason why black should keep the knight on 4e). So far the variation
is forced, but after K5b it gets complicated. Black must be careful to
keep the right piece to drop on 3g in case of a bishop check on 2f. Also,
even if pieces need to be dropped to defend against checks, there must
still be a win. Finally, there is no time to let white take the promoted
pawn on 9c. There is a variation that meets all of these requirements:
Nx3c+ Gx3c N*6d (this must be a drop!) K6a N4b+. If then B*2f B*3g N*3f
Sx3f S*4i white has a knight and silver in hand, which is enough to mate
after S*7b. So far, Sato has seen this all. However, he thought that
after N4b+, white could play Lx9c and his attack would end. He overlooked
that after Lx9c, black can play B*5a and there is no defense!

104.S2bx3c   07:45:00  07:41:00
105.N4ex3c+  07:45:00  07:41:00
106.N4ax3c   07:45:00  07:41:00
107.N*3d     07:46:00  07:41:00
108.K4b-5a   07:46:00  07:41:00
109.+B5ex3c  07:55:00  07:41:00
110.G3bx3c   07:55:00  07:41:00
111.B*4b     07:55:00  07:41:00
112.K5a-6a   07:55:00  07:41:00
113.B4bx3c+  07:55:00  07:41:00
114.L9ax9c   07:55:00  07:42:00

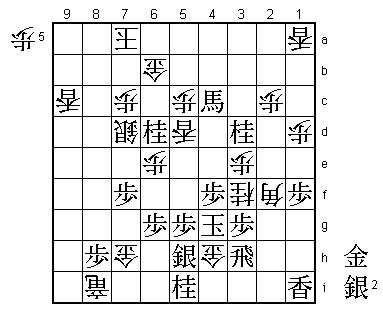
There is no quick win from here, so white is one move quicker.

115.N5f-6d   07:56:00  07:42:00
116.S*4i     07:56:00  07:50:00
117.+B3cx4c  07:59:00  07:50:00
118.K6a-7a   07:59:00  07:50:00
119.N*5i     07:59:00  07:50:00
120.S4ix5h=  07:59:00  07:52:00
121.S4gx5h   07:59:00  07:52:00
122.B*2f     07:59:00  07:52:00
123.P*3g     07:59:00  07:52:00
124.N*3f     07:59:00  07:53:00
125.K4h-4g   07:59:00  07:53:00
126.G*4h     07:59:00  07:53:00
Resigns      07:59:00  07:53:00

Mate after 127.Rx4h Nx4h+ Kx4h +Rx5i Kx5i Bx3g+ Any*4h N*4g Sx4g R*6i.
At first glance, this looked like a convincing victory for Habu, but
this was actually a very close game that could have been won by Sato
if he had not overlooked a single move deep in a side variation. A little
bit of luck for Habu, but that may be just what he needs after being on
the receiving end in most of the games he has played this summer against Sato.
