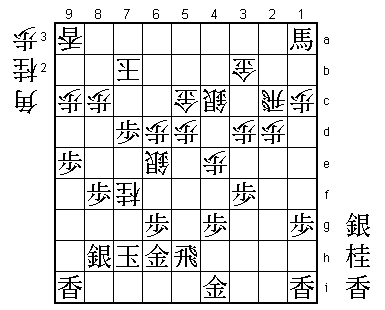
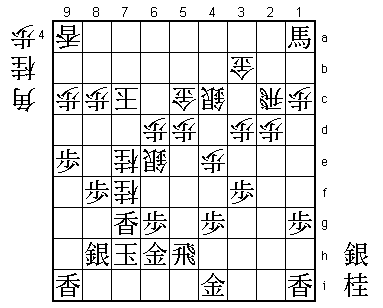
46th Oi Match Game 2
[Black "Habu Yoshiharu, Oi"]
[White "Sato Yasumitsu, Challenger"]
[Event "46th Oi-sen, Game 2"]
[Date "July 21st and 22nd 2005"]
1.P7g-7f     00:00:00  00:00:00
2.P3c-3d     00:00:00  00:00:00
3.P2g-2f     00:01:00  00:00:00
4.P5c-5d     00:01:00  00:01:00
5.S3i-4h     00:27:00  00:01:00
6.B2bx8h+    00:27:00  00:12:00
7.S7ix8h     00:27:00  00:12:00
8.R8b-2b     00:27:00  00:12:00

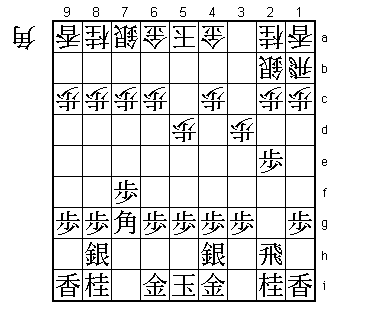
The Gokigen Nakabisha. This is an unusual way of playing the opening,
but Yamasaki did the same thing in the NHK final against Habu, so
this is not a new move. The position is different, though, since Habu
played 5.K6h instead of 5.S4h.

9.B*7g       00:32:00  00:12:00
10.R2b-1b    00:32:00  00:16:00

White hasn't played a single general move yet, but there is no time
for that now. "In the opening a bishop is more valuable than a rook"
is a well-known shogi proverb, but this position is an exception. If
black manages to exchange the bishop for the rook, the white developed
will be too much constrained by protecting squares where the rook can
be dropped. On the other hand, black can play a natural development of
pieces without giving white a chance to use the bishop.

11.P2f-2e    00:35:00  00:16:00
12.S3a-2b    00:35:00  00:24:00

It is hard to believe that the white position is being played by a top
professional. However, again there is no choice. The natural 12.G3b is
not good because of 13.P2d Px2d Rx2d P*2c Rx3d. In this position, white
can not counter with B*2h because of P*2b (Rx2b? Bx2b+) or with B*4e
because of Rx3b+ Sx3b (Rx3b Bx1a+) P*2b N3c P2a+ (Sx2a Bx3c+) and black
gets an overwhelming position.

13.P2e-2d    00:47:00  00:24:00
14.P2cx2d    00:47:00  00:27:00
15.R2hx2d    00:47:00  00:27:00
16.P*2c      00:47:00  00:28:00
17.R2d-2h    00:47:00  00:28:00
18.K5a-6b    00:47:00  00:32:00
19.K5i-6h    00:48:00  00:32:00
20.K6b-7b    00:48:00  00:33:00
21.K6h-7h    00:49:00  00:33:00
22.S7a-6b    00:49:00  00:40:00
23.P3g-3f    01:21:00  00:40:00
24.G4a-3b    01:21:00  00:55:00
25.S4h-3g    01:22:00  00:55:00
26.S2b-3c    01:22:00  01:07:00
27.S3g-4f    01:25:00  01:07:00
28.S6b-5c    01:25:00  01:59:00
29.P9g-9f    01:50:00  01:59:00
30.P4c-4d    01:50:00  02:23:00
31.P5g-5f    02:16:00  02:23:00
32.G6a-6b    02:16:00  02:32:00
33.P9f-9e    02:24:00  02:32:00
34.R1b-2b    02:24:00  02:59:00
35.G6i-6h    02:39:00  02:59:00
36.P2c-2d    02:39:00  03:06:00
37.N2i-3g    02:39:00  03:06:00
38.R2b-2c    02:39:00  03:13:00
39.P8g-8f?   03:05:00  03:13:00

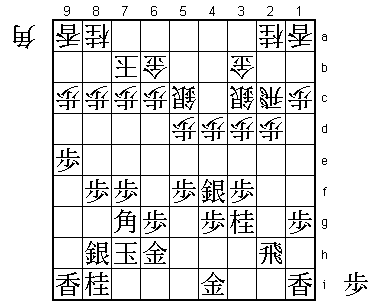
The game has quieted down and both sides have taken time to develop their
pieces. After the game, Habu said that he regretted this way of playing.
Better would have been 39.B6f followed by N7g to be able to play an edge
attack at any given time. After 39.P8f the advanced edge pawn on 9e becomes
meaningless.

40.S3c-4b    03:05:00  03:20:00
41.P5f-5e    04:20:00  03:20:00
42.S4b-4c    04:20:00  03:23:00
43.P5ex5d    04:25:00  03:23:00
44.S5cx5d    04:25:00  03:36:00
45.S4f-5e    04:25:00  03:36:00
46.S5dx5e    04:25:00  03:45:00
47.B7gx5e    04:25:00  03:45:00
48.N2a-3c    04:25:00  03:58:00
49.P*5d      04:30:00  03:58:00

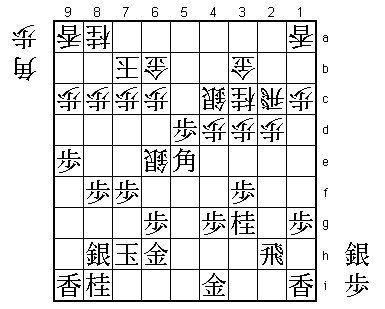
Looks like a good move, because this avoids the development of the rook
through R2a and R5a, but white has a strong counter.

50.S*6e!     04:30:00  04:29:00

This simply threatens to take the pawn on 5d and surprisingly, black has no
good way of defending against that. For example, 51.S*5c S6ex5d Sx4d+ N2e!
(not Sx5e +Sx4c Gx4c S*3b and black wins) +Sx5d Sx5d Bx1a+ Nx3g+ R5h P*5e
+B1b R5c is good for white.

51.P5d-5c+   04:43:00  04:29:00
52.G6bx5c    04:43:00  04:29:00
53.N8i-7g    04:43:00  04:29:00
54.S6ex7f    04:43:00  04:47:00
55.P*7d      05:16:00  04:47:00

Habu realizes that he is in trouble and goes for the desperate attack.

56.P6c-6d    05:16:00  05:02:00
57.P7dx7c+   05:17:00  05:02:00
58.N8ax7c!   05:17:00  05:23:00

A hard move to play, because the head of the knight looks so weak, but Sato
has seen that 58.Kx7c is not good because of 59.S*6e!. If then 60.S5d (Sx6e
Nx6e forks king and gold) R5h! S7fx6e Nx6e Sx6e Bx4d is good for black.

59.R2h-5h    05:45:00  05:23:00
60.P*5d      05:45:00  05:34:00
61.P*7d      05:49:00  05:34:00
62.N7c-6e    05:49:00  05:38:00
63.N7gx6e    05:49:00  05:38:00
64.S7fx6e    05:49:00  05:38:00
65.N*4e      05:49:00  05:38:00
66.N3cx4e    05:49:00  06:04:00
67.N3gx4e    05:49:00  06:04:00
68.P4dx4e    05:49:00  06:04:00
69.B5ex1a+   05:49:00  06:04:00
70.N*7f      05:49:00  06:04:00

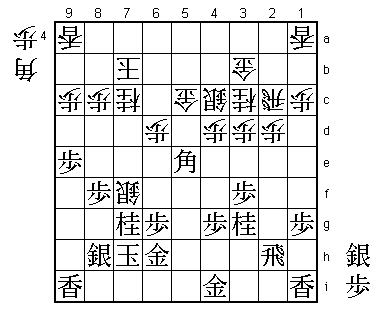
Very painful. White has a number of knight in hand, so he can play this
drop a number of times in a row. Black has no pawns in hand, so there is
no way to defend here.

71.P7d-7c+   06:28:00  06:04:00
72.K7bx7c    06:28:00  06:04:00
73.L*7g      06:28:00  06:04:00
74.N*7e      06:28:00  06:12:00
Resigns      06:33:00  06:12:00

An unexpectedly quick end to this game (a little past three in the afternoon),
but after 75.Lx7f Sx7f +B6f S6e (or Nx6g+ Gx6g +Sx6g +Bx6g L*6e) +Bx7e L*7d white
wins quickly. Habu saw no way to make a fight of it and resigned. A complete
victory by Sato with some unusual opening moves. He showed no signs that he
suffered any psychological damage from losing the 4th game of the Kisei match
and takes a 2-0 lead. Habu is already in a situation of having the win with
the white pieces to avoid going three games down with four to play.
