46th Oi Match Game 1
[Black "Sato Yasumitsu, Challenger"]
[White "Habu Yoshiharu, Oi"]
[Event "46th Oi-sen, Game 1"]
[Date "July 13th and 14th 2005"]
1.P7g-7f 00:01:00 00:00:00
2.P3c-3d 00:01:00 00:01:00
3.P2g-2f 00:04:00 00:01:00
4.P5c-5d 00:04:00 00:08:00
5.P2f-2e 00:12:00 00:08:00
6.R8b-5b 00:12:00 00:10:00
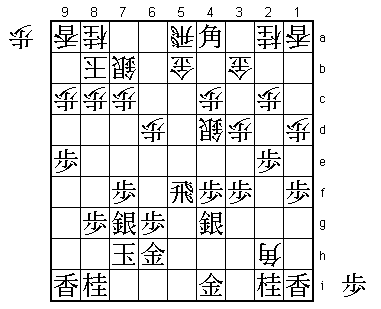
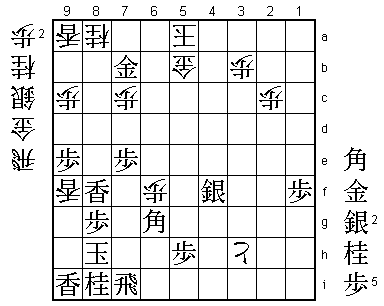
Habu plays the Gokigen Nakabisha in this first game. A very popular
way of playing for white, so in that sense not a major surprise.
However, seeing Habu play this opening one can not help but remember
the fourth game of this year's Meijin match against Moriuchi. In that
game Habu suffered a total defeat, so why would he again play an opening
in which he has had such a bad experience? They key might be in Habu's
response to a similar question he was asked when he played the
R8e-Yokofudori: "Because I don't understand it". Playing an opening at
the big stage seems to deepen Habu's understanding much more than just
playing it in practice or studying it at home.
7.B8hx2b+ 00:13:00 00:10:00
8.S3ax2b 00:13:00 00:10:00
9.P9g-9f 00:14:00 00:10:00
10.K5a-6b 00:14:00 01:01:00
11.K5i-6h 00:31:00 01:01:00
12.K6b-7b 00:31:00 01:05:00
13.S3i-4h 00:32:00 01:05:00
14.P5d-5e 00:32:00 02:21:00
Habu has used 51 minutes for 10.K6b and 76 minutes for 14.P5e, which
seems to support the theory above. He is of course well aware of the
opening theory in this position, but playing it himself leads to new
insights. Still, Habu may not have liked what he saw...
15.P9f-9e 00:59:00 02:21:00
Pushing the pawn on the edge is an important asset of the black
position. More attacking options and less chances for the white king
to escape up the board.
16.P5e-5f 00:59:00 02:29:00
17.P5gx5f 01:05:00 02:29:00
18.R5bx5f 01:05:00 02:29:00
19.S7i-8h 01:06:00 02:29:00
20.S2b-3c 01:06:00 02:40:00
21.S8h-7g 01:07:00 02:40:00
22.R5f-5a 01:07:00 02:44:00
23.K6h-7h 01:08:00 02:44:00
24.K7b-8b 01:08:00 02:45:00
25.G6i-6h 01:13:00 02:45:00
26.S7a-7b 01:13:00 02:46:00
27.P3g-3f 01:23:00 02:46:00
28.P6c-6d 01:23:00 02:59:00
29.P4g-4f 01:32:00 02:59:00
30.G4a-3b 01:32:00 03:24:00
31.P1g-1f 02:23:00 03:24:00
32.P1c-1d 02:23:00 03:33:00
33.S4h-4g 03:32:00 03:33:00
34.P*5f 03:32:00 04:09:00
35.R2h-5h 03:39:00 04:09:00
36.S3c-4d 03:39:00 04:11:00
37.P*5b 03:50:00 04:11:00
38.G6ax5b 03:50:00 04:27:00
39.R5hx5f 03:52:00 04:27:00
40.B*2h 03:52:00 04:28:00
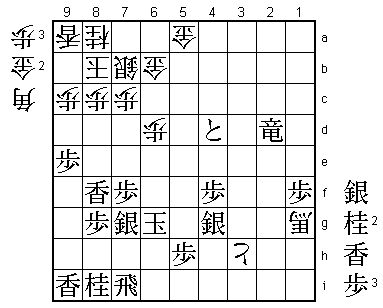
41.B*4a! 04:40:00 04:28:00
Black already seemed to have the edge, but this is a big blow that
Habu might have underestimated. 41.B*6b looks the same, but then
42.P5e Bx5a+ Gx5a R5h Bx1i+ is good for white (being a lance up).
42.G3b-4b 04:40:00 04:42:00
No choice. 42.P*5e R5h Rx4a (not Bx1i+ as above because the gold
on 3b is hanging) Rx2h gives black a much better position.
43.B4ax5b+ 04:40:00 04:42:00
44.G4bx5b 04:40:00 04:43:00
45.G*4b 05:00:00 04:43:00
46.P*5e 05:00:00 04:43:00
47.G4bx5a 05:00:00 04:43:00
48.G5bx5a 05:00:00 04:43:00
49.R5f-5i 05:00:00 04:43:00
50.B2hx1i+ 05:00:00 04:49:00
51.R*3a 05:00:00 04:49:00
52.G*6a 05:00:00 04:49:00
53.G4i-3h 05:04:00 04:49:00
54.N2a-3c 05:04:00 04:51:00
55.R3ax1a+ 05:04:00 04:51:00
56.L*5b 05:04:00 04:51:00
57.P*5g 05:25:00 04:51:00
58.N3cx2e 05:25:00 04:53:00
59.R5i-7i 05:27:00 04:53:00
60.+B1i-1h 05:27:00 04:57:00
61.+R1ax1d 05:35:00 04:57:00
62.N2e-1g+ 05:35:00 04:58:00
63.+R1d-2e 06:01:00 04:58:00
64.P3d-3e 06:01:00 05:04:00
65.P3fx3e 06:10:00 05:04:00
66.P5e-5f 06:10:00 05:07:00
67.P5gx5f 06:10:00 05:07:00
68.P*5e 06:10:00 05:07:00
69.P3e-3d 06:18:00 05:07:00
70.P5ex5f 06:18:00 05:07:00
71.P*5h 06:18:00 05:07:00
72.P2c-2d 06:18:00 05:11:00
73.+R2ex2d 06:19:00 05:11:00
74.P*2g 06:19:00 05:11:00
75.N2ix1g 06:20:00 05:11:00
76.+B1hx1g 06:20:00 05:11:00
77.P3d-3c+ 06:20:00 05:11:00
78.N*6e 06:20:00 06:04:00
79.+P3cx4c 06:52:00 06:04:00
80.P5f-5g+ 06:52:00 06:05:00
81.P5hx5g 06:56:00 06:05:00
82.L5bx5g+ 06:56:00 06:05:00
83.G6hx5g 06:56:00 06:05:00
84.N6ex5g+ 06:56:00 06:05:00
85.P*5b 06:56:00 06:05:00
86.G5a-6b 06:56:00 06:08:00
87.P5b-5a+ 07:00:00 06:08:00
88.G6ax5a 07:00:00 06:08:00
89.+P4cx4d 07:05:00 06:08:00
90.P2g-2h+ 07:05:00 06:17:00
91.P*5h 07:06:00 06:17:00
92.+N5gx6g 07:06:00 06:19:00
93.K7hx6g 07:06:00 06:19:00
94.+P2hx3h 07:06:00 06:19:00
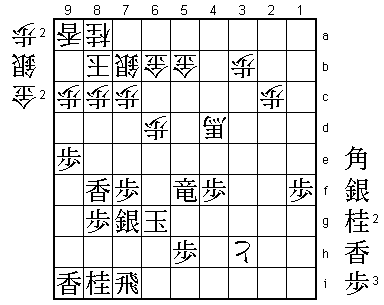
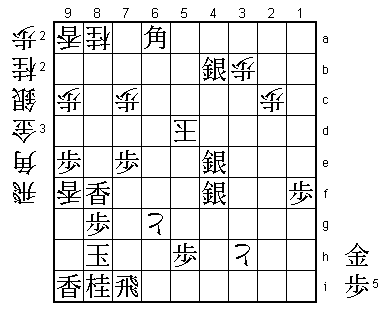
95.L*8f? 07:19:00 06:19:00
Sato has made a promoted rook and has gradually improved his
position despite Habu's desperate attack. However, 95.L*8f is
a mistake. Correct was 95.P9d Px9d P*9b Lx9b N*8f aiming at
N*7d next. If then P8d, black can strongly attack on the edge
with P*9c Lx9c P*9e.
96.B*7d! 07:19:00 06:24:00
Sato may have overlooked this move.
97.S4g-5f 07:30:00 06:24:00
98.P*2c 07:30:00 06:34:00
99.+R2d-3c 07:30:00 06:34:00
100.P*3b 07:30:00 06:37:00
101.+R3c-4c 07:30:00 06:37:00
102.G5a-5b 07:30:00 06:44:00
103.+R4c-5d 07:30:00 06:44:00
104.B7dx5f 07:30:00 06:55:00
105.+R5dx5f 07:34:00 06:55:00
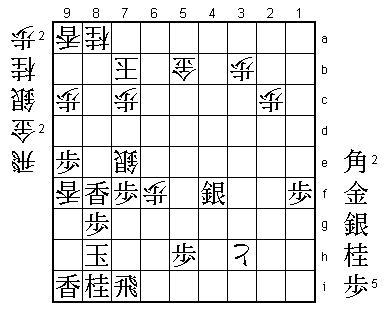
106.+B1gx4d 07:34:00 06:55:00
Text book Furibisha play: Using a couple of pawns to drive the
promoted rook back into the own position, followed by picking
up the tokin on 4d and activating the promoted bishop. More
important than removing the tokin is the fact that the black
king and black promoted rook are very badly positioned. The position
is very difficult now, and Sato realizes that he has no time to waste.

107.N*7e     07:34:00  06:55:00
108.G*5e     07:34:00  07:10:00
109.+R5fx5e  07:46:00  07:10:00
110.+B4dx5e  07:46:00  07:10:00
111.G*6f     07:46:00  07:10:00
112.+B5ex4f  07:46:00  07:20:00
113.S*5g     07:46:00  07:20:00
114.P6d-6e   07:46:00  07:41:00
115.S5gx4f   07:48:00  07:41:00
116.P6ex6f   07:48:00  07:41:00
117.S7gx6f   07:51:00  07:41:00
118.S*7d     07:51:00  07:41:00
119.L*8e     07:51:00  07:41:00
120.P*6e     07:51:00  07:47:00
121.L8ex8c+  07:51:00  07:47:00
122.K8b-7a   07:51:00  07:47:00
123.S6f-5g   07:51:00  07:47:00
124.G*6f     07:51:00  07:49:00
125.K6g-7h   07:55:00  07:49:00
126.S7dx7e   07:55:00  07:51:00
127.S5gx6f   07:55:00  07:51:00
128.P6ex6f   07:55:00  07:51:00
129.G*8b     07:56:00  07:51:00
130.K7a-6a   07:56:00  07:51:00
131.+L8cx7b  07:56:00  07:51:00
132.G6bx7b   07:56:00  07:51:00
133.G8bx7b   07:56:00  07:51:00
134.K6ax7b   07:56:00  07:51:00
135.K7h-8h   07:57:00  07:51:00
136.L*9f     07:57:00  07:55:00
This is a mating threat: G*9g Lx9g (or Nx9g R*6h followed by S*7g)
Lx9g+ Kx9g R*9i L*9h N*8e etc. Because of this, many felt that
Habu had managed to turn the tables, but Sato has found a way out.

137.B*4e     07:59:00  07:55:00
138.K7b-6a   07:59:00  07:55:00
139.P7fx7e   07:59:00  07:55:00
140.G*6g     07:59:00  07:57:00
141.G*7b     07:59:00  07:57:00
142.K6a-5a   07:59:00  07:57:00
143.B4ex6g   07:59:00  07:57:00
144.P6fx6g+? 07:59:00  07:57:00

Seems like the only move in this position, but it is the decisive
mistake. Here Habu missed a chance to put Sato in major difficulties
with 144.R*6h!. Then 145.B7h defends the check and saves the bishop,
but then 146.P6g+ is a mating threat. The difference between this and
the game will become clear in the final position. After 146.P6g+ there
seems to be no black mate, but that doesn't necessarily mean that white
is winning. For example 147.G*6b Gx6b Gx6b Kx7b N*5d K6c P*6d Kx5d
B*4e K5c P6c+ K4b B4ex6g defends against the white mating threat with
a mating threat. This looks good for black, but actually can be countered
again by G*5f! (Bx5f N*7f K7g G*6f is mate). It would have been great to
see how both players would have handled such an endgame in byoyomi, but
unfortunately the game is suddenly over after 144.Px6g+.

145.G*6b     07:59:00  07:57:00
146.G5bx6b   07:59:00  07:58:00
147.G7bx6b   07:59:00  07:58:00
148.K5ax6b   07:59:00  07:58:00
149.N*5d     07:59:00  07:58:00
150.K6b-5b   07:59:00  07:58:00
151.B*6a     07:59:00  07:58:00
152.K5b-5c   07:59:00  07:58:00
153.S*4b     07:59:00  07:58:00
154.K5cx5d   07:59:00  07:58:00
155.S*4e     07:59:00  07:58:00
Resigns      07:59:00  07:58:00
Mate after 156.K6c G*5c K6d G5d K6e G5e K6f G5f. Not that for this mate
to work, the rook on 7i needs to defend 7e and 7f. In the variation after
144.Px6g+, the bishop on 7h is blocking the rook, so this mate doesn't work.
After Sato got an overwhelming advantage in the middle game, many expected
the game to be over soon, but Habu showed what a good fighter he is by getting
back in this game. He didn't get the result, but this promises a lot for this
Oi title match. On the other hand, Sato was never phased by seeing his
advantage disappear, showing that he is in exceptionally good form these days.