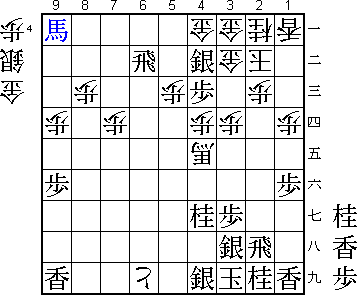
45th Oza Match Game 3
Black: Habu Yoshiharu, Oza
White: Shima Akira, Challenger
45th Oza-sen, September 26th 1997
1.P2g-2f           0/0          0/0
2.P8c-8d           0/0          1/1
3.P2f-2e           1/1          0/1
4.P8d-8e           0/1          0/1
5.G6i-7h           0/1          0/1
6.G4a-3b           0/1          0/1
7.P2e-2d           0/1          0/1
8.P2cx2d           0/1          0/1
9.R2hx2d           0/1          0/1
10.P*2c            0/1          0/1
11.R2d-2f          0/1          0/1
12.S7a-7b          0/1          4/5
13.P9g-9f          3/4          0/5
14.P1c-1d          0/4          1/6
15.P7g-7f          0/4          0/6
16.P8e-8f          0/4          1/7
17.P8gx8f          0/4          0/7
18.R8bx8f          0/4          0/7
19.S3i-3h          1/5          0/7
20.P6c-6d          0/5          4/11
21.N8i-7g          2/7          0/11

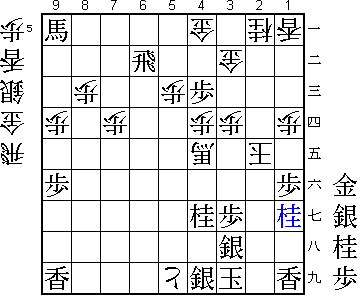
Habu likes to play many different types of openings. In the first game we saw
a Yagura, in the second game a Shikenbisha and now a Hineribisha opening.

22.K5a-4a          0/7          16/27
23.K5i-4h          16/23        0/27
24.S3a-4b          0/23         1/28
25.P1g-1f          19/42        0/28
26.R8f-8b          0/42         4/32
27.P7f-7e          0/42         0/32
28.P9c-9d          0/42         13/45
29.P*8e            7/49         0/45
30.S7b-6c          0/49         0/45
31.R2f-7f          1/50         0/45
32.P3c-3d          0/50         0/45
33.S7i-6h          5/55         0/45
34.K4a-3a          0/55         0/45
35.P6g-6f          11/66        0/45
36.B2b-3c          0/66         27/72
37.S6h-6g          2/68         0/72
38.G6a-7b          0/68         0/72
39.S6g-5f          20/88        0/72
40.S6c-5d          0/88         0/72
41.B8h-9g          1/89         0/72
42.G7b-6c          0/89         0/72
43.K4h-3i          3/92         0/72
44.K3a-2b          0/92         1/73
45.R7f-8f          0/92         0/73

46.P4c-4d          0/92         51/124

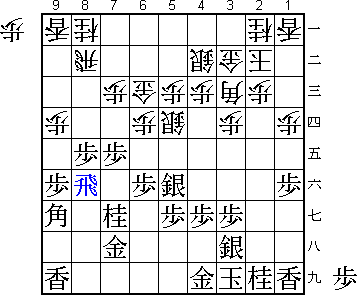
Normal is 46.P*8c, but white's idea here is to postpone that defense only move
as long as possible. If black should play 46.P8d to promote the pawn, then
47.N9c P8c+ P*8e! is a good white counter.

47.P4g-4f          12/104       0/124
48.B3c-2d          0/104        0/124
49.G7h-6h          0/104        0/124
50.B2dx4f          0/104        0/124
51.P6f-6e          3/107        0/124
52.P*8c            0/107        6/130
53.P7e-7d          3/110        0/130
54.P7cx7d          0/110        8/138
55.P*7b            0/110        0/138

A well-known combination. White can not take this pawn because of 57.P8d.

56.N8a-7c          0/110        34/172

Up until this point the position is identical to the fourth game of last
year's Oi match between Habu and Fukaura. Habu won that game, but there were
chances for both players and Fukaura initially had the advantage. If Shima had
confidence that this position would be good for white, the next simple move
changes that...

57.P7b-7a+!        3/113        0/172

In the Oi game Habu played 57.S5f-4g and got into trouble. This pawn promotion
is much better, because the bishop is in a vulnerable position at 4f. Shima's
choice of opening is questionable, since Habu will have studied what went
wrong in the Oi game against Fukaura. From now on Habu has the advantage.

58.P6dx6e          0/113        3/175
59.+P7a-7b         7/120        0/175
60.R8bx7b          0/120        7/182
61.P8e-8d          0/120        0/182
62.R7b-8b          0/120        0/182
63.S5fx6e          3/123        0/182
64.P*6g            0/123        17/199
65.G6hx6g          26/149       0/199
66.P*6f            0/149        2/201
67.S6ex5d          20/169       0/201
68.P6fx6g+         0/169        1/202
69.S5dx6c+         0/169        0/202
70.B4fx5g+         0/169        0/202
71.G*4h            3/172        0/202

72.+B5g-7e?        0/172        16/218

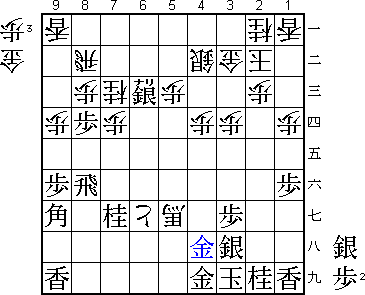
Not good. It gives black the opportunity to bring his bishop on 9g into play
with tempo. Necessary was 72.+B6h P*4c Sx4c Px8c+ +Bx7g +Px8b +Bx8f Bx8f
R*2f P*2g Rx8f +Sx5c and white has dangerous counterchances after B*7e and/or
N*5f.

73.R8f-2f          5/177        0/218
74.+B7ex8d         0/177        3/221
75.P*8e            8/185        0/221
76.N7cx8e          0/185        2/223
77.N7gx8e          0/185        0/223
78.+B8dx8e         0/185        18/241
79.B9g-6d          0/185        0/241
80.G*3e            0/185        1/242
81.R2f-2g          11/196       0/242

82.N*5f?           0/196        7/249

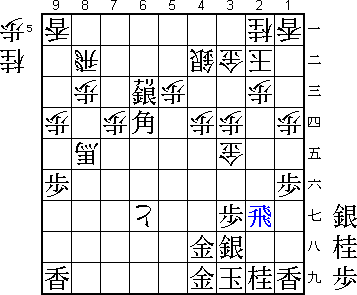
Now the game is lost. After the simple 82.R9b white still has chances to
survive. For example 83.+Sx5c Sx5c Bx5c+ S*4b +Bx4d S3c and white can drop
pawns on the fifth and fourth file to strengthen his own attack, while the
rook works defensively. Also 82.R9b 83.P*5d Px5d S*4a G3a S5b+ N*2f kills the
black rook threats while attacking, leading to a difficult position.

83.G4h-4g          30/226       0/249
84.+P6g-5h         0/226        2/251
85.G4ix5h          1/227        0/251
86.+B8ex5h         0/227        0/251
87.S*4i!           0/227        0/251

The decider. White has nothing but to pull the horse back. After that the loss
of the rook on 8b and its consequent use in attack decides the game.

88.+B5h-7f         0/227        21/272
89.B6dx8b+         2/229        0/272
90.+B7f-5d         0/229        0/272
91.R2g-2h          8/237        0/272
92.+B5dx6c         0/237        0/272
93.G4gx5f          0/237        0/272
94.P*6h            0/237        0/272
95.P*4c            10/247       0/272
96.S4b-3a          0/247        0/272
97.N*4g            13/260       0/272
98.G3e-4e          0/260        1/273
99.G5fx4e          1/261        0/273
100.+B6cx4e        0/261        0/273
101.G*4a           3/264        0/273
102.P6h-6i+        0/264        0/273
103.G4ax3a         8/272        0/273
104.G3bx3a         0/272        0/273
105.R*6b           7/279        0/273
106.G*3b           0/279        0/273
107.S*4b           0/279        0/273
108.G*4a           0/279        3/276
109.+B8bx9a!       0/279        0/276

Some nice endgame play by Habu. By dropping the silver on 4b first before
taking the lance, a lancedrop on 2g is very powerful because white cannot
defend by the natural G*3c.

110.+P6i-5i        0/279        5/281
111.L*2g           2/281        0/281
112.S*2d           0/281        4/285
113.L2gx2d         5/286        0/285
114.P2cx2d         0/286        0/285
115.S4bx4a=        0/286        0/285
116.G3ax4a         0/286        0/285
117.R2hx2d         0/286        0/285
118.P*2c           0/286        0/285
119.R2dx2c+        0/286        0/285
120.K2bx2c         0/286        0/285
121.P*2d           0/286        0/285
122.K2cx2d         0/286        0/285
123.P*2e           0/286        0/285
124.K2dx2e         0/286        0/285
125.N2i-1g         0/286        0/285
Resigns            0/286        0/285
Time:              04:46:00     04:45:00

Black has mate: 126.K1f S*2e K2f G*1f or 126.K2f G*2e K1f N*2h or
126.K2d P*2e K3c S*2d K2b G*2c and simple mate.
