45th Oza Match Game 2
Black: Shima Akira, Challenger
White: Habu Yoshiharu, Oza
45th Oza-sen, Game 2, September 12th 1997
Like in the first game, Shima started this game wearing his trademark Armani
suit instead of the formal kimono which is the custom in professional title
matches. Shima was clearly tense for this important game that he had to win
to stay in this match.
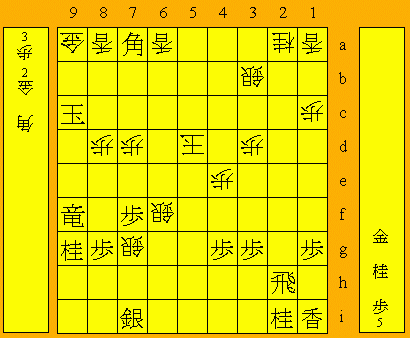
1.P7g-7f 1/1 0/0
2.P3c-3d 0/1 1/1
3.P2g-2f 1/2 0/1
4.P4c-4d 0/2 1/2
5.P2f-2e 3/5 0/2
6.B2b-3c 0/5 1/3
7.S3i-4h 0/5 0/3
8.R8b-4b 0/5 1/4
The Shikenbisha (Fourth File Rook), which Habu often chooses with white these
days.
9.K5i-6h 0/5 0/4
10.S7a-7b 0/5 2/6
11.K6h-7h 0/5 0/6
12.P9c-9d 0/5 0/6
13.P5g-5f 3/8 0/6
14.P9d-9e 0/8 2/8
Shima likes to play the Ibisha Anaguma against Shikenbisha, so Habu chooses
a strategy devised by Fujii (6-dan) to set up a quick attack against the
Anaguma.
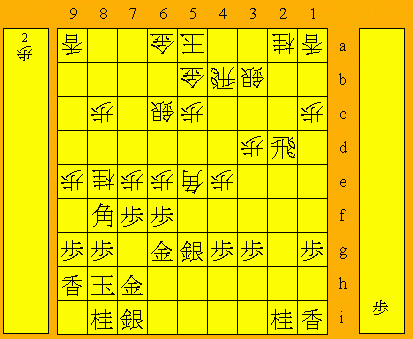
15.G4i-5h 1/9 0/8
16.G4a-5b 0/9 3/11
17.S4h-5g 20/29 0/11
18.S3a-3b 0/29 7/18
19.B8h-7g 0/29 0/18
20.P6c-6d 0/29 4/22
21.K7h-8h 6/35 0/22
22.P7c-7d 0/35 1/23
23.P6g-6f 0/35 0/23
24.N8a-7c 0/35 6/29
25.G5h-6g 2/37 0/29
26.P4d-4e 0/37 1/30
27.G6i-7h 37/74 0/30
28.S7b-6c 0/74 6/36
More natural is of course 28.G5b-6c, but Habu is planning to keep his king on
5a while attacking. If so, the gold on 5b defends better against a black
counterattack.
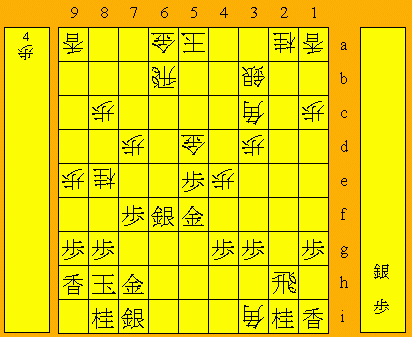
29.L9i-9h 4/78 0/36
Brave decision. Shima plays the anaguma despite the fact that Habu is preparing
for it.
30.N7c-8e 0/78 53/89
Starting a strong attack against the black king. Of course it is unclear if
this attack is strong enough, since it does not use any general.
31.B7g-8f 42/120 0/89
32.P6d-6e 0/120 3/92
33.P5f-5e 0/120 0/92
34.B3cx5e 0/120 8/100
35.P2e-2d 1/121 0/100
36.P2cx2d 0/121 1/101
37.R2hx2d 0/121 0/101
38.P7d-7e 0/121 79/180
Played after long thought, but without reaching a conclusion. Both Habu and
Shima, as well as the commentators have no idea who is better here.
39.P*5d 71/192 0/180
Many choices... 39.Bx7e, 39.Px7e and 39.S6h are other candidate moves. Which
is better is anybody's guess.
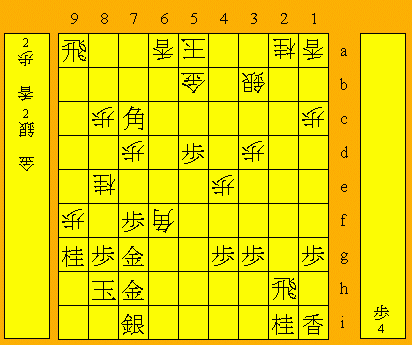
40.S6cx5d 0/192 30/210
41.B8fx7e 1/193 0/210
42.G5b-4c 0/193 11/221
43.R2d-2h 22/215 0/221
44.R4b-6b 0/215 23/244
It looks like Habu is better now he has switch the rook to the important 6th
file, but things are still very difficult.
45.G6g-5f 30/245 0/244
46.B5e-3c 0/245 0/244
47.P*5e 1/246 0/244
48.P*7d 0/246 10/254
49.B7ex5c+ 8/254 0/254
50.G4cx5c 0/254 0/254
51.P5ex5d 0/254 0/254
52.G5cx5d 0/254 1/255
53.P*5e 1/255 0/255
54.P6ex6f 0/255 4/259
55.S5gx6f 1/256 0/259
56.B*3i 0/256 5/264
57.P5ex5d?         2/258        0/264

Looks good, but is a mistake. Better is 57.R6h. Habu planned to play 58.P*6g,
but after 59.Rx6g P9f Px9f P*6e S7g Gx5e Gx5e Bx5e S*5c it is black who comes
out on top. Also 58.G5c P8f B2d R6g B4h+ Px8e +B5h P*6h and it seems that black
is better.

58.R6bx6f          0/258        17/281
59.G5fx6f          2/260        0/281
60.B3ix6f+         0/260        0/281
61.S*7g            0/260        0/281
62.P9e-9f!         0/260        0/281

Overlooked by Shima? This nasty move threatens mate: Px9g+ Lx9g Lx9g+ Nx9g
+Bx7g etc. Habu's attack now gets decisive strength.

63.P9gx9f          4/264        0/281
64.P*9g            0/264        0/281
65.L9hx9g          16/280       0/281
66.L9ax9f          0/280        0/281
67.P*9h            0/280        0/281
68.L9fx9g+         0/280        0/281
69.P9hx9g          0/280        0/281
70.P*9f            0/280        0/281
71.L*5c            0/280        0/281
72.P*5b            0/280        2/283
73.L5cx5b+         5/285        0/283
74.G6ax5b          0/285        1/284
75.R*9a            0/285        0/284
76.L*6a            0/285        1/285
77.S7gx6f          10/295       0/285
78.B3cx6f          0/295        5/290
79.G*7g            0/295        0/290
80.P9fx9g+         0/295        4/294
81.N8ix9g          0/295        0/294
82.P*9f            0/295        1/295
83.B*7c!           2/297        0/295
Good fighting move. 83.Rx9f+ Nx7g+ Gx7g Bx7g+ Kx7g G*6g K8f S*7g K9e G*8d is
mate. This bishopdrop defends the square on 8d, giving black a chance for
entering king.

84.K5a-4b?         0/297        1/296

A mistake, which almost costs the game. Habu would have given Shima no chance
if he would have played 84.S*6b Bx6b+ Gx6b Rx9f+ Nx7g+ Gx7g Bx7g+ Kx7g S*6f
Kx6f G7c and the black king is mated (K5g B*3i or K7g G*6g K8h B*7g K9h G*9i
or P*6e Lx6e K5f G*6f).

85.R9ax9f+         1/298        0/296
86.N8ex7g+         0/298        0/296
87.G7hx7g          0/298        0/296
88.B6fx7g+         0/298        1/297
89.K8hx7g          0/298        0/297
90.S*6f            0/298        0/297
91.K7g-8f          1/299        0/297
92.S*7g            0/299        0/297
93.K8f-8e          0/299        0/297
94.G*8d!           0/299        2/299

Habu uses his final two minutes to avoid the last trap. 94.G*8b is an
attractive move (95.Bx8b+ G*8d), but white would suddenly lose after 95.P5c+!.
After 96.Kx5c B*7a or 96.Gx5c B*5a followed by B8b+, the black king can escape
to safety. Another big mistake would have been 94.G*7b?, since black would win
after 95.+R9b Gx7c +Rx5b Kx5b G*5c K4a B*5b K3a N*4c Sx4c B4a+ Kx4a Rx2a+.
Like in the first game, Shima is a little unlucky that there is still a way to
win and that Habu finds it.

95.B7cx8d+         0/299        0/299
96.P8cx8d          0/299        0/299
97.K8e-9d          0/299        0/299
98.L*8a            0/299        0/299
99.G*5c            0/299        0/299
100.G5bx5c         0/299        0/299
101.P5dx5c+        0/299        0/299
102.K4bx5c         0/299        0/299
103.B*7a           0/299        0/299
104.K5c-5d         0/299        0/299
105.K9d-9c         0/299        0/299
106.G*9a           0/299        0/299
Resigns            0/299        0/299
Time:              04:59:00     04:59:00

There are two mating threats: G*8c and G*9b K9d G8c K9e G*9d. This can only
be defended by G*8b, but after G*9b Kx8d P*8c black is still mated.