45th Oza Match Game 1
Black: Habu Yoshiharu, Oza
White: Shima Akira, Challenger
45th Oza-sen, Game 1, September 3rd 1997
1.P7g-7f           1/1          0/0
2.P8c-8d           0/1          0/0
3.S7i-6h           1/2          0/0
4.P3c-3d           0/2          0/0
5.P6g-6f           1/3          0/0
6.S7a-6b           0/3          0/0
7.P5g-5f           2/5          0/0
8.P5c-5d           0/5          0/0
9.S3i-4h           1/6          0/0
10.S3a-4b          0/6          1/1
11.G4i-5h          2/8          0/1
12.G4a-3b          0/8          0/1
13.G6i-7h          1/9          0/1
14.K5a-4a          0/9          0/1
15.K5i-6i          2/11         0/1

The Yagura opening does not come as a surprise, with both players being
experts in this type of opening. The mindsets for this match:
Shima: "The theme of this Oza match will be whether a ordinary person can
beat a special person or not".
Habu: "I am not a special person and Shima is not a ordinary person. The theme
of this Oza match will be how I can resist Shima's exquisite opening play".

16.G6a-5b          0/11         1/2
17.S6h-7g          7/18         0/2
18.S4b-3c          0/18         0/2
19.B8h-7i          0/18         0/2
20.B2b-3a          0/18         0/2
21.P3g-3f          1/19         0/2
22.P4c-4d          0/19         0/2
23.G5h-6g          0/19         0/2
24.P7c-7d          0/19         1/3
25.S4h-3g          7/26         0/3
26.B3a-6d          0/26         13/16
27.B7i-6h          3/29         0/16
28.G5b-4c          0/29         0/16
29.K6i-7i          4/33         0/16
30.K4a-3a          0/33         0/16
31.K7i-8h          1/34         0/16
32.P8d-8e          0/34         1/17
33.S3g-4f          50/84        0/17
34.S6b-5c          0/84         3/20
35.N2i-3g          0/84         0/20
36.K3a-2b          0/84         0/20
37.P2g-2f          1/85         0/20
38.S3c-2d          0/85         0/20
39.P1g-1f          0/85         0/20
40.P1c-1d          0/85         0/20
41.R2h-5h          3/88         0/20
42.B6d-7c          0/88         26/46
43.P5f-5e          3/91         0/46
44.P5dx5e          0/91         0/46
45.S4fx5e          0/91         0/46
46.R8b-5b          0/91         0/46
47.S5e-4f          6/97         0/46
48.R5b-5a          0/97         1/47
49.P9g-9f          38/135       0/47
50.P9c-9d          0/135        2/49
51.P*5e            31/166       0/49
52.P*5d            0/166        3/52
53.P1f-1e          1/167        0/52
54.P1dx1e          0/167        0/52
55.P5ex5d          0/167        0/52
56.S5cx5d          0/167        0/52
57.P*5e            1/168        0/52

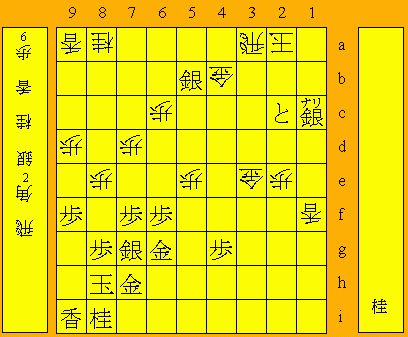
This is a very modern opening line. White is prepared to sacrifice the bishop
against a silver to stop black's attack and leave him without pawns in hand.
Shima has some experience with this line of play. He played it against
Moriuchi in this year's Ryu-O tournament and he also played it in the game
against Goda in the final of the Oza challenger tournament.

58.S5dx5e          0/168        0/52
59.S4fx5e          0/168        0/52
60.B7cx5e          0/168        0/52

Not 60.Rx5e?? because of Rx5e Bx5e S*3a! and black wins.

61.S*4f            7/175        0/52
62.P*5d            0/175        1/53
63.S4fx5e          0/175        0/53
64.P5dx5e          0/175        0/53
65.R5h-2h          0/175        0/53
66.P1e-1f          0/175        2/55
67.B*6b            0/175        0/55

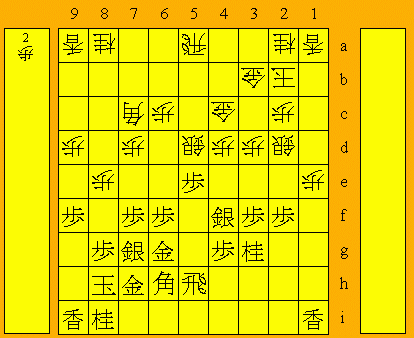
Here Goda played 67.P4f which turned out to be not so good. Habu decides to
follow the line that Moriuchi played.

68.R5a-3a          0/175        12/67

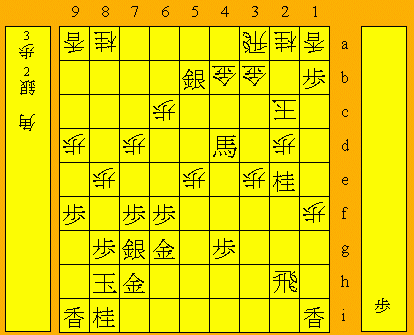
69.B6hx2d?!        0/175        0/67

Played in no time, so obviously a prepared move by Habu. Moriuchi settled for
the more natural 70.B8d+ and after 71.P1g+ 72.R5h 73.S*7c 74.+B8c the game
became a long struggle that Moriuchi eventually won. However, analysis showed
that 73.S*6i should have given Shima the advantage.

Habu's bishop sacrifice is a very speculative move and is not very likely to
be the final word in this position.

70.P2cx2d          0/175        63/130
71.P2f-2e          0/175        0/130
72.P2dx2e?         0/175        0/130

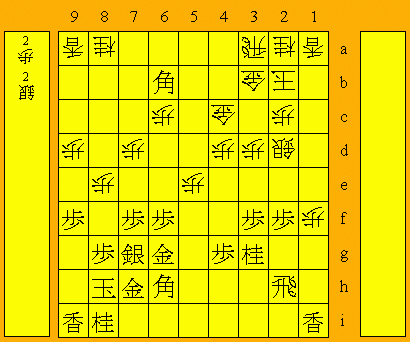
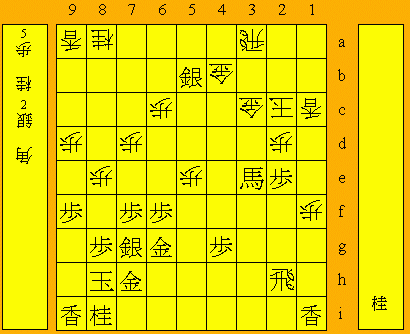
A mistake. 72.P1g+ is better. After that, 73.R5h moves the black rook from the
dangerous second file, so this is better for white. Habu intended to push on
with 73.Px2d, but after +Px2h Lx1a+ P*2c! which defends effectively against
L*2e, there is no good way for black to continue the attack. Habu had not seen
this move. Shima saw it, but calculated deeper and reached the wrong conclusion
that black was still better.

73.S*5b            16/191       0/130
74.G4c-4b?         0/191        26/156

This second mistake by Shima turns the dubious bishop sacrifice into a game
winner. White should have played 74.S*2d Nx2e S*2c Sx4c+ Gx4c G*5c R6a! which
stops the black attack. After Gx4c Rx6b there is no continuation and white
threatens to launch a severe counterattack with P*2g Rx2g B*4i. Shima: "It
seems I can make an entering king as well, doesn't it?".

75.N3gx2e          10/201       0/156
76.P*2d            0/201        35/191
77.B6bx4d+         4/205        0/191
78.K2b-2c          0/205        0/191
79.P3f-3e          11/216       0/191
80.P3dx3e          0/216        2/193
81.P*1b!           3/219        0/193

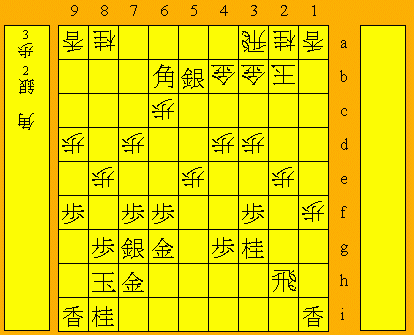
Another one of those great Habu endgame moves. After the obvious 81.+Bx1a,
white takes the silver on 5b and can escape with his king to the center of
the board. Habu has exactly the two pawns he needs to play different line
of attack.

82.L1ax1b          0/219        10/203
83.P*1c            0/219        0/203
84.N2ax1c          0/219        12/215
85.N2ex1c+         6/225        0/215
86.L1bx1c          0/225        0/215
87.+B4dx3e         0/225        0/215
88.G3b-3c          0/225        0/215
89.P*2e!           4/229        0/215

And another great move that decides the game. Habu turns a knight into a silver
which is just enough to give his attack decisive power. One has to feel a
little sorry for Shima. Habu's attack again hangs on a single pawn.

90.P2dx2e          0/229        15/230
91.+B3ex2e         0/229        0/230
92.S*2d            0/229        0/230
93.N*3e            0/229        0/230
94.S2dx3e          0/229        0/230
95.+B2ex3e         0/229        0/230
96.P*2d            0/229        0/230
97.L1ix1f          17/246       0/230
98.L1cx1f          0/246        7/237
99.S*1e            7/253        0/237
100.N*2e           0/253        17/254
101.R2hx2e         2/255        0/254
102.P2dx2e         0/255        0/254
103.P*2d           0/255        0/254
104.K2c-2b         0/255        0/254
105.P*3d           1/256        0/254
106.G3cx3d         0/256        0/254
107.S1e-1d         0/256        0/254
108.G3dx3e         0/256        0/254
109.P2d-2c+        0/256        0/254
110.K2b-2a         0/256        0/254
111.S1d-1c+        0/256        0/254
Resigns            0/256        0/254
Time:              04:16:00     04:14:00

After the only defense 112.S*1a, black plays his last piece 113.N*2d to leave
white without defense. The final position makes it look like there was a big
difference in this game. However, on two occassions Habu just had the single
pawn that was needed to keep his attack going which is more luck than ability.
This game is a good illustration of the proverb: "A pawn is worth a thousand
golds".
