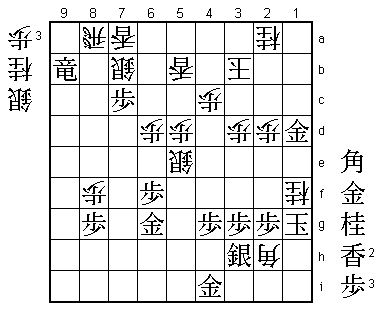
45th Oi Match Game 1
[Black "Habu Yoshiharu, Challenger"]

[White "Tanigawa Koji, Oi"]

[Event "45th Oi-sen, Game 1"]

[Date "July 16th and 17th 2004"]

1.P7g-7f     00:00:00  00:00:00

2.P3c-3d     00:00:00  00:03:00

3.P7f-7e     00:01:00  00:03:00


The Quick Ishida Opening. Before the match Habu said that he wanted to

try new moves and new ways of building positions and already on his

second move he is true to his word. This opening is a rarity in title

matches.


4.K5a-4b     00:01:00  00:43:00


After the game, Tanigawa denied that he was surprised by Habu's choice

of opening. "One of the possibilities", he called it. Still, he took 40 minutes for

4.K4b. When asked if he used this time to decide whether or not to play Ai-Furibisha

(Double Ranging Rook) he again responded negatively: "This shape has disadvantages,

so I never considered it".


5.P6g-6f     00:12:00  00:43:00

6.S7a-6b     00:12:00  00:47:00

7.R2h-7h     00:14:00  00:47:00

8.K4b-3b     00:14:00  00:49:00

9.K5i-4h     00:19:00  00:49:00

10.P8c-8d    00:19:00  01:06:00

11.K4h-3h    00:46:00  01:06:00

12.P8d-8e    00:46:00  01:14:00

13.R7h-7f    00:47:00  01:14:00

14.P6c-6d    00:47:00  01:21:00

15.G6i-5h    02:19:00  01:21:00

16.S6b-6c    02:19:00  01:25:00

17.K3h-2h    02:19:00  01:25:00

18.P1c-1d    02:19:00  02:01:00

19.P1g-1f    02:23:00  02:01:00

20.G6a-5b    02:23:00  02:09:00

21.S3i-3h    02:29:00  02:09:00

22.R8b-7b!?  02:29:00  03:51:00

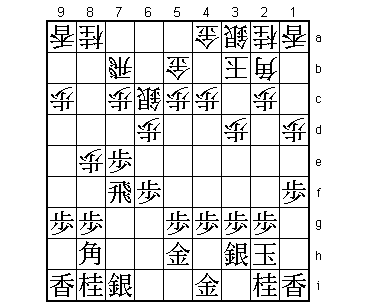
It is impossible to say if this move is good or bad, but commentator

Fujii thought this showed Tanigawa's relaxed state of mind. 22.R7b is

not an unusual move, but it is usually played after strengthening the

castle with P2d-K2c-S3b. Playing it with only a boat formation is risky

because of the thin defense around the white king. It is unlikely that

Tanigawa prepared this move at home, so this shows that he is not afraid

to choose risky opening strategies over the board.


23.P9g-9f    02:53:00  03:51:00

24.P9c-9d    02:53:00  03:53:00

25.B8h-7g    04:09:00  03:53:00

26.S3a-4b    04:09:00  04:18:00

27.S7i-6h    04:24:00  04:18:00

28.S4b-3c    04:24:00  04:41:00

29.P9f-9e    04:37:00  04:41:00

30.P9dx9e    04:37:00  04:59:00

31.L9ix9e    04:37:00  04:59:00

32.P*9c      04:37:00  05:00:00

33.R7f-9f    05:10:00  05:00:00

34.R7b-8b    05:10:00  05:03:00

35.S6h-6g    05:30:00  05:03:00

36.G5b-4b    05:30:00  05:08:00

37.B7g-6h    05:37:00  05:08:00

38.S3c-2d    05:37:00  05:22:00

39.N8i-7g    05:39:00  05:22:00

40.S6c-5d    05:39:00  05:33:00


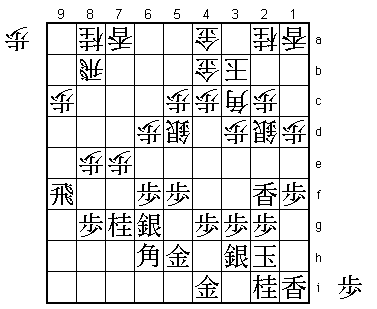
An unusual formation of generals around the king, but again Fujii praised

Tanigawa's shogi sense. Despite being unusual, this castle formation is

quite hard to break down. This being said, black has developed his knight

and lance on the left, getting a pawn in hand in the process. The general

opinion here was that black was better.


41.P5g-5f    05:52:00  05:33:00

42.B2b-3c    05:52:00  05:49:00

43.P7e-7d?   06:18:00  05:49:00

An important overplay. This pawn exchange is going to be used against the

black position, so this turns out to be a mistake. If black wants to attack

here, he should have done it with the simple 43.Lx9c+. For example, 44.Lx9c

P*9d Lx9d Rx9d L*9c Rx6d P*6c L*8d R5b Rx5d Px5d Lx8a+ L9g+ N6e and black

has two pieces for the rook and developed his small pieces. White is in

trouble, for example P6d Nx7c+ P6e N*4e is gives black a strong attack.

Black can also strengthen his castle with 43.P2f, followed by S2g and G3h

before attacking.


44.P7cx7d    06:18:00  05:50:00

45.L9ex9c+   06:18:00  05:50:00

46.L9ax9c    06:18:00  05:53:00

47.P*9d      06:18:00  05:53:00

48.L9cx9d    06:18:00  05:53:00

49.R9fx9d    06:18:00  05:53:00

50.P*9c      06:18:00  05:53:00

51.R9d-9f    06:18:00  05:53:00


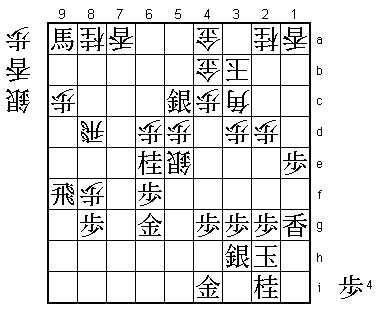
The problem. 51.Rx7d fails to 52.L*7c followed by P*7f.


52.P7d-7e    06:18:00  06:16:00

53.L*2f      06:31:00  06:16:00

54.L*7a!     06:31:00  06:39:00

There is a big difference between the effectiveness of the consecutive

lance drops. Even though 53.L*2f attacks the silver, white can just

ignore this. On the other hand, 54.L*7a strongly threatens P8f followed

by P7f next. If white can get a promoted pawn on 7g, the black position

will fall apart, so Habu has to rush into an attack that has not been

fully prepared. White has taken the lead in this game.


55.B6h-4f    06:53:00  06:39:00

56.P8e-8f    06:53:00  06:57:00

57.B4fx6d    06:57:00  06:57:00

58.R8b-8d    06:57:00  06:57:00

59.B6d-9a+   06:57:00  06:57:00

60.P7e-7f    06:57:00  07:01:00

61.P5f-5e    07:00:00  07:01:00

62.S5dx5e    07:00:00  07:06:00

63.N7g-6e    07:01:00  07:06:00

64.P7f-7g+   07:01:00  07:06:00

65.L2fx2d    07:02:00  07:06:00

66.P2cx2d    07:02:00  07:06:00

67.P*5d      07:13:00  07:06:00

68.P5cx5d    07:13:00  07:07:00

69.S*5c      07:13:00  07:07:00

70.P1d-1e    07:13:00  07:13:00

71.P1fx1e    07:18:00  07:13:00

72.P*1g      07:18:00  07:13:00

73.L1ix1g    07:29:00  07:13:00

74.+P7gx6g   07:29:00  07:13:00

75.G5hx6g    07:29:00  07:13:00

76.P*6d!     07:29:00  07:15:00

At this stage of the game, taking the time to go for a knight is often bad,

but in this position it shows the confidence Tanigawa has in his position.

He wants to kill the black attack completely. Habu has to sacrifice more

material to keep it going.


77.S5cx4b+   07:34:00  07:15:00

78.G4ax4b    07:34:00  07:15:00

79.N6e-5c+   07:34:00  07:15:00

80.G4bx5c    07:34:00  07:15:00

81.+B9ax8a   07:34:00  07:15:00

82.R8dx8a    07:34:00  07:16:00

83.R9fx9c+   07:34:00  07:16:00


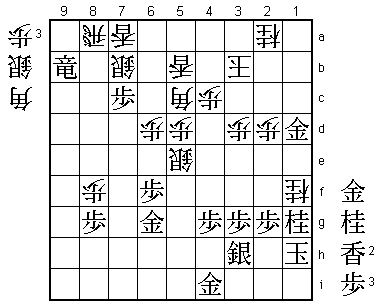
Threatens both +Rx6c and the fork +R9b, but this attack has no real power.

White is winning. It looks like the black king is still well-protected, but

from here on Tanigawa shows his famous "Lightning Speed Endgame Technique".


84.L*5b      07:34:00  07:32:00

85.N*4e      07:35:00  07:32:00

86.N*2e      07:35:00  07:33:00

87.G*1f      07:38:00  07:33:00

88.B3c-4d    07:38:00  07:34:00

89.N4ex5c+   07:48:00  07:34:00

90.B4dx5c    07:48:00  07:34:00

91.+R9c-9b   07:48:00  07:34:00

92.S*7b      07:48:00  07:34:00

93.P*7c      07:48:00  07:34:00

94.L1ax1e    07:48:00  07:40:00

95.G1fx1e    07:48:00  07:40:00

96.N2ex1g+   07:48:00  07:40:00

97.N2ix1g    07:48:00  07:40:00

98.L*1a      07:48:00  07:42:00

99.P*1d      07:54:00  07:42:00

100.L1ax1d   07:54:00  07:42:00

101.G1ex1d   07:54:00  07:42:00

102.N*1f     07:54:00  07:42:00

103.K2h-1h   07:57:00  07:42:00

103.K3i holds out longer, but after 104.Sx6f! Gx6f B*5g G4h Bx1g+ K4i Bx6f+

is a mating threat: N*5g Gx5g (K5i G*6i K5h S*6g; K5h S*6g K5i G*6h) +B3i

Kx3i +Bx5g G*4h S*2h K4i G*3i K5i G*6h. There is no defense and his position

is in complete disarray, so Habu opts to be mated instead.


104.B5cx1g+  07:57:00  07:43:00

105.K1hx1g   07:57:00  07:43:00

106.B*2h     07:57:00  07:43:00

Resigns      07:57:00  07:43:00

Mate after 107.Kx1f S*2e K1e Sx1d Kx1d N*2b or 107.K1h P*1g K2i S*1h. A very

good start of this match by Tanigawa, who needed only one overplay by Habu

to win with the white pieces. Habu drops the opening game of the Oi match

for the third year in a row, which is not a good sign (after all, he lost

the other two matches after that). There is already a lot of pressure on

Habu to win the second game.
