44th Oi Match Game 5
[Black "Habu Yoshiharu, Challenger"]
[White "Tanigawa Koji, Oi"]
[Event "44th Oi-sen, Game 5"]
[Date "September 8th and 9th 2003"]
1.P7g-7f     00:00:00  00:00:00
2.P3c-3d     00:00:00  00:03:00
3.P2g-2f     00:01:00  00:03:00
4.G4a-3b     00:01:00  00:08:00
5.G6i-7h     00:04:00  00:08:00
6.P1c-1d     00:04:00  00:42:00

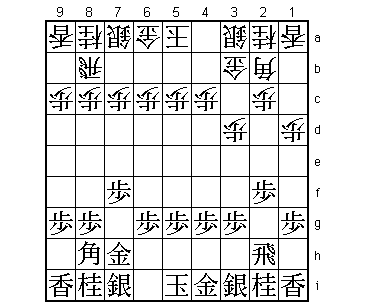
Already a position that has never been played before. This is no surprise,
as white basically gives up another move. That this is not necessarily bad
was shown by Yamasaki against Tanigawa in their Ryu-O challenger tournament
on August 11th. That game started with 1.P7f P3d P2f P1d and became a
Kakugawari game after P2e Bx8h+ Sx8h. In the Kakugawari P1d is a valid
move, and the difference is that because of the loss of a move, white is
no longer forced to enter the Kakugawari with the pawn on 8e. With the
pawn on 8d, white gets more attacking chances and Yamasaki exploited
this difference very well, even though he missed a win in the late endgame.

7.S3i-4h?    00:50:00  00:42:00

If Habu would have played 7.P2e, Tanigawa planned to reply with 8.Bx8h+
Sx8h and play for a development like in his game with Yamasaki. Habu of
course knew this game and decided to play 7.S4h instead. Not good, as he
admitted after the game. After 7.S4h, black can no longer avoid the
exchange of pawns on the 8th file, which is an important opening
advantage for white.

8.P8c-8d     00:50:00  01:01:00
9.P6g-6f     00:54:00  01:01:00
10.P8d-8e    00:54:00  02:03:00
11.B8h-7g    00:55:00  02:03:00
12.S7a-6b    00:55:00  02:03:00
13.G4i-5h    01:05:00  02:03:00
14.P5c-5d    01:05:00  02:04:00
15.S7i-8h    01:37:00  02:04:00
16.B2b-3c    01:37:00  02:07:00
17.K5i-6i    01:50:00  02:07:00
18.S3a-2b    01:50:00  02:09:00
19.G5h-6g    01:58:00  02:09:00
20.B3c-4b    01:58:00  02:15:00
21.B7g-5i    01:58:00  02:15:00
22.P8e-8f    01:58:00  02:19:00
23.P8gx8f    01:58:00  02:19:00
24.B4bx8f    01:58:00  02:19:00
25.N8i-7g    01:58:00  02:19:00
26.B8f-4b    01:58:00  02:35:00
27.P*8g      02:03:00  02:35:00
28.K5a-4a    02:03:00  02:44:00
29.P5g-5f    02:06:00  02:44:00
30.S2b-3c    02:06:00  02:59:00
31.S4h-5g    02:14:00  02:59:00
32.P7c-7d    02:14:00  03:05:00
33.P3g-3f    02:26:00  03:05:00
34.B4b-6d    02:26:00  03:12:00
35.R2h-1h    04:34:00  03:12:00
36.S3c-4d    04:34:00  03:22:00
37.S5g-4f    04:38:00  03:22:00
38.S6b-5c    04:38:00  03:37:00
39.K6i-7i    04:42:00  03:37:00
40.K4a-3a    04:42:00  03:42:00
41.K7i-8i    04:47:00  03:42:00
42.P9c-9d    04:47:00  03:44:00
43.P1g-1f    04:56:00  03:44:00
44.S5c-4b    04:56:00  03:58:00
45.N2i-3g    05:03:00  03:58:00

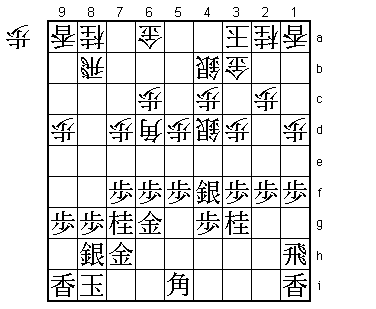
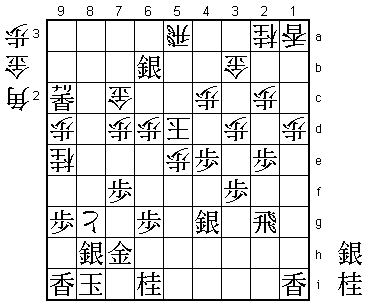
White got more out of the opening than he could have hoped. Tanigawa is
in complete control of the position. 45.N3g is a risky move, but Habu saw
no other alternative.

46.R8b-5b?   05:03:00  04:23:00

Too deep. The obvious 46.P3e would have been better. Then 47.Px3e P*3f
N2e P2d R3h Px2e Px2e P5e Rx3f Px5f Gx5f P7e Px7e P*7f N6e N*7g is
almost forced and gives white an overwhelming position. For example,
K7i Bx4f Rx4f (Px4f S*4g) S*4e and white wins because either a rook or
a gold in hand leads to mate in one. Therefore, after N*7g black must
play Sx7g Px7g+ Gx7g but then S*5h with attack on the bishop and the
threat of Sx4g= next is pretty decisive.

47.N3g-4e    05:07:00  04:23:00
48.R5b-5a    05:07:00  04:40:00
49.B5i-4h    05:41:00  04:40:00
50.P5d-5e    05:41:00  05:36:00
51.P6f-6e    06:00:00  05:36:00
52.B6d-7c    06:00:00  05:39:00
53.P5fx5e    06:19:00  05:39:00
54.S4dx5e    06:19:00  05:39:00
55.S4fx5e    06:20:00  05:39:00
56.R5ax5e    06:20:00  05:52:00
57.N7g-8e    06:21:00  05:52:00
58.B7c-9e    06:21:00  06:04:00
59.S*5f      06:23:00  06:04:00
60.R5e-5a    06:23:00  06:08:00
61.P*5c      06:25:00  06:08:00
62.S*4d      06:25:00  06:17:00
63.P4g-4f    06:46:00  06:17:00
64.P*5e      06:46:00  06:31:00
65.S5f-4g    06:46:00  06:31:00
66.B9e-6b    06:46:00  06:31:00
67.P6e-6d    07:26:00  06:31:00
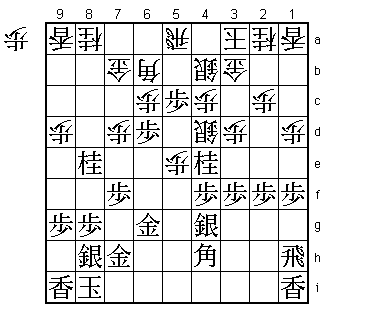
68.G6a-7b?   07:26:00  06:50:00

Here Tanigawa misses another chance to win quickly. Better was the
simple 68.Px6d. For example, 69.P7e P*8d Px7d Px8e P*6c B7a B8d P*7b
Bx5a+ Sx5a R*8c B*9b Rx8e+ B9c R3h N*8b and it is hard to defend against
the double attack Bx7d next. Tanigawa said after the game that he did
not like P*7b and N*8b but admitted that it might have been better
than the variation played in the game.

69.P2f-2e    07:26:00  06:50:00
70.P6cx6d    07:26:00  06:50:00
71.P1f-1e    07:31:00  06:50:00
72.P1dx1e    07:31:00  07:00:00
73.B4hx1e!   07:31:00  07:00:00

The start of the black counter attack. 74.Lx1e fails to 75.Rx1e P*1c P2d
Px2d P*1b.

74.P*1g      07:31:00  07:03:00
75.R1hx1g    07:32:00  07:03:00
76.P*1d      07:32:00  07:03:00
77.B1ex4b+?  07:41:00  07:03:00

A little but too much. 77.B4h was correct.

78.K3ax4b    07:41:00  07:03:00
79.P5c-5b+   07:41:00  07:03:00
80.K4bx5b    07:41:00  07:07:00
81.P*5d      07:41:00  07:07:00
82.K5b-6c    07:41:00  07:08:00
83.S*5c      07:41:00  07:08:00
84.K6cx5d!   07:41:00  07:08:00

A nice king maneuver by Tanigawa. The king looks awkward on 5d, but it
is actually protected quite well and black has no good way to attack it.
White no gets plenty of time to get his own attack going. During the
game, Habu also thought that he was losing after this, but it seems that
things are not so clear yet.

85.S5cx6b+   07:41:00  07:08:00
86.G7bx6b    07:41:00  07:08:00
87.B*8b      07:41:00  07:08:00
88.P*8d      07:41:00  07:09:00
89.B8bx9a+   07:42:00  07:09:00
90.P8dx8e    07:42:00  07:09:00
91.L*8d      07:46:00  07:09:00
92.N8a-9c    07:46:00  07:27:00
93.+B9a-9b   07:47:00  07:27:00
94.B*3i      07:47:00  07:27:00
95.+B9bx9c   07:47:00  07:27:00
96.S4dx4e    07:47:00  07:29:00
97.R1g-2g    07:50:00  07:29:00
98.N*6f      07:50:00  07:31:00
99.G6gx6f    07:51:00  07:31:00
100.B3ix6f+  07:51:00  07:31:00
101.P*6g     07:51:00  07:31:00
102.+B6f-5g  07:51:00  07:33:00
103.N*6i     07:52:00  07:33:00
104.+B5g-4h  07:52:00  07:33:00
105.L8d-8c+  07:52:00  07:33:00
106.+B4hx9c  07:52:00  07:34:00
107.+L8cx9c  07:52:00  07:34:00
108.P8e-8f   07:52:00  07:34:00
109.P4fx4e   07:53:00  07:34:00
110.N*9e     07:53:00  07:34:00
111.B*8d     07:55:00  07:34:00
112.S*7c     07:55:00  07:35:00
113.B8dx7c+  07:55:00  07:35:00
114.G6bx7c   07:55:00  07:35:00
115.S*6b     07:55:00  07:35:00
116.P8fx8g+  07:55:00  07:39:00

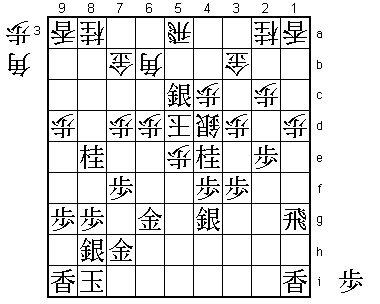
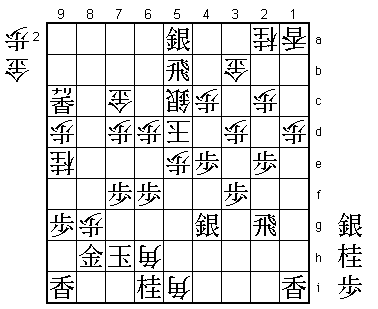
117.S6bx5a=? 07:57:00  07:39:00

This move ends the Oi match. It is unclear if the position after 84.K5d
is better for black than both players thought or if Tanigawa made a
mistake in the moves after that, but Habu had a chance to win the game
here. If he would have played 117.Sx5b+ instead, he might have taken
kept his chances of taking the Oi title from Tanigawa alive. The point
is that after 118.+Px8h Kx8h B*5i (threatens mate with P*8g next) R*5b
S*5c N*6f white has to play K6e because K6c S*5d is a simple mate. If
the silver on 5a is not promoted, white can play K6c with attack on
the rook and there is no mate. After K6e, the defending knight on 6i
enters the attack with N5g! and after Kx7f P*7g K7e S*7f white is no
longer threatening mate and black wins easily. Most professionals would
prefer non-promoting the silver over promoting as it seems to take away
more moves from the white king. However, in this case the defense of the
rook is more important.

118.+P8gx8h  07:57:00  07:40:00
119.G7hx8h   07:57:00  07:40:00
120.B*6h     07:57:00  07:40:00
121.K8i-7h   07:59:00  07:40:00
122.B*5i     07:59:00  07:42:00
123.R*5b     07:59:00  07:42:00
124.S*5c     07:59:00  07:46:00
125.P6g-6f   07:59:00  07:46:00
126.P*8g     07:59:00  07:46:00
Resigns      07:59:00  07:46:00

No defense and no attack (N*4f K6c and black again suffers from the
undefended rook). Habu might have had some chances in this game, but
it was Tanigawa who dictated the pace from the start. His reward is
another Oi title and a new anti-Habu record: it is the first time that
Habu has lost in title matches for two straight years.
