44th Oi Match Game 2
[Black "Tanigawa Koji, Oi"]
[White "Habu Yoshiharu, Challenger"]
[Event "44th Oi-sen, Game 2"]
[Date "July 29th and 30th 2003"]
1.P2g-2f     00:00:00  00:00:00
2.P8c-8d     00:00:00  00:02:00
3.P2f-2e     00:08:00  00:02:00
4.P8d-8e     00:08:00  00:05:00
5.G6i-7h     00:08:00  00:05:00
6.G4a-3b     00:08:00  00:08:00
7.P2e-2d     00:11:00  00:08:00
8.P2cx2d     00:11:00  00:10:00
9.R2hx2d     00:11:00  00:10:00
10.P*2c      00:11:00  00:11:00
11.R2d-2h    00:12:00  00:11:00
12.P8e-8f    00:12:00  00:19:00
13.P8gx8f    00:13:00  00:19:00
14.R8bx8f    00:13:00  00:19:00
15.P*8g      00:14:00  00:19:00
16.R8f-8d    00:14:00  00:19:00
17.S3i-3h    00:20:00  00:19:00
18.P9c-9d    00:20:00  00:34:00
19.P9g-9f    00:26:00  00:34:00
20.P3c-3d    00:26:00  00:45:00
21.S3h-2g    00:39:00  00:45:00

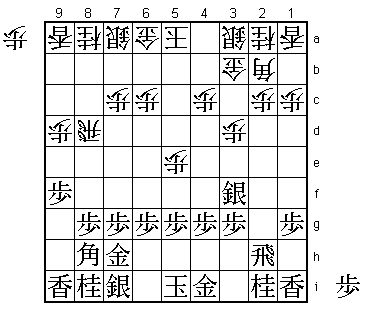
This the 134th meeting between Tanigawa and Habu, but this is the first
time that this opening has been played. The climbing silver attack is
not considered a real threat for white, but it is a very positive way
of playing the opening, which suits Tanigawa's playing style very well.

22.P5c-5d    00:39:00  00:55:00
23.S2g-3f    01:24:00  00:55:00
24.P5d-5e?!  01:24:00  01:01:00

Pushing up this center pawn is Habu's new idea in this opening. Taking
an active position in the center is only a secondary consideration. Habu
actually wanted to know if it was possible to play this opening without
moving the bishop to 3c, thus saving a move. The clear answer from this
game is that this is not the right way to play this position. The
R8e-Yokofudori hybrid makes white overextend himself and Habu soon is
in a lot of trouble.

25.S7i-6h    01:26:00  01:01:00
26.S7a-6b    01:26:00  01:08:00
27.P7g-7f    01:33:00  01:08:00
28.K5a-4a    01:33:00  02:08:00
29.K5i-6i    01:45:00  02:08:00
30.G6a-5a    01:45:00  02:31:00
31.S6h-7g    02:30:00  02:31:00
32.B2b-4d    02:30:00  02:51:00
33.P4g-4f    03:35:00  02:51:00
34.P3d-3e    03:35:00  04:12:00
35.S3f-4g    03:37:00  04:12:00
36.B4d-2b    03:37:00  04:13:00
37.S7g-6f    03:43:00  04:13:00
38.R8d-5d    03:43:00  04:13:00
39.P3g-3f    04:11:00  04:13:00
40.R5d-3d    04:11:00  04:32:00
41.P3fx3e    04:44:00  04:32:00
42.R3dx3e    04:44:00  04:32:00
43.P*2d      04:44:00  04:32:00
44.P2cx2d    04:44:00  04:48:00
45.R2hx2d    04:44:00  04:48:00
46.P7c-7d    04:44:00  04:48:00

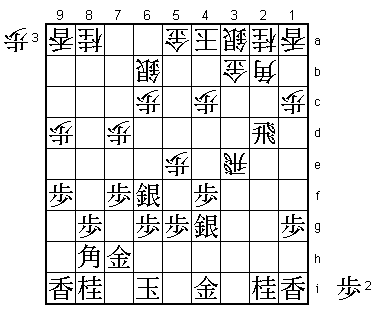
47.P*3f!     05:23:00  04:48:00

Habu didn't pay enough attention to this reply. 47.Rx7d is good for
white after 48.R2e followed by S7c, but after 47.P*3f white has no
good way to continue. Habu planned 48.P*2c here, which gives both
players chances after 49.R2h R3d, but after 49.Px3e Px2d R*8c N7c
P*2h! white has no moves as he has already dropped a pawn on the
second file. On the other hand, black can just pick up the lance on
9a and use that on the 5th file. This attack is very strong. White
can't afford to exchange rooks in this position.

48.R3e-1e    05:23:00  05:07:00
49.R2d-2f    05:54:00  05:07:00
50.P*2c      05:54:00  05:14:00
51.P1g-1f    05:55:00  05:14:00
52.R1e-1d    05:55:00  05:14:00
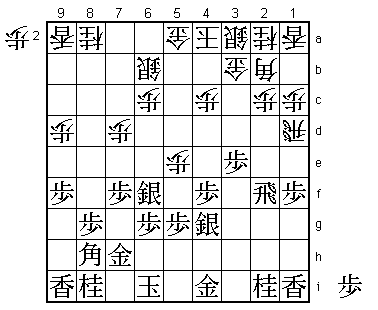
53.P3f-3e!   05:55:00  05:14:00

Typical Tanigawa. Most professionals would have been contend with
moves like 53.G5h, strengthening the center. White can only wait until
the black attack comes, as opening the position is suicidal. Instead,
Tanigawa doesn't hesitate to attack the white position. Attacking is
what he is good at and that is what he is going to do. All through
his career he has taken the calculated risk of his attack backfiring.

54.P7d-7e    05:55:00  05:26:00
55.S4g-3f    05:56:00  05:26:00
56.P7ex7f    05:56:00  06:04:00
57.S3f-2e    05:57:00  06:04:00
58.R1d-7d    05:57:00  06:17:00
59.S2e-3d    06:10:00  06:17:00
60.B2b-4d    06:10:00  06:17:00
61.S3dx2c=   06:15:00  06:17:00

Most shogi players have this painful (or pleasant, depending on which
side of the board your are sitting) experience: a simple breakthrough
on the 2nd file. However, on a professional level this is a rarity.
At this point, Habu was wondering if he would be completely blown away.

62.B4dx3e    06:15:00  06:18:00
63.S2cx3b+   06:50:00  06:18:00
64.K4ax3b    06:50:00  06:18:00
65.G*2c      06:50:00  06:18:00
66.K3b-4b    06:50:00  07:11:00
67.R2f-3f    06:55:00  07:11:00
68.B3e-5c    06:55:00  07:11:00
69.P*2b      06:58:00  07:11:00

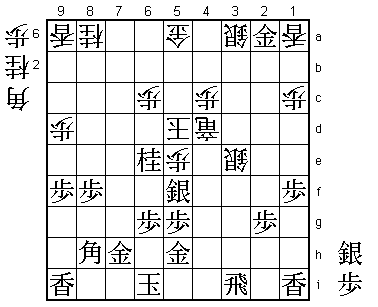
Simply winning material. This game looks almost over.

70.P*8f      06:58:00  07:11:00
71.P8gx8f    07:04:00  07:11:00
72.S*3e      07:04:00  07:18:00
73.R3f-3h    07:06:00  07:18:00
74.S3ax2b    07:06:00  07:22:00
75.S6f-6e    07:10:00  07:22:00
76.P7f-7g+   07:10:00  07:23:00
77.N8ix7g    07:11:00  07:23:00
78.R7d-3d    07:11:00  07:23:00
79.G2cx2b    07:12:00  07:23:00
80.R3d-2d    07:12:00  07:23:00

It seems like Tanigawa has taken this double attack too lightly...

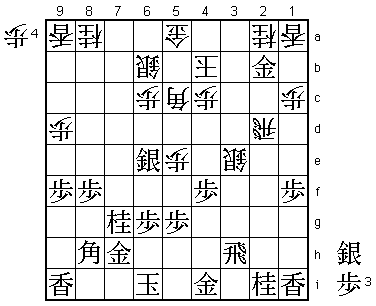
81.S6e-5d!!  07:20:00  07:23:00

Brilliant move. Defend against a double attack by putting yet another
piece at the mercy of the rook. 82.Rx5d fails to 83.N6e B4d S*4e. The
white bishop is tied to the defense of the silver on 3e and has no
freedom of movement.

82.R2dx2i+   07:20:00  07:27:00
83.S5dx5c+   07:20:00  07:27:00
84.S6bx5c    07:20:00  07:27:00
85.B*3a      07:21:00  07:27:00
86.K4b-5b    07:21:00  07:27:00
87.R3h-3i    07:21:00  07:27:00
88.+R2i-2f   07:21:00  07:27:00
89.N7g-6e    07:37:00  07:27:00

All black's pieces are jumping in on the attack.. We are in Tanigawa's
world.

90.S*4b!     07:37:00  07:31:00

Habu takes a final stand. This is the only move that gives him a
prayer. If he can get the white bishop, he might get counter chances
with B*4g.

91.N6ex5c+   07:37:00  07:31:00
92.K5bx5c    07:37:00  07:31:00
93.G2bx2a    07:38:00  07:31:00
94.S4bx3a    07:38:00  07:33:00
95.N*6e      07:39:00  07:33:00
96.K5c-5d    07:39:00  07:42:00
97.P*2g!     07:43:00  07:42:00

Another good move. Tanigawa uses the tie of this rook to the silver on
3e to set up a second wave of attack.

98.+R2fx4f   07:43:00  07:45:00
99.P*4g      07:43:00  07:45:00
100.+R4fx4g  07:43:00  07:45:00
101.G4i-5h   07:43:00  07:45:00
102.+R4g-4d  07:43:00  07:45:00
103.S*5f!!   07:44:00  07:45:00

Another brilliant move to finish this game. White can not take this
silver because of Bx4d. 104.B*2h looks like holding the position together,
but after 105.Sx5e Bx5e+ Bx5e +Rx5e S*5f followed by taking the silver
on 3e and/or 3a leaves white without defense.

104.P*3h     07:44:00  07:50:00

This is more or less the same as resigning.

105.S5fx5e   07:48:00  07:50:00
106.+R4dx5e  07:48:00  07:50:00
107.B8hx5e   07:48:00  07:50:00
108.P3hx3i+  07:48:00  07:50:00
109.R*5c     07:48:00  07:50:00
110.K5d-4e   07:48:00  07:50:00
111.R5cx5a+  07:48:00  07:50:00
112.N*4f     07:48:00  07:55:00
113.S*5f     07:50:00  07:55:00
114.K4e-3f   07:50:00  07:55:00
115.S5f-4g   07:50:00  07:55:00
116.K3f-3g   07:50:00  07:55:00
117.+R5ax3a  07:50:00  07:55:00
Resigns      07:50:00  07:55:00

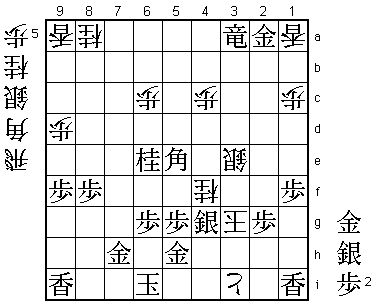
White loses all his pieces, so here Habu resigned. It is impossible to
defend both the silver on 3e and the knight on 4f. There is also no chance
of an entering king, as white is mated after 118.K2h Bx4f. A brilliant
performance by Tanigawa, who couldn't wish for a better start in the
first two games of this match. If this game is an indication of the
form of both players, this will be a very short Oi match with an
unexpected winner.
