43rd Oi Match Game 4
Black: Tanigawa Koji, Challenger
White: Habu Yoshiharu, Oi
43rd Oi-sen, Game 4, August 19th and 20th 2002
1.P7g-7f     00:00:00  00:00:00
2.P8c-8d     00:00:00  00:07:00
3.P2g-2f     00:11:00  00:07:00
4.G4a-3b     00:11:00  00:12:00
5.G6i-7h     00:12:00  00:12:00
6.P8d-8e     00:12:00  00:21:00
7.B8h-7g     00:12:00  00:21:00
8.P3c-3d     00:12:00  00:23:00
9.S7i-8h     00:13:00  00:23:00
10.B2bx7g+   00:13:00  00:28:00
11.S8hx7g    00:14:00  00:28:00
12.S3a-4b    00:14:00  00:28:00
13.S3i-3h    00:19:00  00:28:00
14.S7a-7b    00:19:00  00:31:00
15.P9g-9f    00:27:00  00:31:00
16.P9c-9d    00:27:00  00:36:00
17.P4g-4f    00:34:00  00:36:00
18.P6c-6d    00:34:00  00:44:00
19.S3h-4g    00:41:00  00:44:00
20.S7b-6c    00:41:00  00:49:00
21.K5i-6h    00:44:00  00:49:00
22.P1c-1d    00:44:00  01:15:00
23.P1g-1f    00:46:00  01:15:00
24.K5a-4a    00:46:00  01:17:00
25.K6h-7i    00:58:00  01:17:00
26.K4a-3a    00:58:00  01:20:00
27.G4i-5h    01:05:00  01:20:00
28.S6c-5d    01:05:00  01:29:00
29.P3g-3f    01:22:00  01:29:00
30.G6a-5b    01:22:00  01:39:00
31.S4g-5f    01:36:00  01:39:00
32.P4c-4d    01:36:00  01:41:00
33.P6g-6f    01:46:00  01:41:00
34.P7c-7d    01:46:00  01:52:00
35.N2i-3g    02:00:00  01:52:00
36.N8a-7c    02:00:00  02:43:00
37.P2f-2e    02:22:00  02:43:00
38.S4b-3c    02:22:00  02:47:00

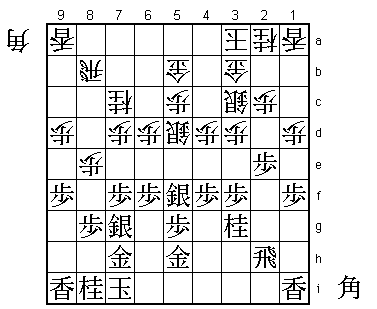
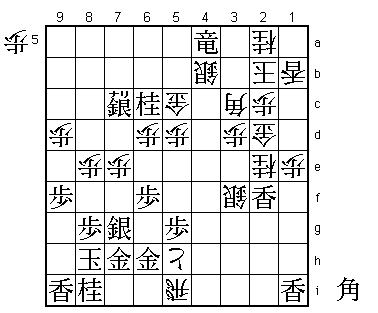
A brave decision by Habu to play the Kakugawari opening when he
is 3-0 down against Tanigawa, who is considered to be almost
unbeatable with this opening. Habu realises that he not only has
to win this game, but also all the other three games in this match
to keep his Oi title. Therefore, winning this fourth game is a
requirement to stay alive, but it would be an important bonus for the
rest of the match if he could win while doing some psychological damage
as well. What better way to make Tanigawa think than to beat him in
his favourite opening? Of course, it would be suicide if Habu would
just plunge in and hope for the best. He has prepared a very
interesting move...

39.P4f-4e    02:57:00  02:47:00
40.P4dx4e    02:57:00  02:50:00
41.P3f-3e    02:57:00  02:50:00
42.S3c-4d    02:57:00  02:59:00
43.P1f-1e    03:06:00  02:59:00
44.P1dx1e    03:06:00  03:03:00
45.P2e-2d    03:07:00  03:03:00
46.P2cx2d    03:07:00  03:04:00
47.P7f-7e    03:07:00  03:04:00
48.P7dx7e    03:07:00  03:19:00
49.R2hx2d    03:08:00  03:19:00
50.P*2c      03:08:00  03:19:00
51.R2d-2i    03:08:00  03:19:00
52.G5b-6c    03:08:00  03:19:00
53.P*1b      04:15:00  03:19:00
54.L1ax1b    04:15:00  03:22:00
55.B*1a      04:16:00  03:22:00
56.S4dx3e    04:16:00  03:55:00
57.S5fx4e    04:21:00  03:55:00
58.B*2b      04:21:00  03:57:00
59.P*3c      05:06:00  03:57:00
60.G3bx3c    05:06:00  04:27:00
61.B1ax2b+   05:06:00  04:27:00
62.K3ax2b    05:06:00  04:27:00
63.S4ex5d    05:06:00  04:27:00
64.P5cx5d    05:06:00  04:27:00
65.N3g-4e    06:16:00  04:27:00
66.G3c-2d!?! 06:16:00  04:37:00

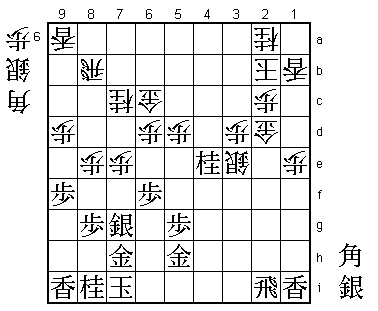
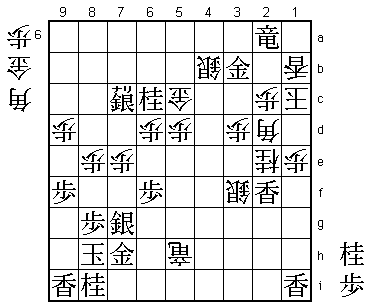
This is Habu's new move. The position here is identical to the
4th game of the Kio match between Habu and Sato. That time Habu
had black and Sato played 66.G3b here. After 67.B*4a Habu won the
game, but it was quite close and he needed a mistake by Sato to
make his attack work. Tanigawa said he had mainly considered
66.G3b 67.S*4c Gx4c B*4a B*1d Lx1e G4b. This is also not such a
clear variation, but it seems that black still has the upper hand.

66.G2d is a move that almost no professional would play. It is bad
shape and allows moves like B*4a and B*4c. It is really a move
without precedent, as according to Fukaura (7-dan), a move like
G2d hadn't even been played in similar positions. Fukaura also
said that at best it would be a move to try in a training game,
but that he would definitely not have the guts to play it at a
big stage like a title match.

67.N4e-5c+?  06:50:00  04:37:00

Tanigawa's surprise at 66.G2d immediately invites a mistake. This
knight is too valuable an attacking piece to just give up. After
this move, the position turns in white's favour. Alternatives that
were studied after the game are 67.B*4a B*7d R4i P*4f (or P*4d) and
67.B*7a R7b Bx3e+ Px3e Rx2d (or S*4d) Px2d S*3d. Both variations
lead to positions that are very hard to judge and it seems almost
certain that this game will be the start of some intense study by
the other professionals.

68.G6cx5c    06:50:00  04:41:00
69.B*7a      06:50:00  04:41:00
70.R8b-5b    06:50:00  04:41:00
71.S*6a      06:50:00  04:41:00
72.R5b-5a    06:50:00  04:42:00
73.B7a-6b+   06:50:00  04:42:00
74.S*4b      06:50:00  04:42:00
75.+B6bx5a   07:07:00  04:42:00
76.S4bx5a    07:07:00  04:42:00
77.R*7a      07:07:00  04:42:00
78.B*3h!     07:07:00  05:31:00

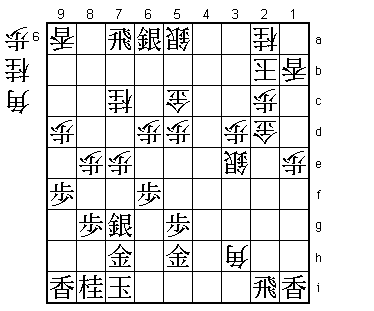
Important. Habu wants to slow the game down to make his pawn
advantage work. He does this by making a promoted bishop and
pulling this bishop back in defence. 78.B*3f looks good, but
after the simple 79.G4h, white has no good continuation.

79.R2i-3i    07:08:00  05:31:00
80.B3h-7d+   07:08:00  05:31:00
81.S6a-7b+   07:09:00  05:31:00
82.+B7d-5b   07:09:00  05:31:00
83.+S7bx7c   07:09:00  05:31:00
84.B*3f      07:09:00  05:49:00
85.G5h-6h    07:17:00  05:49:00
86.P*4g      07:17:00  05:51:00
87.R7ax9a+   07:26:00  05:51:00
88.P4g-4h+   07:26:00  05:51:00
89.R3ix3f    07:27:00  05:51:00
90.S3ex3f    07:27:00  05:51:00
91.K7i-8h    07:27:00  05:51:00
92.R*5i      07:27:00  06:00:00
93.N*6c      07:33:00  06:00:00
94.S5a-4b    07:33:00  06:25:00
95.L*2f?     07:33:00  06:25:00

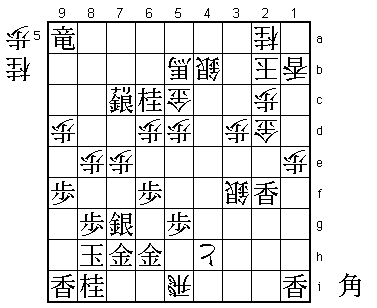
Tanigawa does everything to keep his attack going, but this is a
small but significant mistake. The white king is likely to escape
to 1d at some point and dropping the lance on 2f makes it impossible
to drop a knight there. Better was 95.L*2h. Tanigawa said after
the game that he was worried about Rx1i+ followed by +Rx2h, but
agreed after the game that this was not really something to be
concerned about.

96.N*2e      07:33:00  06:33:00

Or 96.+P5h Lx2d P*4a G6h-6g +Px5g Lx2c+ Kx2c P*2d K3c. "It looks
dangerous, but this was indeed an alternative" (Habu).

97.B*6a      07:34:00  06:33:00
98.+B5bx6a!  07:34:00  06:41:00

Rushing the attack with 98.+P5h would be bad after 99.Bx5b+ Gx5b
+R4a and the gold on 5b is attacked. With only a single bishop,
it is hard to defend against the black attack.

99.+R9ax6a   07:34:00  06:41:00
100.+P4h-5h  07:34:00  06:41:00
101.+R6a-4a  07:35:00  06:41:00
102.B*3c     07:35:00  06:41:00

Attack and defence. This stops the black attack completely. The
knight and silver formation on 6c and 7c is impossible to get into
motion in time.

103.G6h-6g   07:46:00  06:41:00

The only way to attack is 103.B*3b, but after 104.S3a Bx2a+ Kx2a
Gx5h Rx5h+ P*3b K2b black can not get to the white king. The gold
on 2d is perfectly guarding the escape route of the king to 1d.

104.+P5hx5g  07:46:00  06:48:00
105.G6gx5g   07:50:00  06:48:00
106.R5ix5g+  07:50:00  06:48:00
107.B*6h     07:50:00  06:48:00
108.+R5g-5e  07:50:00  07:15:00
109.B6hx2d   07:51:00  07:15:00
110.B3cx2d   07:51:00  07:15:00
111.G*3b     07:51:00  07:15:00
112.K2b-1c   07:51:00  07:15:00
113.+R4ax2a  07:51:00  07:15:00
114.+R5e-5h  07:51:00  07:17:00
Resigns      07:53:00  07:17:00

Black can try something like 115.+R2b, but after 116.K1d +Rx1b
G*1c the attack has died. There is also no defence, as a move
like 115.N*6h is answered by 116.B*4e. It is interesting to note,
that if Tanigawa would have dropped the lance on 2h, then there
would have been a very simple mate here with +R2b K1d N*2f. Of
course this would not actually have happened, but illustrates
that 95.L*2h might have given Habu more problems. So Habu gets
what he wants, a win to keep the match alive and some extra bonus
psychological bonus points by winning with white and beating
Tanigawa in his favourite opening. The rest of the match will
show if this is indeed enough to pull off a miracle. Tanigawa
still needs only one win from three games...
