42nd Oi Match Game 4
Black: Habu Yoshiharu, Oi
White: Yashiki Nobuyuki, Challenger
42nd Oi-sen, Game 4, August 20th and 21st 2001
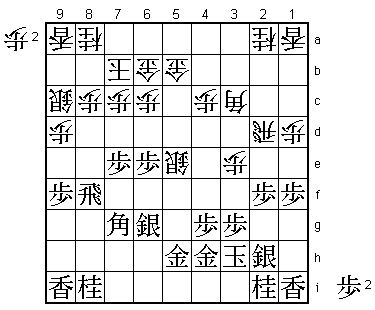
1.P7g-7f 00:00:00 00:00:00
2.P3c-3d 00:00:00 00:03:00
3.P6g-6f 00:02:00 00:03:00
4.S3a-4b 00:02:00 00:11:00
5.S7i-6h 00:06:00 00:11:00
6.P5c-5d 00:06:00 00:13:00
7.S6h-6g 00:10:00 00:13:00
8.S4b-5c 00:10:00 00:16:00
9.B8h-7g 00:17:00 00:16:00
10.B2b-3c 00:17:00 00:23:00
11.R2h-8h 00:26:00 00:23:00
12.R8b-2b 00:26:00 00:32:00
Double ranging rook. Not as rare nowadays as it was about ten
years ago, but still not a very common choice in title matches.
The lack of joseki in this opening actual fits the style of both
players. Habu because a deep understanding of shogi strategy is
vital and Yashiki because ai-furibisha with white is a very active
opening and Yashiki likes to play positively. Both players play the
mukaibishi (opposing rook) which is most common.
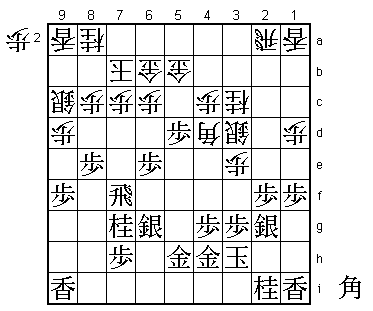
13.P8g-8f 00:34:00 00:32:00
14.K5a-6b 00:34:00 00:33:00
15.P8f-8e 00:46:00 00:33:00
16.K6b-7b 00:46:00 00:35:00
17.K5i-4h 00:46:00 00:35:00
18.P2c-2d 00:46:00 00:35:00
19.K4h-3h 00:46:00 00:35:00
20.P2d-2e 00:46:00 00:35:00
21.G6i-5h 01:03:00 00:35:00
22.G4a-5b 01:03:00 00:37:00
23.P8e-8d 01:43:00 00:37:00
24.P8cx8d 01:43:00 00:37:00
25.R8hx8d 01:43:00 00:37:00
26.P*8c 01:43:00 00:37:00
27.R8d-8f 01:43:00 00:37:00
28.P2e-2f 01:43:00 00:46:00
29.P2gx2f 01:44:00 00:46:00
30.R2bx2f 01:44:00 00:46:00
31.P*2g 01:44:00 00:46:00
32.R2f-2d 01:44:00 00:46:00
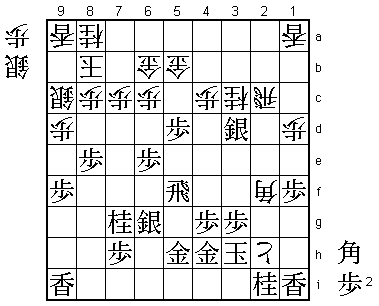
33.P9g-9f 02:03:00 00:46:00
34.P9c-9d 02:03:00 00:55:00
35.P6f-6e 02:14:00 00:55:00
36.P3d-3e 02:14:00 01:43:00
37.P7f-7e 02:15:00 01:43:00
38.P1c-1d 02:15:00 01:56:00
39.P1g-1f 02:18:00 01:56:00
40.S7a-8b 02:18:00 02:01:00
41.S3i-2h 02:22:00 02:01:00
42.G6a-6b 02:22:00 02:06:00
43.G4i-4h 02:23:00 02:06:00
44.P5d-5e 02:23:00 02:58:00
45.P5g-5f 02:57:00 02:58:00
46.S5c-5d 02:57:00 03:09:00
47.P5fx5e 03:16:00 03:09:00
48.S5dx5e 03:16:00 03:10:00
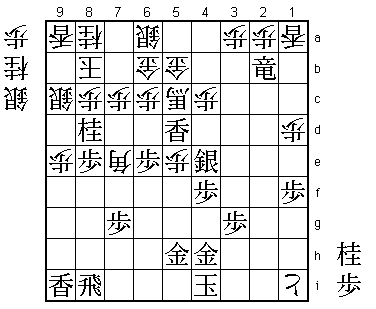
49.P2g-2f? 03:16:00 03:10:00
A mistake. Habu wants to improve his position by putting the silver
on 2g, but he overlooks white's next move. After the game, he said
he should have played 49.S1g here, threatening to move out the silver,
pressuring the white rook.
50.S8b-9c! 03:16:00 03:36:00
Now Yashiki plays this plan instead. If black doesn't do anything, this
silver will move out to 8d and black is in a lot of trouble.
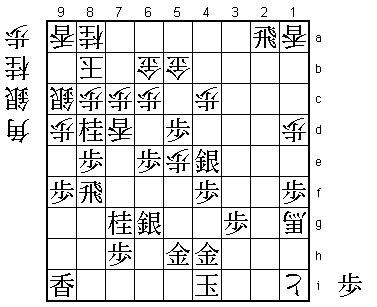
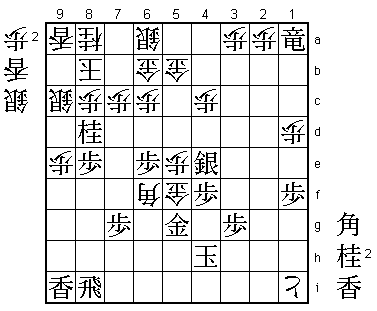
51.P*5f 03:58:00 03:36:00
The sealed move. Habu doesn't want to drop this pawn, but there
weren't many alternatives. For example, 51.P*8e (to stop the silver)
then the counter 52.P8d! is very frightening: After 53.P2e R5d R2f
P*2c P*5f S4d S7f Px8e Sx8e S8d S7f P7d black is in trouble. However,
the move Habu played doesn't give a much better result.
52.S5e-4d 03:58:00 03:38:00
53.S2h-2g 03:58:00 03:38:00
54.S9c-8d 03:58:00 03:48:00
55.B7g-6f 04:00:00 03:48:00
56.S4d-4e 04:00:00 04:07:00
57.P5f-5e 04:32:00 04:07:00
58.S4e-3d 04:32:00 04:47:00
This silver is in a perfect spot, helped by Habu's 51st move P*5f.
White has the upper hand.
59.P*8e 04:50:00 04:47:00
60.S8d-9c 04:50:00 04:47:00
61.B6f-7g 04:50:00 04:47:00
62.B3c-4d 04:50:00 05:17:00
63.R8f-7f 04:58:00 05:17:00
64.N2a-3c 04:58:00 05:27:00
65.P5e-5d 05:25:00 05:27:00
66.B4dx7g+ 05:25:00 05:39:00
67.N8ix7g 05:25:00 05:39:00
68.B*4d 05:25:00 05:49:00
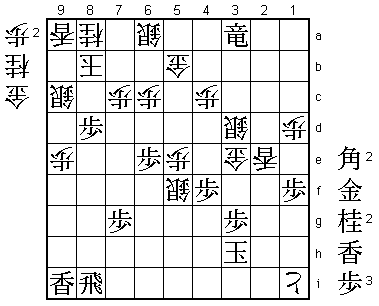
69.P7e-7d? 06:03:00 05:49:00
Habu follows a interesting but strange plan here (see his 75th move).
Objectively better was probably 69.P9e Px9e P7d Px7d Lx9e P*9d P5c+
G5bx5c Rx7d P*7c Rx4d Px4d B*5a and now G4c is followed by P6d and
black has a nice attack even though it might not be enough. "I don't
like this at all" (Yashiki). "In the game I ended up with no moves to
play, so to play a fighting move like that was the only way" (Habu).
70.P7cx7d 06:03:00 05:50:00
71.R7fx7d 06:03:00 05:50:00
72.P*7c 06:03:00 05:50:00
73.R7d-7f 06:03:00 05:50:00
74.R2d-2a 06:03:00 05:58:00
75.P*7h!? 06:34:00 05:58:00
Good or bad, this was the move that surprised everyone. Black drops
the pawn he just exchanged in a very passive way. Some felt that this
type of moves is a sign of Habu's brilliance. It is already preparing
the position for an endgame where the only way to win is to make it
difficult for the opponent. Therefore, 75.P*7h can be considered the
move that has the seed of victory in it.

76.K7b-8b    06:34:00  06:13:00
77.R7f-8f    06:35:00  06:13:00
78.P3e-3f    06:35:00  06:31:00
79.R8fx3f    06:38:00  06:31:00
80.S3d-3e    06:38:00  06:32:00
81.R3f-5f    06:38:00  06:32:00
82.P*2h      06:38:00  06:46:00
83.K3hx2h    06:39:00  06:46:00
84.S3ex2f    06:39:00  06:46:00
85.S2gx2f    06:48:00  06:46:00
86.P*2g      06:48:00  06:46:00
87.K2hx2g    06:48:00  06:46:00
88.B4dx2f    06:48:00  06:46:00
89.K2g-3h    06:48:00  06:46:00
90.P*2g      06:48:00  06:48:00

Those who have trouble breaking into the enemy camp should study the
sequence above. Yashiki has played a textbook example of how to use
pawns to put the opponent's pieces in disarray and finally break
through the defense.

91.P*2c      06:56:00  06:48:00
92.R2ax2c    06:56:00  06:53:00
93.S*3d      06:56:00  06:53:00
94.P2g-2h+   06:56:00  06:56:00
Here white's advantage looks so big that the game might be over soon.
Still, Habu is not ready to give up yet.

95.K3h-4i    06:56:00  06:56:00
96.S*4e      06:56:00  07:00:00
97.S3dx4e    06:56:00  07:00:00
98.N3cx4e    06:56:00  07:02:00
99.S*3d      06:56:00  07:02:00
100.R2c-2d   06:56:00  07:06:00
101.S3dx4e   06:57:00  07:06:00
102.B2f-3e   06:57:00  07:14:00
103.P*2e     06:59:00  07:14:00
104.R2dx2e   06:59:00  07:20:00
105.S4e-3f   07:01:00  07:20:00
106.R2e-2f   07:01:00  07:25:00
107.B*1g!    07:22:00  07:25:00

The first of a sequence of moves to make things difficult for white.
First, Habu wants a rook in hand to get some pressure on the back rank.

108.+P2hx2i  07:22:00  07:29:00
109.B1gx2f   07:22:00  07:29:00
110.B3ex2f   07:22:00  07:29:00
111.S3f-4e   07:22:00  07:29:00
112.B2f-3e   07:22:00  07:33:00
113.P4g-4f   07:22:00  07:33:00
114.P*5e     07:22:00  07:45:00
115.R5f-7f   07:27:00  07:45:00
116.+P2ix1i  07:27:00  07:46:00
117.R*2a     07:31:00  07:46:00
118.L*7d     07:31:00  07:48:00
119.R7f-8f   07:31:00  07:48:00
120.B3e-1g+  07:31:00  07:55:00
121.N*8d!    07:47:00  07:55:00
Habu magic. This knight is not attacking a piece and even though taking
it is very bad, leaving it seems to be perfectly alright. However, with
this knight so close to the king, white now also has things to worry
about.

122.P*3a     07:47:00  07:56:00
123.R2a-2b+  07:49:00  07:56:00
124.S*6a     07:49:00  07:58:00
125.P9f-9e   07:50:00  07:58:00
126.P9dx9e   07:50:00  07:58:00
127.R8f-8i   07:51:00  07:58:00

Habu has created a position where Yashiki can make mistakes and now
waits for what's going to happen. If Yashiki finds a way to win from
here with only 2 minutes left on the clock, there is nothing that can
be done. If Yashiki makes a mistake, Habu's pieces are ready to clean
up. Habu is not looking for truth, he is looking for a way to win.

128.L7dx7g+  07:51:00  07:59:00
129.P7hx7g   07:51:00  07:59:00
130.N*7e     07:51:00  07:59:00
131.S6g-7f   07:53:00  07:59:00
132.B*6f     07:53:00  07:59:00
133.S7fx7e   07:53:00  07:59:00
134.B6fx7e   07:53:00  07:59:00
135.P5d-5c+  07:53:00  07:59:00
136.+B1gx5c  07:53:00  07:59:00
137.L*5d     07:54:00  07:59:00
138.P*2a!    07:54:00  07:59:00
This seems to end all of black's hope. The promoted rook is forced
out of play and without it black's attack is powerless.

139.+R2bx1a  07:56:00  07:59:00
140.N*5f     07:56:00  07:59:00
141.P*5g     07:56:00  07:59:00
142.N5fx4h+  07:56:00  07:59:00
143.K4ix4h   07:56:00  07:59:00
144.+B5cx5d  07:56:00  07:59:00
145.S4ex5d   07:56:00  07:59:00
146.L*5f     07:56:00  07:59:00
147.S5d-4e   07:58:00  07:59:00
148.L5fx5g+  07:58:00  07:59:00
149.G5hx5g   07:58:00  07:59:00
150.G*5f     07:58:00  07:59:00
151.L*6f     07:58:00  07:59:00
152.B7ex6f?  07:58:00  07:59:00
Finally the moment for which Habu has been waiting has come. In
byoyomi Yashiki makes a vital mistake. He could have won here by
playing 152.Gx6f Gx6f Bx6f G*5g Bx7g+. White is then threatening
P5f (attacking the rook on 1a) and if black blocks the diagonal
with a move like N*6f then L*5f is winning for white. Yashiki thought
he saw a way to win, but with only minor pieces the black king has
just enough legs to run away from the threats.

153.S4ex5f   07:58:00  07:59:00
154.B6fx5g+  07:58:00  07:59:00
155.K4hx5g   07:58:00  07:59:00
156.P5ex5f   07:58:00  07:59:00
157.K5gx5f   07:58:00  07:59:00
158.P*5e     07:58:00  07:59:00
159.K5f-4g   07:58:00  07:59:00
160.L*2c     07:58:00  07:59:00
161.P*2e     07:58:00  07:59:00
162.S*5f     07:58:00  07:59:00
163.K4g-3f   07:58:00  07:59:00
164.S*3d     07:58:00  07:59:00
165.G*2f     07:58:00  07:59:00
166.G6b-5c   07:58:00  07:59:00

The only way for white to continue is to bring in another gold. This
weakens the castle and also gives Habu the two moves he needs to bring
the promoted rook on 1a into play. Black wins by one move.

167.+R1ax2a  07:58:00  07:59:00
168.G5c-4d   07:58:00  07:59:00
169.+R2ax3a  07:58:00  07:59:00
170.P8cx8d   07:58:00  07:59:00
171.P8ex8d   07:58:00  07:59:00
172.G*3e     07:58:00  07:59:00
173.G2fx3e   07:58:00  07:59:00
174.G4dx3e   07:58:00  07:59:00
175.K3f-2g   07:58:00  07:59:00
176.L2cx2e   07:58:00  07:59:00
177.K2g-3h   07:58:00  07:59:00
Resigns      07:58:00  07:59:00
There is clearly no mate after G*4g K4i, so Yashiki resigned. It's a
pity for him that he had such a shaky start in this match as his play
seemed to improve during the match. However, because of his bad start,
the match is over before he has a chance to show what he is really
capable of. On the other hand, Habu got his 9th consecutive Oi title
in a very impressive style. There seemed to have been no psychological
impact of losing the Kisei title earlier this month. He might just take
the Ryu-O title instead.