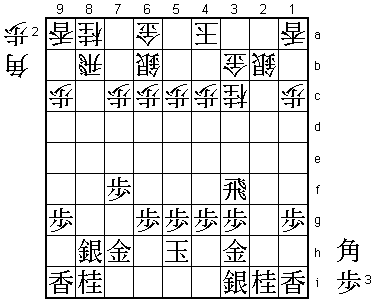
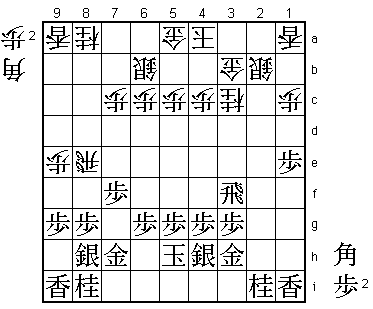
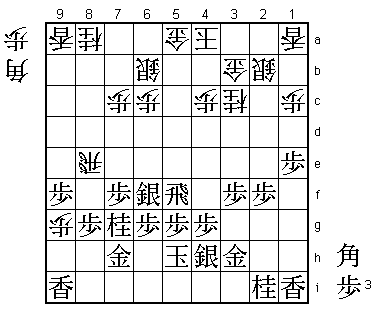
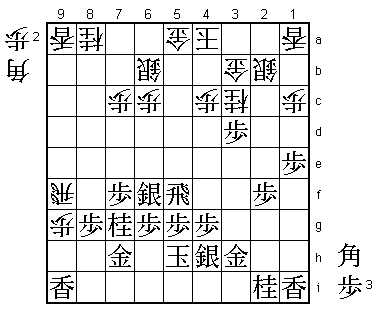
42nd Oi Match Game 2
Black: Habu Yoshiharu, Oi
White: Yashiki Nobuyuki, Challenger
42nd Oi-sen, Game 2, July 31st and August 1st 2001
1.P7g-7f     00:00:00  00:00:00
2.P3c-3d     00:00:00  00:04:00
3.P2g-2f     00:00:00  00:04:00
4.P8c-8d     00:00:00  00:05:00
5.P2f-2e     00:04:00  00:05:00
6.P8d-8e     00:04:00  00:05:00
7.G6i-7h     00:07:00  00:05:00
8.G4a-3b     00:07:00  00:05:00
9.P2e-2d     00:12:00  00:05:00
10.P2cx2d    00:12:00  00:05:00
11.R2hx2d    00:12:00  00:05:00
12.P8e-8f    00:12:00  00:13:00
13.P8gx8f    00:12:00  00:13:00
14.R8bx8f    00:12:00  00:13:00
15.R2dx3d    00:19:00  00:13:00
16.B2b-3c    00:19:00  00:17:00
17.R3d-3f    00:27:00  00:17:00
18.S3a-2b    00:27:00  00:27:00
19.G4i-3h    00:40:00  00:27:00
20.K5a-4a    00:40:00  01:12:00
21.K5i-5h    00:51:00  01:12:00
22.S7a-6b    00:51:00  01:26:00
23.B8hx3c+   01:30:00  01:26:00
24.N2ax3c    01:30:00  01:26:00
25.S7i-8h    01:30:00  01:26:00
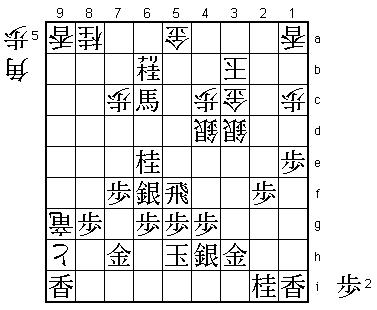
26.R8f-8b?!  01:30:00  01:54:00

The R8e Yokofudori is a dangerous opening, but that also means that one
must play it positively. A small mistake can be deadly, but not playing
it as sharp as possible can be just as bad. If possible, white doesn't
want to pull back the rook to 8b, but having it work sideways by moving
it to 8d. Yashiki thought this was dangerous because of 26.R8d P*2c Gx2c
P*8b Rx8b P*8c R9b (Rx8c B*5f) P7e followed by R8f. This may have been
true, but having to pull back the rook to 8b also is an indication that
there is something wrong with white's position.


27.S3i-4h    01:51:00  01:54:00
28.G6a-5a    01:51:00  02:08:00
29.P1g-1f    02:18:00  02:08:00
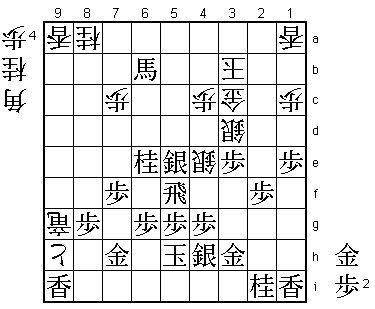
30.P9c-9d?!  02:18:00  02:59:00

An important error of judgment. Both players move their edge pawns up,
but black gets a lot more out of this than white. Furthermore, in doing
so, white misses the opportunity to play P7d, which is a vital move in
this Yokofudori variation. If white can not develop the knight on 8a,
it is very hard to get a good attack going.


31.P*8g      02:35:00  02:59:00
32.P9d-9e    02:35:00  03:16:00
33.P1f-1e    02:53:00  03:16:00
34.R8b-8e    02:53:00  03:53:00

Now white can no longer play P7d, because of the edge attack P1d Px1d
P*1b Lx1b B*5f or because of the risk of having a bishop fork on 5e.
Black has won the opening. Most time during the post-mortem analysis
was spent on 34.R2d here, but after 35.B*8c P*2h Gx2h P*2g G3h B*2h
Gx2h Px2h+ B*3e R3d Bx6b+ Gx6b S*5c Gx5c Rx5c+ G*5b *R5e white has
the move +P3h, but black's attack after B6a+ next seems stronger.


35.R3f-2f    03:51:00  03:53:00
36.P5c-5d    03:51:00  04:25:00

A desperate try to get some attack, but this actually only helps black.


37.S8h-7g    05:17:00  04:25:00
38.P5d-5e    05:17:00  05:21:00
39.S7g-6f    05:25:00  05:21:00
40.P5e-5f    05:25:00  05:35:00
41.R2fx5f    05:25:00  05:35:00
42.R8e-2e    05:25:00  05:42:00
43.P*2f      05:27:00  05:42:00
44.R2e-8e    05:27:00  05:46:00
45.P3g-3f    05:40:00  05:46:00
46.P9e-9f    05:40:00  06:08:00

White has no choice. If he tries to be patient and finally play 46.P7d,
then black gets a strong attack after 47.N7g R8d P3e.


47.P9gx9f    05:41:00  06:08:00
48.P*9g      05:41:00  06:15:00
49.N8i-7g!   05:51:00  06:15:00

A mistake would have been 49.Lx9g B*9h N7g R8b G8h Bx8g+ P*8c Rx8c
P*8d Rx8d P*8e +Bx8h Px8d +Bx9g P8c+ L*5b and white's attack has
succeeded. After R4f G*4e white wins the rook.


50.R8e-8b    05:51:00  06:19:00
51.P3f-3e    06:00:00  06:19:00
52.P*8f      06:00:00  06:30:00
53.P8gx8f    06:05:00  06:30:00
54.R8bx8f    06:05:00  06:32:00
55.P*8g      06:17:00  06:32:00
56.R8fx9f    06:17:00  06:32:00
57.P3e-3d!   06:17:00  06:32:00

Another great move by Habu. The normal way to play here would have
been 57.N3g to bring the knight into the attack, but this gives white
time for P9h+ followed by +Px9i and R9h+, which is dangerous for black.


58.P9g-9h+   06:17:00  06:44:00
59.P3dx3c+   06:20:00  06:44:00
60.S2bx3c    06:20:00  06:44:00
61.P*3d      06:32:00  06:44:00
62.S3cx3d    06:32:00  06:56:00
63.N*5d      06:40:00  06:56:00
64.S6b-5c    06:40:00  07:03:00
65.P*3c      06:52:00  07:03:00
66.G3bx3c    06:52:00  07:04:00
67.N7g-6e    06:52:00  07:04:00
68.S5c-4d    06:52:00  07:18:00
69.B*8e      06:55:00  07:18:00
70.R9f-9g+   06:55:00  07:29:00
71.B8ex6c+   06:55:00  07:29:00
72.K4a-3b    06:55:00  07:29:00
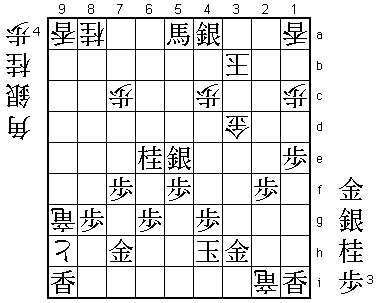
73.N5d-6b+!  07:00:00  07:29:00

Most players would prefer 73.N4b+ Gx4b R5a+ as it saves the rook. However,
Habu doesn't care about the rook. He has judged perfectly that 6b is the
perfect square for the promoted bishop to attack the white king from the
front and the back.


74.G5ax6b    07:00:00  07:31:00
75.+B6cx6b   07:00:00  07:31:00
76.P*5e      07:00:00  07:31:00
77.S6fx5e    07:00:00  07:31:00
78.S4d-4e    07:00:00  07:31:00
79.P*3e      07:02:00  07:31:00

Game over. Black gives up the rook to make his attack unstoppable.

80.S4ex5f    07:02:00  07:32:00
81.P3ex3d    07:02:00  07:32:00
82.G3cx3d    07:02:00  07:32:00
83.P5gx5f    07:02:00  07:32:00
84.P*5g      07:02:00  07:35:00
85.S4hx5g    07:04:00  07:35:00
86.N*4e      07:04:00  07:36:00
87.+B6b-5a   07:12:00  07:36:00
88.N4ex5g+   07:12:00  07:42:00
89.K5hx5g    07:12:00  07:42:00
90.R*5i      07:12:00  07:42:00
91.K5g-4h    07:12:00  07:42:00
92.R5ix2i+   07:12:00  07:42:00
93.S*4a      07:12:00  07:42:00
Resigns      07:12:00  07:42:00

Mate after 94.K2c S*3b K1b G*2c or 94.K2b S*3a Kx3a (K1b G*2b) G*3b.
In the first two games Habu has made Yashiki look quite helpless. If
Yashiki doesn't find some way to get his own game going, this match will
be over in no-time.
