41st Oi Match Game 4
Black: Tanigawa Koji, Challenger
White: Habu Yoshiharu, Oi
41st Oi-sen, Game 4, August 21st and 22nd 2000
1.P7g-7f     1/1       0/0
2.P8c-8d     0/1       3/3
3.P2g-2f     1/2       0/3
4.G4a-3b     0/2       7/10
5.G6i-7h     5/7       0/10
6.P8d-8e     0/7       3/13
7.B8h-7g     2/9       0/13
8.P3c-3d     0/9       0/13
9.S7i-8h     2/11      0/13
10.B2bx7g+   0/11      7/20
11.S8hx7g    0/11      0/20

The first three games of this match saw Habu playing Shikenbisha, so his
choice of opening in this game was a little surprising. However, his strategy
in game 2 was a failure, so trying something else was necessary. Still,
Tanigawa is almost unbeatable in the Kakugawari, so the interesting question
was if Habu had found something new to fight it.

12.S3a-4b    0/11      0/20
13.S3i-3h    2/13      0/20
14.S7a-7b    0/13      1/21
15.P9g-9f    7/20      0/21
16.P9c-9d    0/20      5/26
17.P4g-4f    7/27      0/26
18.P6c-6d    0/27      11/37
19.S3h-4g    3/30      0/37
20.S7b-6c    0/30      2/39
21.K5i-6h    2/32      0/39
22.P1c-1d    0/32      26/65
23.P1g-1f    13/45     0/65
24.G6a-5b    0/45      8/73
25.S4g-5f    19/64     0/73
26.S6c-5d    0/64      6/79
27.G4i-5h    33/97     0/79
28.P6d-6e    0/97      23/102
29.P3g-3f    11/108    0/102
30.K5a-4a    0/108     19/121
31.N2i-3g    3/111     0/121
32.K4a-3a    0/111     11/132
33.K6h-7i    5/116     0/132
34.P4c-4d    0/116     17/149
35.K7i-8h    62/178    0/149
36.K3a-2b    0/178     23/172
37.G5h-4h    15/193    0/172
38.S4b-3c    0/193     40/212
39.R2h-2i    7/200     0/212
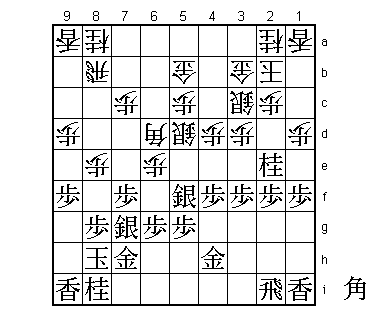
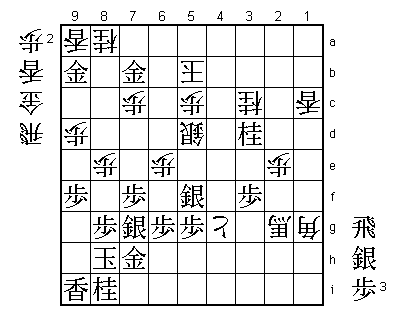
40.B*6d      0/200     20/232

It seems that the P6e pawn push followed by this bishop drop is what Habu
had in mind. He had judged that it would be difficult for Tanigawa to attack.
After 41.G4g P7d followed by N7c, white would get a satisfactory position...

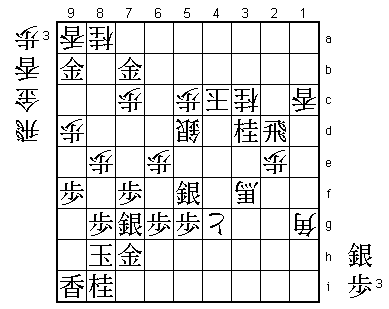
41.N3g-2e!   35/235    0/232

Tanigawa shows that Habu's judgement was wrong. He sacrifices a knight for
a strong (perhaps already decisive) attack.

42.S3c-4b    0/235     30/262

Habu had planned 42.S2d, but here he realized that he would be in trouble
after 43.P4e Px4e P6f. Unfortunately for him, 42.S4b is not much better.

43.P4f-4e    33/268    0/262
44.P2c-2d    0/268     16/278
45.P4ex4d    18/286    0/278
46.P2dx2e    0/286     11/289

This gives black a very strong attacking base on the head of the king, but
if white does not take the knight and plays the quiet move 46.P7d,
the black gets a clear advantage after 47.P1e Px1e P*1c G2c B*4a. Without
the pawn on 7d, white would be able to win this bishop with G5a.

47.P2fx2e    2/288     0/289
48.S4b-3c    0/288     1/290
49.P2e-2d    14/302    0/290
50.S3cx4d    0/302     22/312
51.B*3g      0/302     0/312
52.B6dx3g+   0/302     58/370
53.G4hx3g    0/302     0/370
54.G5b-4b    0/302     0/370
55.P1f-1e    27/329    0/370
56.P1dx1e    0/329     12/382
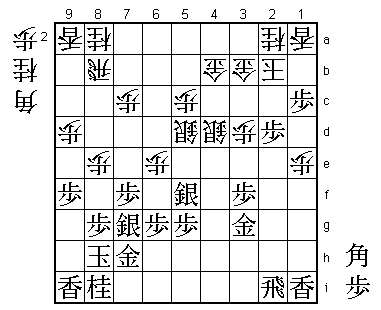
57.P*1c?     31/360    0/382

Natural move, but wrong. Tanigawa could have decided the game very quickly
by 57.B*2c, which white can not answer with 58.G3b-4c, as black wins in
all variation after 59.P*4c: 1) 60.Sx4c P*4e, 2) 60.G4b-4c B4a+ or
3) 60.G3cx4c P*1b.

58.P*2e      0/360     1/383
59.L1ix1e    2/362     0/383
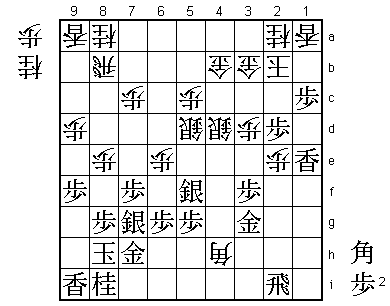
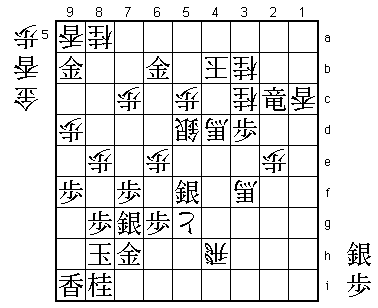
60.B*4h!     0/362     8/391

This is the start of white's counterattack and slows down black's attack as
well. Habu thought that he would lose quickly, but here he suddenly saw a
way to fight for his life.

61.B*4f      54/416    0/391
62.P*4e      0/416     15/406
63.R2i-4i    0/416     0/406
64.P4ex4f    0/416     1/407
65.R4ix4h    0/416     0/407
66.B*5i      0/416     0/407
67.R4h-1h    7/423     0/407
68.B5ix3g+   0/423     8/415
69.P1c-1b+   0/423     0/415
70.K2b-3c    0/423     0/415
71.L1e-1c+   0/423     0/415
72.K3c-4c    0/423     13/428
73.P2d-2c+   1/424     0/428
74.P4f-4g+   0/424     1/429
75.+P2cx3b   1/425     0/429
76.G4bx3b    0/425     0/429
77.R1h-1g    0/425     0/429
78.G*2g      0/425     4/433
79.B*6a      19/444    0/433
80.N*5b      0/444     0/433
81.R1gx2g?!  0/444     0/433

A decision based on probably the only flaw in Tanigawa's game: he hates it
when his opponent can make an entering king. Objectively best would
probably have been 81.R1d +Px5g R2d N1c R2a+ +Px5f. After this, white has
enough safe territory at the head of the king to enter. However, the problem
is that the rook on 8b will is hard to save. In this case, white would
probably not have enough points to finish the game with jishogi.
Habu: "I thought I could enter, but I did not know if I would have
enough points". Tanigawa decides to live or die by his attack. The game
now has become very close and it is completely unclear who will win.

82.+B3gx2g   0/444     0/433
83.+P1b-2b   0/444     0/433
84.G3b-4b    0/444     7/440
85.G*3b      0/444     0/440
86.G4bx3b    0/444     14/454

In the press room it was thought that 86.P*4a was better, but Habu saw that
after 87.Gx4b Px4b G*7b R9b P*4e +Bx3f Bx5b+ Kx5b Px4d the white king would
not be able to escape.

87.+P2bx3b   0/444     0/454
88.K4cx3b    0/444     0/454
89.G*7b      0/444     0/454
90.R8b-9b    0/444     0/454
91.B6ax5b+   3/447     0/454
92.L1ax1c    0/447     0/454
93.+B5bx3d   12/459    0/454
94.G*4c      0/459     3/457
95.G*2c      0/459     0/457
96.K3b-4b    0/459     4/461
97.+B3d-2d   0/459     0/461
98.G4c-3c    0/459     2/463
99.N*3d      9/468     0/463
100.K4b-5b   0/468     1/464
101.G2cx3c   0/468     0/464
102.S4dx3c   0/468     0/464
103.+B2dx3c  0/468     0/464
104.N2ax3c   0/468     1/465
105.G*8c     0/468     0/465
106.B*1g!    0/468     9/474

Great defence.

107.G8cx9b?  8/476     0/474

Better would have been to close the escape route up the board with 107.P*4d
Bx4d+ and only then 109.Gx9b and after +Bx3d S*3b black might still have the
edge.

108.K5b-4c   0/476     0/474
109.R*2d     0/476     0/474
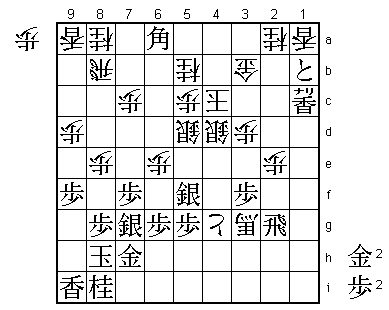
110.+B2gx3f? 0/476     2/476

A rare endgame mistake by Habu. If he would have played 110.K4d then after
111.N4b+ G*3d! he would have won. Habu said he had only looked at 112.P*3d,
which loses after P*4e Nx4e R2c+.

111.N3d-4b+  0/476     0/476
112.K4cx4b   0/476     0/476
113.P*4d     0/476     0/476
114.N*3b     0/476     0/476
115.R2d-2c+  1/477     0/476
116.B1gx4d+  0/477     0/476
117.G7b-6b   0/477     0/476
118.+P4gx5g  0/477     2/478
119.P*3d     0/477     0/478
120.R*4h?    0/477     0/478

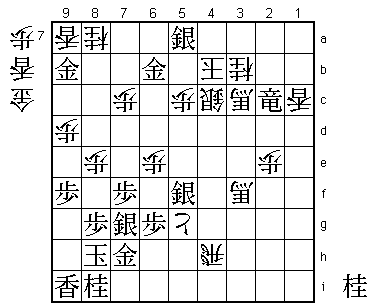
Attack and defence and therefore a natural looking move. However, this is
the losing move. Habu could still have made things very difficult with
120.+B6i. If black than plays the same variation as in the game, white can
still win with +Bx7h in the end.

121.P*4c     0/477     0/478
122.S5dx4c   0/477     0/478
123.P3dx3c+  0/477     0/478
124.+B4dx3c  0/477     0/478
125.S*5a     0/477     0/478
Resigns      0/477     1/479
Time:        07:57:00  07:59:00

After 126.K3a +Rx3c white has no mate and no defence. A very exciting game
that could have been over very quickly. Habu showed some uncharacteristic
mistakes in the endgame that gave Tanigawa the chance to win. Maybe the hard
schedule that Habu has had so far in this season is taking its toll.
