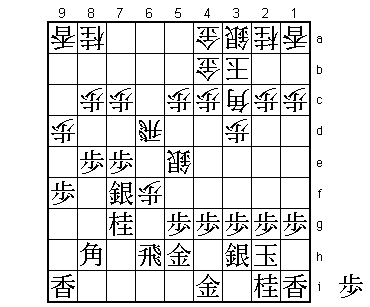
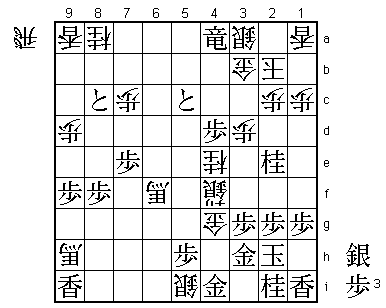
41st Oi Match Game 3
Black: Habu Yoshiharu, Oi
White: Tanigawa Koji, Challenger
41st Oi-sen, Game 3, August 8th and 9th 2000
1.P7g-7f 0/0 0/0
2.P3c-3d 0/0 1/1
3.P6g-6f 1/1 0/1
4.S7a-6b 0/1 18/19
5.S7i-7h 8/9 0/19
6.P6c-6d 0/9 24/43
7.R2h-6h 13/22 0/43
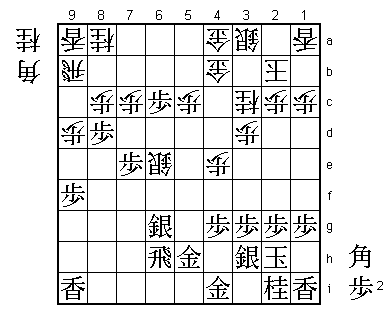
It seems like Habu is determined to play Furibisha in this match. The first
game was a Ai-Furibisha, the second game Habu played Shikenbisha with white
and this game he plays Shikenbisha with black.
8.S6b-6c 0/22 1/44
9.S7h-6g 0/22 0/44
10.K5a-4b 0/22 3/47
11.K5i-4h 21/43 0/47
12.K4b-3b 0/43 2/49
13.K4h-3h 3/46 0/49
14.S6c-5d 0/46 1/50
This early attack against the Shikenbisha is not often seen in professional
shogi. Tanigawa has prepared this at home.
15.P7f-7e 24/70 0/50
The standard attack is P7d~N7c~N8e~P6e. 15.P7e makes this attack impossible.
16.R8b-6b 0/70 11/61
17.G6i-5h 27/97 0/61
18.P6d-6e 0/97 46/107
This looks more dangerous than it actually is. Without the knight, this attack
is not so strong.
19.K3h-2h 55/152 0/107
20.P6ex6f 0/152 15/122
21.B8hx6f 10/162 0/122
22.S5d-5e 0/162 51/173
23.B6f-8h 45/207 0/173
24.P*6f 0/207 16/189
A scary looking attacking base, but this game shows that this pawn is too
weak and in danger of being captured without playing a role in attack.
25.S6g-7f 8/215 0/189
26.R6b-6d 0/215 2/191
27.S3i-3h 18/233 0/191
28.G6a-5b 0/233 14/205
29.P9g-9f 22/255 0/205
30.P9c-9d 0/255 8/213
31.P8g-8f 8/263 0/213
32.B2b-3c 0/263 15/228
33.P8f-8e 20/283 0/228
34.G5b-4b 0/283 10/238
35.N8i-7g! 16/299 0/238
This move shows the weakness of the pawn on 6f. The threat is 35.S6e R6b P5f
S6d S7f followed by P*6e and the capture of the pawn on 6f. If this plan
would succeed, white would lose quickly.
36.R6d-6b 0/299 45/283
37.N7g-6e!? 27/326 0/283
Positive play. Habu sacrifices a knight for positional advantage. Still,
things are not very clear...
38.K3b-2b 0/326 24/307
39.P5g-5f 7/333 0/307
40.S5ex5f 0/333 3/310
41.B8hx6f 3/336 0/310
42.P4c-4d 0/336 3/313
43.B6f-3i 9/345 0/313
44.P4d-4e 0/345 27/340
45.B3i-6f 17/362 0/340
46.P*6g 0/362 33/373
47.B6fx3c+ 3/365 0/373
48.N2ax3c 0/365 0/373
49.S7fx6g 2/367 0/373
50.S5fx6e 0/367 7/380
51.P*6c 0/367 0/380
52.R6b-9b 0/367 11/391
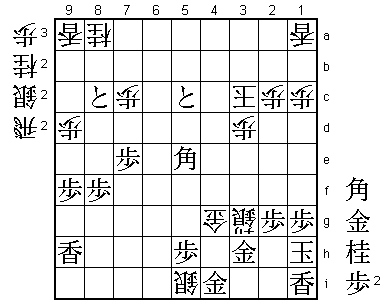
53.P8e-8d 26/393 0/391
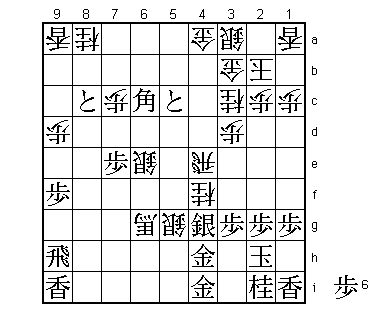
Here black seems to be in complete control, despite being a knight down.
However, the next move shows that the knight sacrifice is a little suspect.

54.G4b-3b!   0/393     8/399

Great move. Tanigawa ignores the promotion of the pawn and reactivates his
rook, going straight for Habu's king. After 54.Px8d, black would get a big
advantage after 55.B*8c. After taking the rook, P6b+ is a very fast attack.

55.P8dx8c+   6/399     0/399
56.R9b-4b    0/399     0/399
57.P6c-6b+   0/399     0/399
58.P4e-4f    0/399     12/411
59.P4gx4f    5/404     0/411
60.N*5d      0/404     5/416
61.G5h-4h    7/411     0/416
62.N5dx4f    0/411     0/416
63.S3h-4g    1/412     0/416
64.B*7g      0/412     3/419
65.R6h-9h    17/429    0/419
66.P*6f      0/429     15/434
67.S6g-7h    2/431     0/434
68.B7g-6h+   0/431     0/434
69.+P6b-6c   4/435     0/434
70.P6f-6g+   0/435     5/439
71.S7hx6g    1/436     0/439
72.+B6hx6g   0/436     0/439
73.+P6cx5c   0/436     0/439
74.R4b-4e    0/436     9/448
75.B*6c      1/437     0/448
76.S*5g      0/437     5/453
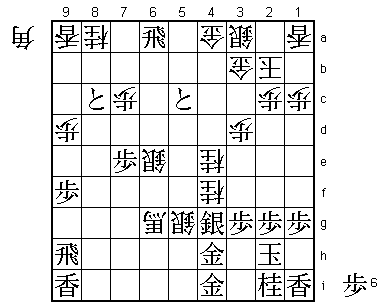
Black is in deep trouble. He is actually a knight and a silver down at the
moment, while the white king is much safer than the black one. In the press
room the general opinion was that Tanigawa was winning.

77.B6cx4e+?  8/445     0/453

This makes matters worse. Better was 77.P*4c. If then 78.G5a Bx4e+ Nx4e P4b+
is good for black. If 78.Sx4h+ Gx4h S5f Sx4f Rx4f Bx4a+ there is the strange
situation that even though black is not threatening mate, he only needs one
more piece. Therefore, white needs to find an attack that wins without giving
up that extra piece in the process. This is unexpectedly hard. Habu should
have played this line as it gave him the best chances to survive.

78.N3cx4e    0/445     0/453
79.R*6a      1/446     0/453
80.B*8e??    0/446     7/460

A blunder that turns the game around. Tanigawa could have won here after
the simple 80.Sx4h+ Gx4h N5g+ Rx4a+ +Nx4g. This threatens mate after B*3i
Kx3i G*3h Gx3h +B5g etc. Also, Gx5g B*3i Kx3i G*3h leads to mate.

81.P*5h      2/448     0/460
82.S6e-5f    0/448     4/464
83.S4gx4f    1/449     0/464
84.S5gx4f+   0/449     0/464
85.P*8f      1/450     0/464
86.B8e-7f    0/450     3/467
87.R6ax4a+   1/451     0/467

Suddenly black's attack is very strong, while white's attack is too slow.

88.S5f-4g+   0/451     0/467
89.G*3h      3/454     0/467
90.+S4gx3h   0/454     0/467
91.G4ix3h    0/454     0/467
92.S*5i      0/454     0/467
93.G4h-4i    16/470    0/467
94.G*4g      0/470     1/468
95.N*2e      1/471     0/468
96.+B6g-6f   0/471     3/471
97.P*4d      5/476     0/471
98.B7fx9h+   0/476     2/473
For a moment, the professionals in the press room thought that Habu had
blundered. This looks like a brilliant move. If black would be given time
to take the gold on 4g, white would be mated after S*3c K1b (Gx3c +Rx3a etc.)
+Rx3b Bx3b G*2b etc. However, after 98.B9h+, white can take on 3b with a
promoted bishop instead of an unpromoted bishop, so there is no mate.
If black takes the bishop (99.Lx9h) then 100.+Sx3g leads to mate after
both 101.K1h R*2h Gx2h +Sx2h Kx2h +B5e and 101.Nx3g Nx3g+ Gx3g Gx3g Kx3g
N*4e. Defending a mate by taking a rook and at the same time threatening
mate oneself is usually enough to win...

99.K2h-1h!   0/476     0/473

This shows that Habu has seen it all. White can no longer make a mating
threat without giving black the pieces he needs. The amazing thing is
that Habu played this move without thinking. He must have seen that this
much earlier.

100.N4ex3g+  0/476     3/476

This is not a mating threat, but after 100.+Sx3g Nx3g Nx3g+ Gx3g Gx3g N*1d
white is mated.

101.L9ix9h   0/476     0/476
102.+B6fx4d  0/476     3/479
103.P*3c     1/477     0/479
104.+B4dx3c  0/477     0/479
105.N2ex3c+  0/477     0/479
106.G3bx3c   0/477     0/479
107.N2ix3g   0/477     0/479
108.+S4fx3g  0/477     0/479
109.+R4ax3a  1/478     0/479
110.K2bx3a   0/478     0/479
111.S*4b     0/478     0/479
112.K3a-2a   0/478     0/479
113.S*2b     0/478     0/479
114.K2ax2b   0/478     0/479
115.S4bx3c=  0/478     0/479
116.K2bx3c   0/478     0/479
117.B*5e     0/478     0/479
Resigns      0/478     0/479
Time:        07:58:00  07:59:00
Mate after B*4b if white drops a piece on 4d, or after 118.K2d B*3c. Again
Habu manages to snatch victory from the jaws of defeat. Tanigawa must be
disappointed, but he is only 2-1 behind, so he needs to fire himself up
for the vital fourth game.