40th Oi Match Game 4
Black: Habu Yoshiharu, Oi
White: Tanigawa Koji, Challenger
40th Oi-sen, Game 4, August 17th and 18th 1999
1.P7g-7f           2/2          0/0
2.P3c-3d           0/2          4/4
3.P6g-6f           2/4          0/4

With 3-0 down and the white pieces, everyone in the press room was discussing
what strategy Tanigawa would pick. All other games thus far were played with
the fashionable Yokofudori opening and most votes went to this opening again.
However, this 3rd move surprised everyone, including Tanigawa. Habu very
rarely plays the Furibisha with black.

4.R8b-3b           0/4          17/21

Tanigawa takes 17 minutes to recover and decide what to do. He probably wanted
to play Furibisha to begin with, so he plays it anyway. Now the game becomes
a Ai-Furibisha game. Double Ranging Rook was a very rare opening about 15
years ago, but recently there are many strong young players who only play
Furibisha, so the Ai-Furibisha is not so uncommon anymore. However, Habu
and Tanigawa have played 95 games together and this is their first game with
this opening. Habu seems to have psyched out his opponent: "I was aiming for
Ai-Furibisha".

5.S7i-6h           11/15        0/21
6.P3d-3e           0/15         9/30
7.S6h-6g           11/26        0/30
8.K5a-6b           0/26         3/33
9.B8h-7g           7/33         0/33
10.K6b-7b          0/33         7/40
11.R2h-8h          4/37         0/40
12.P3e-3f          0/37         13/53
13.P3gx3f          11/48        0/53
14.R3bx3f          0/48         0/53
15.S3i-2h          6/54         0/53
16.P1c-1d          0/54         3/56
17.P1g-1f          16/70        0/56
18.G4a-5b          0/70         14/70
19.K5i-4h          12/82        0/70
20.S3a-4b          0/82         17/87
21.G6i-5h          6/88         0/87
22.S4b-3c          0/88         38/125
23.P6f-6e          35/123       0/125
24.S3c-4d          0/123        3/128
25.P8g-8f          18/141       0/128
26.R3f-3d          0/141        19/147
27.P*3g            8/149        0/147
28.N2a-3c          0/149        46/193
29.P8f-8e          18/167       0/193
30.S4d-3e          0/167        2/195

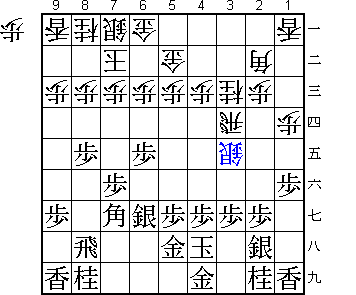
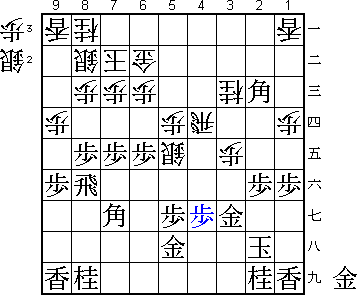
Despite being better prepared for the opening than Tanigawa, Habu has not
managed to get any advantage. On the contrary, with 30.S3e, Tanigawa has
managed to build an attacking formation without allowing Habu a pawn in
hand. Tanigawa was quite happy with his position here.

31.K4h-3h          1/168        0/195
32.G6a-6b          0/168        20/215
33.G4i-4h          20/188       0/215
34.S7a-8b          0/188        11/226
35.P7f-7e          51/239       0/226
36.P9c-9d          0/239        17/243
37.P9g-9f          13/252       0/243
38.P2c-2d          0/252        31/274
39.S6g-5f          23/275       0/274
40.P2d-2e          0/275        49/323
41.R8h-8f          16/291       0/323

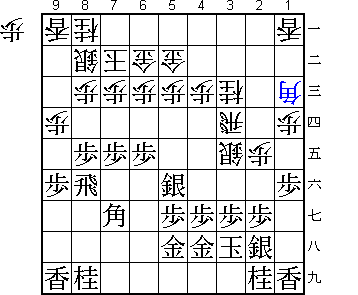
Painfully making clear black's opening failure. The normal way for this rook
to end up on 8f is after the exchange P8d Px8d Rx8d P*8c R8f. Tanigawa has
not allowed this, so Habu has to play the rook to 8f without gaining a pawn
in hand.

42.B2b-1c          0/291        14/337

43.S5f-5e          44/335       0/337

Black will have considered the violent 43.P1e Px1e Lx1e P*1d Lx1d Rx1d Bx3c+,
but after B2d +B2c R1h+ the difference between both attacking silvers is too
big and white has the advantage.

44.B1c-2d          0/335        23/360
45.R8f-7f          41/376       0/360
46.P5c-5d          0/376        28/388
47.S5e-4f          1/377        0/388

No choice. After 47.S6f, white easily improves his position by P2f Px2f Sx2f
and he gets another free pawn in hand. Habu decided to play aggressively and
see if he can weather the storm.

48.S3ex4f          0/377        17/405
49.P4gx4f          0/377        0/405
50.R3d-3e          0/377        0/405
51.R7f-6f          22/399       0/405
52.P4c-4d          0/399        2/407
53.G4h-4g          6/405        0/407
54.P4d-4e?         0/405        2/409

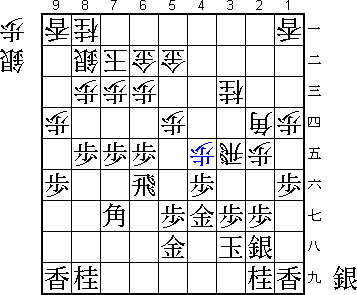
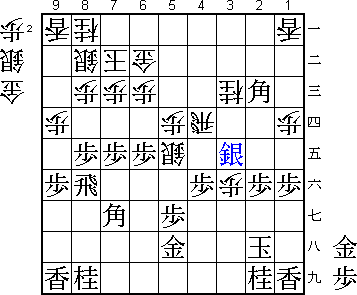
A very natural move, but a mistake. In the postmortem it was concluded that
54.S*5e R8f P4e P3f R3d S*3e Px4f was better for white after both 1) Gx4f
Sx4f Rx4f G*4e and 2) Sx3d Px4g+ Gx4g P*4f G4h G*4g. These variations are
not easy, but it seems that white has better winning chances than in the
game.

55.P3g-3f          4/409        0/409
56.R3e-3d          0/409        0/409
57.S*3e            6/415        0/409
58.B2dx3e          0/415        2/411
59.P3fx3e          0/415        0/411
60.R3dx3e          0/415        0/411
61.S2h-3g          0/415        0/411
62.S*5e            0/415        3/414

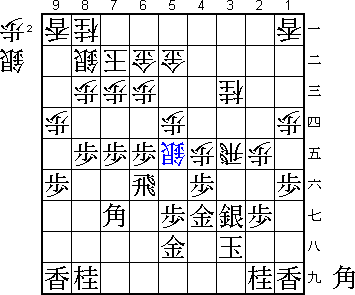
White's position looks very good here, but in reality it is very difficult
to continue his attack.

63.R6f-8f          3/418        0/414
64.P4ex4f          0/418        23/437
65.G4g-3f          2/420        0/437
66.R3e-3d          0/420        0/437
67.B*2c            2/422        0/437
68.R3d-4d          0/422        0/437
69.S3gx4f          2/424        0/437
70.P2e-2f          0/424        5/442
71.P2gx2f          6/430        0/442
72.P*3e            0/430        0/442
73.G3f-3g          8/438        0/442
74.P*2h            0/438        2/444
75.S4fx3e          19/457       0/444
76.R4d-4b          0/457        8/452
77.P*4c            2/459        0/452
78.G5bx4c          0/459        0/452
79.K3hx2h          0/459        0/452
80.P*3d            0/459        0/452
81.P*4d            1/460        0/452
82.P3dx3e          0/460        2/454
83.P4dx4c+         0/460        0/454
84.R4bx4c          0/460        0/454
85.P*4d!           0/460        0/454

With 85.P*4g black could save himself a pawn, keeping one in hand. However,
this fails to 86.N4e with attack on gold and bishop.

86.R4cx4d          0/460        0/454
87.P*4g            0/460        0/454

88.P*4f?           0/460        7/461

The losing move. Habu feared 88.S*6f Rx6f (Bx6f Sx6f Rx6f P*2g is bad after
both Gx2g B*5e and Kx2g B*4i) Sx6f Bx6f S*3i Kx3i R*6i S*4i Rx6f+ and P3f
next is very strong.

89.P4gx4f          2/462        0/461
90.S*3f            0/462        2/463
91.G3gx3f          1/463        0/463
92.P3ex3f          0/463        0/463
93.S*3e            0/463        0/463

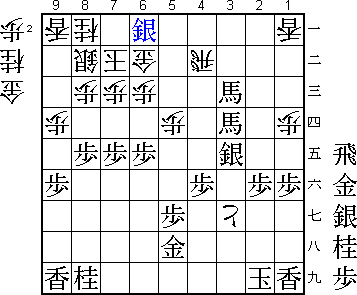
Attacking the rook and defending 4f. This kills white's attack and now black
easily wins in the counter attack.

94.R4d-4b          0/463        2/465
95.B2c-3d+         1/464        0/465
96.S*6f            0/464        2/467
97.R8fx6f          2/466        0/467
98.S5ex6f          0/466        5/472
99.B7gx6f          0/466        0/472
100.R*6i           0/466        0/472
101.B6fx3c+        2/468        0/472
102.R6ix2i+        0/468        1/473
103.K2hx2i         0/468        0/473
104.P3f-3g+        0/468        0/473
105.S*6a           0/468        0/473
Resigns            0/468        0/473
Time:              07:48:00     07:53:00

Mate after both K7a G*7b and Gx6a N*6d Px6d G*6c Kx6c R*5c Kx5c +Bx4b Kx4b
R*4c.

A surprisingly one-sided match with Habu getting his 7th Oi title in straight
games. Considering that Tanigawa came into the match in brilliant form with
a fresh Kisei title under his belt, it is amazing that Habu (who had not won
a game all season) had such an easy time. Habu again shows his remarkable
capacity of playing well when the pressure is the highest. The quality of
a true champion.
