40th Oi Match Game 2
Black: Habu Yoshiharu, Oi
White: Tanigawa Koji, Challenger
40th Oi-sen, Game 2, July 22nd and 23rd 1999
1.P7g-7f           1/1          0/0
2.P3c-3d           0/1          4/4
3.P2g-2f           1/2          0/4
4.P8c-8d           0/2          1/5
5.P2f-2e           7/9          0/5
6.P8d-8e           0/9          0/5
7.G6i-7h           2/11         0/5
8.G4a-3b           0/11         0/5
9.P2e-2d           9/20         0/5
10.P2cx2d          0/20         0/5
11.R2hx2d          0/20         0/5
12.P8e-8f          0/20         3/8
13.P8gx8f          2/22         0/8
14.R8bx8f          0/22         0/8
15.R2dx3d          6/28         0/8
16.B2b-3c          0/28         1/9
17.R3d-3f          27/55        0/9
18.S3a-2b          0/55         7/16
19.P*8g            10/65        0/16
20.R8f-8e          0/65         5/21
21.R3f-2f          2/67         0/21
22.K5a-4a          0/67         8/29
23.K5i-5h          22/89        0/29

Recently, the main debate about the best way for black to fight the R8e
Yokofudori is about the placement of the king. In game 1 Tanigawa chose
K6h, while Habu selects K5h here. The difference is very subtle.

24.S7a-6b          0/89         14/43
25.S3i-3h          1/90         0/43
26.G6a-5a          0/90         7/50
27.P3g-3f          7/97         0/50
28.P7c-7d          0/97         51/101
29.N2i-3g          42/139       0/101
30.N8a-7c          0/139        9/110
31.G4i-4h          27/166       0/110

There are more game examples with the S4h-G3h shape, which somehow seems
more natural. However, whether it is really better than G4h-S3h played
here is hard to say. Maybe it is just a question of taste.

32.P*8f            0/166        54/164
33.P8gx8f          56/222       0/164
34.R8ex8f          0/222        0/164
35.P3f-3e          1/223        0/164
36.P*2e            0/223        40/204
37.R2f-2i          14/237       0/204
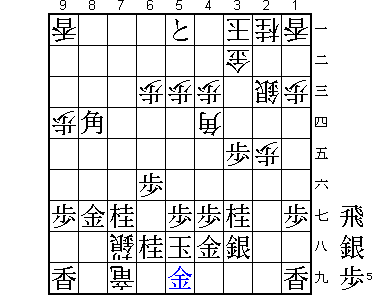
38.B3cx8h+         0/237        20/224

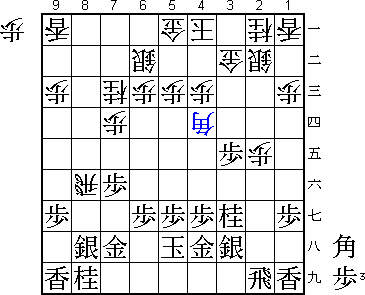
This was the last move of the first day. Only 38 moves, but both players
have finished the development of their pieces. In the press room it was
expected that the fighting would soon commence.

39.S7ix8h          5/242        0/224
40.B*4d?!          0/242        58/282

Probably a change of plan. Habu expected 40.Rx7f S7g R2f and if now S*2g,
then Rx2g+ Rx2g S*2f R2i P*3f N4e P3g+ G4i B*3f is very good for white.
However, if black plays P*2g after R2f, then R3f B*4e Rx3e P*3f Rx4e
Nx4e and it is hard for white to find a good continuation. It is almost
never good to have to change the plan, but in this case it is not a big
problem.

41.S8h-7g          55/297       0/282
42.R8f-8e          0/297        2/284
43.S7g-6f          2/299        0/284
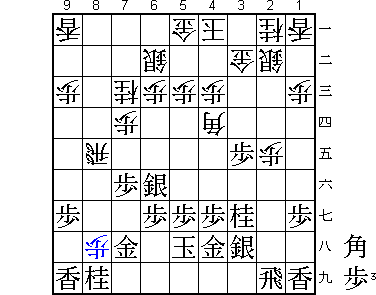
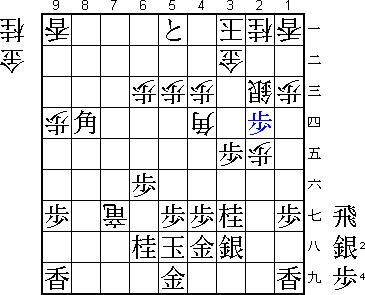
44.P*8h?           0/299        45/329

A big mistake that suddenly ends the game. Tanigawa overlooks a very important
black counter that leaves him virtually defenceless. Necessary was 44.P2f
and then after 45.N7g R8f P7e N8e P*8g Nx7g+ Sx7g R8e white has managed
to exchange the knight and there is still everything to play for.

45.N8i-7g          21/320       0/329
46.R8e-8f          0/320        0/329
47.P7f-7e          39/359       0/329
48.P8h-8i+         0/359        3/332
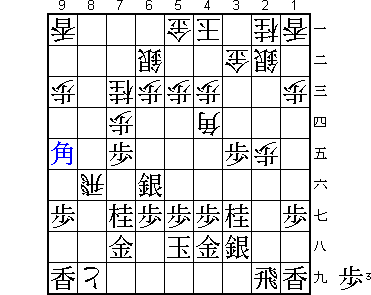
49.B*9e!           6/365        0/332

The move Tanigawa missed. He was counting on 49.P*8g which is alright for
white. However, 49.B*9e is much stronger. For example, 50.+P8h Bx8f +Px7h
Px7d +Px7g Bx7g N8e B9e and P7c+ next is very fast. Or 50.R8c Px7d P9d
Px7c+ Sx7c N*7e R9c N8e and black wins.

50.R8f-7f          0/365        52/384
51.R2ix8i          21/386       0/384

Very painful. White has to give up the promoted pawn that took two moves to
make, while black at the same time threatens to promote the rook. From now
on white can only pray for a miracle.

52.P9c-9d          0/386        0/384
53.B9e-8d          12/398       0/384
54.S2b-2c          0/398        5/389
55.G7h-8g          10/408       0/389

56.R7fx6f          0/408        19/408
57.P6gx6f          0/408        0/408
58.S*7h            0/408        0/408

A desperate attempt.

59.P7ex7d!         4/412        0/408

Simple is best. Black's attack is much more powerful than the white one.

60.S7hx8i=         0/412        1/409
61.P7dx7c+         0/412        0/409
62.R*7h            0/412        14/423
63.N*6h            1/413        0/423
64.R7h-7i+         0/413        0/423
65.+P7cx6b         0/413        0/423
66.S8i-7h+         0/413        0/423
67.+P6bx5a         0/413        0/423
68.K4a-3a          0/413        0/423
69.G*5i            3/416        0/423

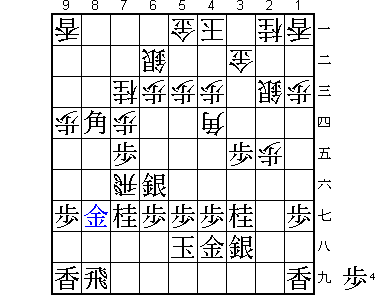
Now it is clear that black is completely safe and white has no defence.

70.+S7hx7g         0/416        0/423
71.G8gx7g          0/416        0/423
72.+R7ix7g         0/416        0/423
73.P*2d            1/417        0/423
Resigns            0/417        0/423
Time:              06:57:00     07:03:00

A complete defeat for Tanigawa, but only one move was the culprit, so
it is hard to judge the level of play of both players. Will Tanigawa
be able to fight back like he did in the Meijin title match?
