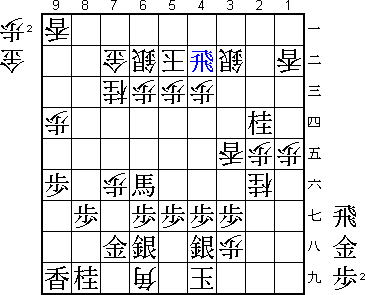
39th Oi Match Game 4
Black: Habu Yoshiharu, Oi
White: Sato Yasumitsu, Challenger
39th Oi-sen, Game 4, August 17th and 18th 1998
1.P7g-7f           0/0          0/0
2.P3c-3d           0/0          15/15

Sato takes a long time for his first move. For some professionals this might
be an indication that they are still unsure of what to play. In Sato's case,
these fifteen minutes were only used to get himself in the right mental state
for the violent strategy he is about to chose.

3.P2g-2f           2/2          0/15
4.P8c-8d           0/2          0/15
5.P2f-2e           4/6          0/15
6.P8d-8e           0/6          0/15
7.G6i-7h           1/7          0/15
8.G4a-3b           0/7          0/15
9.P2e-2d           3/10         0/15
10.P2cx2d          0/10         0/15
11.R2hx2d          0/10         0/15
12.P8e-8f          0/10         0/15
13.P8gx8f          1/11         0/15
14.R8bx8f          0/11         0/15
15.R2dx3d          1/12         0/15
16.B2b-3c          0/12         5/20

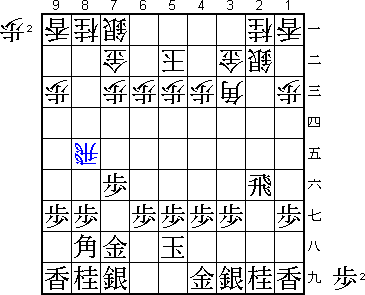
Sato has chosen the B3c variation of the Yokofudori (Side Pawn). This is not
the quickest variation in this opening, but neither player will make a classic
castle around the king, so disaster can strike at any move.

17.R3d-3f          16/28        0/20
18.K5a-5b          0/28         10/30
19.R3f-2f          41/69        0/30
20.S3a-2b          0/69         2/32
21.K5i-5h          1/70         0/32
22.G6a-7b          0/70         56/88
23.P*8g            48/118       0/88
24.R8f-8e          0/118        9/97

This is a rather new idea, introduced by Chuza (4-dan) in his C2 Junisen game
against Matsumoto last year. Chuza won this game and since then R8e has been
picked up by some other young players. Especially Nozuki (4-dan) has tried
this plan a couple of times. However, usually it is played with the king on
4a instead of 5b. Sato will have studied the position and decided that K5b
might be a subtle improvement. In any case, the aim of R8e is the same: white
threatens to play P*2e and has the move P7d without blocking the rook. Black
has no direct attack against the white position, so Habu chooses to quietly
develop his pieces.

25.B8h-7g          24/142       0/97
26.P7c-7d          0/142        53/150
27.S7i-6h          23/165       0/150
28.N8a-7c          0/165        22/172
29.G4i-3h          31/196       0/172
30.S7a-6b          0/196        60/232
31.S3i-4h          3/199        0/232
32.P9c-9d          0/199        0/232
33.P1g-1f          7/206        0/232
34.P1c-1d          0/206        27/259
35.P9g-9f          8/214        0/259
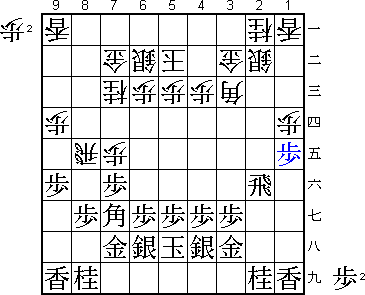
36.P7d-7e?!        0/214        14/273

Sato: "There was no more waiting move". If this is the only move, white's
position might be suspect, since Habu can strongly counter here.

37.P1f-1e!         79/293       0/273

Strong attack. After 38.Px1e P*1b Lx1b Bx3c+ Nx3c B*2a white is in big
trouble.

38.P*2e            0/293        50/323

A well-known tesuji. By sacrificing a pawn, the black rook is forced to a
square where it is under attack in the above variation after Nx3c, so black
has no time to play B*2a then.

39.R2fx2e          57/350       0/323
40.P1dx1e          0/350        3/326
41.R2e-2f!         0/350        0/326

Patient move. Now P*1b is a threat again.

42.S2b-2c?         0/350        70/396

After long thought Sato plays this bad move. The frightening thing about the
Yokofudori is that after just this one bad move his position quickly collapses.
The right move would have been 42.P*2d. Then 43.P8f R8d Px7e P*8e is probably
good for white, so black has to choose the violent 43.Bx3c+ Nx3c N7g R8d Px7e
B*5d P8f P*7f N8e Nx8e Px8e Rx8e N*6d Px6d B*7d B*6c Bx8e Bx8e R*8a B6c Rx9a+
B*4d and white also has a strong attack. The post-mortem analysis could not
give a definitive judgment on this position, but it is clear that white has
much better chances than in the game.

43.P*1b            40/390       0/396
44.P*2e            0/390        5/401
45.R2f-3f          10/400       0/401
46.L1ax1b          0/400        1/402
47.P*2b            17/417       0/402

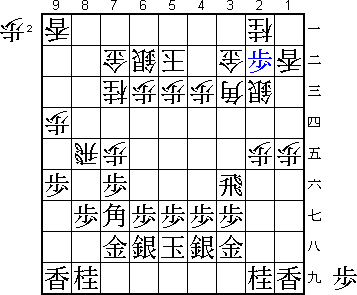
Hard to deal with. 48.Bx2b Bx2b+ Gx2b R3a+ or 48.Gx2b Bx3c+ Nx3c (Gx3c P*2b)
B*1a are both very good for black. Sato has no choice but to throw everything
in attack.

48.P*3e            0/417        3/405
49.R3fx3e          1/418        0/405
50.P7ex7f          0/418        1/406
51.B7gx3c+         1/419        0/406
52.R8ex3e          0/419        2/408
53.+B3c-6f         1/420        0/408
54.R*2f            0/420        28/436

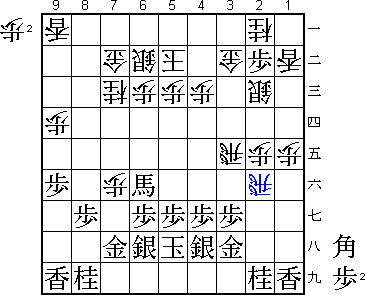
Good try, trying to take the horse on 6f out of play, but not good enough.

55.B*1g!           15/435       0/436

Cool reply. This wins the rook on 3e and the game.

56.R2fx2i+         0/435        29/465
57.G3h-3i          0/435        0/465
58.+R2ix1i         0/435        5/470
59.B1gx3e          0/435        0/470
60.P*3h            0/435        0/470
61.G3i-4i          10/445       0/470
62.L*3c            0/445        0/470

62.N*2g looks better, but after 63.Px2a+ P3i+ G5i +P3h P5f black has a winning
position as well (for example L*6d +B7e).

63.P2bx2a+         5/450        0/470
64.L3cx3e          0/450        0/470
65.+P2a-2b         0/450        0/470
66.+R1ix4i         0/450        3/473
67.K5hx4i          0/450        0/473
68.B*6i            0/450        0/473
69.+P2bx3b         4/454        0/473
70.S2cx3b          0/454        0/473
71.N*2d            3/457        0/473
72.N*2f            0/457        2/475
73.R*4b            1/458        0/475
Resigns            0/458        0/475
Time:              07:38:00     07:55:00

A very short game that clearly showed the danger lurking in the Yokofudori
opening. This means that Habu is now 3-1 up and needs only one win from the
three remaining games to claim his sixth consecutive Oi title.
