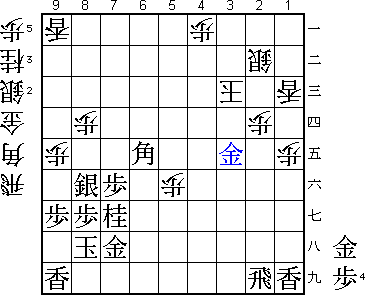
39th Oi Match Game 3
Black: Sato, Challenger
White: Habu, Oi
39th Oi-sen, Game 3, August 6th and 7th 1998
1.P7g-7f           1/1          0/0
2.P8c-8d           0/1          2/2
3.S7i-6h           1/2          0/2
4.P3c-3d           0/2          1/3
5.P6g-6f           1/3          0/3
6.S7a-6b           0/3          2/5
7.P5g-5f           1/4          0/5
8.P5c-5d           0/4          2/7
9.S3i-4h           0/4          0/7
10.S3a-4b          0/4          3/10
11.G4i-5h          1/5          0/10
12.G4a-3b          0/5          10/20
13.G6i-7h          3/8          0/20
14.K5a-4a          0/8          2/22
15.K5i-6i          1/9          0/22

Being the Meijin brings a lot of responsibilities and Sato is very much aware
of that. For one, he is very busy with public appearances that interfere with
his preparation for important games. More importantly, in title matches he
no longer can play the role of the underdog. For a Meijin, losing three games
in a row would mean a considerable loss of face. Furthermore, coming back from
3-0 down against Habu is almost impossible. So Sato will have felt some
pressure in this game. It should have been a little comforting for Sato that
Habu chose to play the Yagura, where Sato is the leading specialist.

16.G6a-5b          0/9          3/25
17.S6h-7g          3/12         0/25
18.S4b-3c          0/12         4/29
19.B8h-7i          0/12         0/29
20.B2b-3a          0/12         1/30
21.P3g-3f          1/13         0/30
22.P4c-4d          0/13         0/30
23.P3f-3e          29/42        0/30
24.P3dx3e          0/42         52/82
25.B7ix3e          0/42         0/82
26.G5b-4c          0/42         0/82
27.S4h-3g          12/54        0/82
28.S6b-5c          0/54         9/91
29.S3g-3f          23/77        0/91
30.S3c-3d          0/77         10/101
31.B3e-6h          17/94        0/101
32.S3d-4e          0/94         6/107
33.S3f-3e          1/95         0/107
34.S5c-4b          0/95         44/151

This odd looking silver retreat has been played before. Of course white wants
to play it as fast as possible to 3c.

35.P4g-4f!         32/127       0/151

A new move by Sato and a strong one. So far, all professional game examples
had 35.R3h as the next move. The expected development is then 36.S3c P4f
S3d S2f P2d. Sato has judged correctly that he does not need to play this
rook to 3h and that it allright where it is now. This saves him at least one
and perhaps two moves.

36.S4e-3d          0/127        1/152
37.S3e-2f          0/127        0/152
38.P2c-2d          0/127        8/160
39.K6i-7i          18/145       0/160
40.S4b-3c          0/145        31/191
41.P*3e            6/151        0/191
42.S3d-2c          0/151        1/192
43.S2f-3g          9/160        0/192
44.B3a-4b          0/160        9/201
45.S3g-3f          1/161        0/201
46.K4a-3a          0/161        0/201
47.G5h-6g          3/164        0/201
48.P9c-9d          0/164        5/206
49.K7i-8h          42/206       0/206
50.P9d-9e          0/206        3/209
51.P2g-2f          2/208        0/209
52.P7c-7d          0/208        39/248

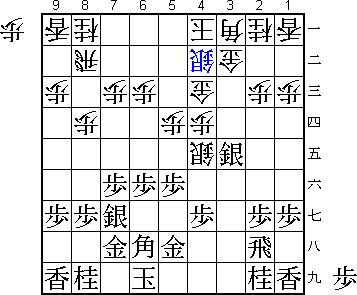
The sealed move. Black has a very nice piece formation and the consensus was
that white was in trouble. The expected continuation was 52.N9c followed by
53.N8e to get some kind of attack going. Instead, Habu decides to wait for
a better chance. He is counting on the problems black will have to break down
white's strong four-general defense.

53.N2i-3g          33/241       0/248
54.N8a-7c          0/241        1/249
55.S7g-8f          77/318       0/249
56.B4b-6d          0/318        33/282
57.P2f-2e          0/318        0/282
58.P2dx2e          0/318        2/284
59.S3fx2e          0/318        0/284
60.P*2d            0/318        0/284
61.S2e-3f          0/318        0/284
62.K3a-2b          0/318        4/288
63.P1g-1f          6/324        0/288
64.P1c-1d          0/324        3/291
65.P*2e            39/363       0/291
66.P2dx2e          0/363        10/301
67.P1f-1e          0/363        0/301
68.P1dx1e          0/363        34/335
69.N3gx2e          0/363        0/335
70.S3c-2d          0/363        1/336
71.P6f-6e          0/363        0/336
72.B6d-5c          0/363        3/339
73.P4f-4e          1/364        0/339
74.P*3c            0/364        2/341

75.B6h-4f          11/375       0/341
76.R8b-7b          0/375        1/342
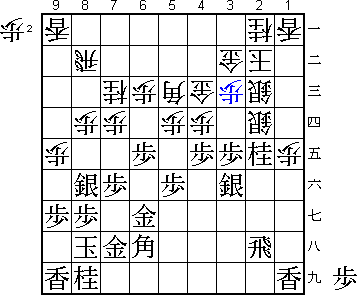
77.P6e-6d?!        41/416       0/342

Sato said that he regretted this move and that he had made a mistake in the
move order. The idea of playing P6d is to create a hole on 6c to drop a piece
later. Sato said that it would have been better to take on 4d first and only
after Gx4d push the pawn to 6d. I am not really sure why 77.Px4d Bx4d is
better for black than the game. This is not explained by Shukan Shogi. In any
case, 77.P6d does not seem to be bad for Sato, but things get very complicated
from here.

78.P6cx6d          0/416        26/368
79.P4ex4d          4/420        0/368
80.B5cx4d          0/420        10/378
81.P5f-5e          0/420        0/378
82.B4dx5e          0/420        6/384
83.B4fx5e          0/420        0/384
84.P5dx5e          0/420        0/384
85.P*1b            15/435       0/384
86.L1ax1b          0/435        9/393
87.P*1c            0/435        0/393
88.N2ax1c          0/435        33/426
89.N2ex1c+         0/435        0/426
90.L1bx1c          0/435        0/426
91.B*6c            0/435        0/426
92.R7b-7a          0/435        0/426
93.B6cx7d+         0/435        0/426
94.P*2e            0/435        1/427
95.S3fx2e          3/438        0/427
96.S2dx2e          0/438        2/429
97.R2hx2e          0/438        0/429
98.P*2d            0/438        0/429
99.R2e-2i          0/438        0/429

At this point there was some discussion about who was actually attacking who.
Moves like 99.P*4d were looked at, but neither player seemed to have given
that much thought. I guess the game is still very close, but it is hard to
see where Sato could have played it better after his opening advantage.

100.N7c-6e         0/438        8/437
101.+B7dx6d        5/443        0/437
102.P*6f           0/443        2/439
103.G6gx6f         0/443        0/439
104.P*7g           0/443        0/439
105.N8ix7g         1/444        0/439
106.N6e-5g+        0/444        1/440
107.P*4d           2/446        0/440
108.G4cx4d         0/446        4/444
109.N*3f           3/449        0/444
110.N*7d           0/449        7/451
111.N3fx4d         3/452        0/451
112.N7dx6f         0/452        6/457
113.N4dx3b+        0/452        0/457

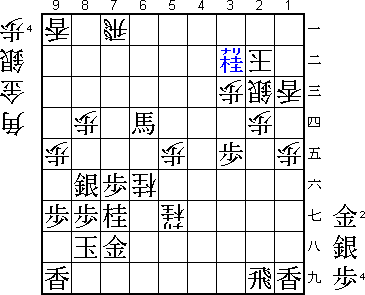
114.S2cx3b?        0/452        2/459

This allows black to take the very important knight on 6f. Naito, 9-dan
suggested 114.Kx3b +B6e N*5d +Bx5d S*4c +Bx4c Kx4c S*5d Kx5d G*6e K4c
Gx6f B*4g with an unclear position.

115.S*3a           0/452        0/459
116.R7ax3a         0/452        0/459
117.+B6dx3a        0/452        0/459
118.K2bx3a         0/452        0/459
119.R*6a           0/452        0/459
120.P*4a           0/452        6/465
121.R6ax6f+        0/452        0/465

Now Sato is in control again.

122.B*2c           0/452        7/472
123.N*3d           9/461        0/472
124.P3cx3d         0/461        0/472
125.+R6fx5g        0/461        0/472
126.S*5f           0/461        2/474
127.N*4c           7/468        0/474
128.K3a-2b         0/468        2/476
129.+R5gx5f        2/470        0/476
130.P5ex5f         0/470        0/476
131.P3ex3d         0/470        0/476

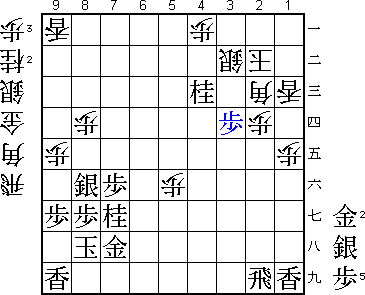
132.S*4b?          0/470        1/477

The losing move. Habu last hope would have been 132.Bx3d. Habu probably feared
133.G*4d, but after G*3c S*3a K2c G*2b K1d Gx3d N*6f B*6i S*2e it is hard to
find a good continuation for black.

133.S*3a           0/470        0/477
134.S4bx3a         0/470        0/477
135.N4cx3a+        0/470        0/477
136.K2bx3a         0/470        0/477
137.S*3c           1/471        0/477
138.S*2b           0/471        0/477
139.G*4c           5/476        0/477
140.G*4b           0/476        0/477
141.S3cx2b+        0/476        0/477
142.K3ax2b         0/476        0/477
143.S*3c           0/476        0/477
144.S3bx3c         0/476        0/477
145.P3dx3c+        0/476        0/477
146.G4bx3c         0/476        0/477
147.S*3a           0/476        0/477
148.K2bx3a         0/476        0/477
149.G4cx3c         0/476        0/477
150.S*2b           0/476        0/477
151.P*3b           0/476        0/477
152.B2cx3b         0/476        0/477
153.G3cx3b         0/476        0/477
154.K3ax3b         0/476        0/477
155.B*6e           0/476        0/477
156.K3b-3c         0/476        1/478
157.G*3e           0/476        0/478
Resigns            0/476        1/479
Time:              07:56:00     07:59:00

Black's king is far from mate and white has no defense against the double
mating threat G*4c~Bx5f and G*3b~Rx2d.

A tough endgame and a vital win for Sato that will boost his confidence.
However, he is still 2-1 behind and has to win the next game as well to
keep in this match.
