39th Oi Match Game 2
Black: Habu, Oi
White: Sato, Challenger
39th Oi-sen, Game 2, July 30th and 31st 1998
1.P7g-7f           1/1          0/0
2.P8c-8d           0/1          6/6
3.P2g-2f           3/4          0/6

Habu's choice of opening is clearly motivated by psychology. After the Meijin
match there was a lot of talk about the reasons why Tanigawa did not choose
the Kakugawari in game 7. After all, Sato had lost all games with white against
this opening  in that match and seemed at a loss when confronted with this
opening. Habu is not known to be an expert in the Kakugawari, but he plays
it anyway because this might be Sato's achilles heel. The risk is of course
that Sato has prepared something that he planned to use in game 7 of the
Meijin match.

4.G4a-3b           0/4          12/18
5.G6i-7h           3/7          0/18
6.P8d-8e           0/7          0/18
7.B8h-7g           3/10         0/18
8.P3c-3d           0/10         0/18
9.S7i-8h           0/10         0/18
10.S3a-4b          0/10         7/25
11.B7gx2b+         2/12         0/25
12.G3bx2b          0/12         0/25
13.S8h-7g          0/12         0/25
14.S7a-6b          0/12         6/31
15.S3i-3h          31/43        0/31
16.P6c-6d          0/43         14/45
17.P4g-4f          8/51         0/45
18.S6b-6c          0/51         1/46
19.S3h-4g          0/51         0/46
20.G2b-3b          0/51         1/47
21.G4i-5h          3/54         0/47
22.P1c-1d          0/54         10/57
23.P1g-1f          22/76        0/57
24.K5a-4a          0/76         17/74
25.K5i-6h          15/91        0/74
26.K4a-3a          0/91         1/75
27.K6h-7i          5/96         0/75
28.S6c-5d          0/96         5/80
29.P3g-3f          25/121       0/80
30.P4c-4d          0/121        15/95
31.S4g-5f          0/121        0/95
32.P6d-6e          0/121        36/131
33.N2i-3g          18/139       0/131
34.G6a-5b          0/139        1/132
35.P9g-9f          5/144        0/132
36.P7c-7d          0/144        95/227
37.P9f-9e          51/195       0/227
38.N8a-7c          0/195        4/231
39.R2h-4h          33/228       0/231
40.G5b-6c          0/228        32/263
41.P2f-2e          11/239       0/263
42.S4b-3c          0/239        17/280
43.B*2f            33/272       0/280
44.B*6d            0/272        60/340
45.R4h-4i          32/304       0/340
46.S5d-4c          0/304        2/342
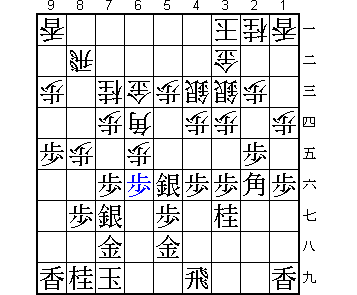
47.P6g-6f!         15/319       0/342

If the white position is what Sato had prepared, he needs to get back to the
study room. This risky looking move which starts a fight close to the black
king, is giving Sato all kinds of trouble.

48.P6ex6f?         0/319        66/408

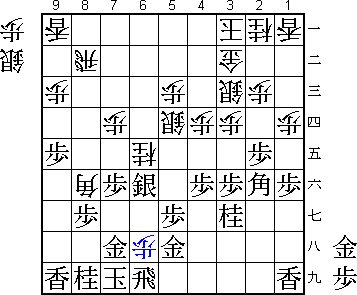
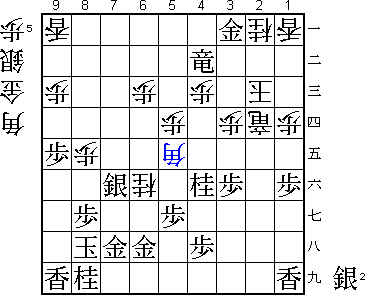
Now Habu gets a clear advantage. The press room extensively analysed 48.G5d.
Then 49.Px6e 50.Gx6e is the natural continuation. After this, Sato feared
51.P4e P3e Px4d S3cx4d most. However, Habu also disliked this variation and
would not have played it. Other moves are 51.Sx6e Nx6e S6f P8f Px8f P*8g
Gx8g Bx8f and it is unclear if black has any good moves, or 51.R6i S5d
Sx6e Nx6e S6f P8f Px8f Bx8f P*8g P*6h! (diagram) R2i (G5hx6h then Bx6h+! Rx6h
P*6g! and a strong white attack) B6d G5hx6h S*4g and black can not get a good
attack going. Sato: "Even if it loses, I should have played G5d".

49.S7gx6f          0/319        0/408
50.P5c-5d          0/319        0/408
51.P4f-4e          25/344       0/408
52.B6d-5c          0/344        2/410
53.S6f-7g          5/349        0/410
54.K3a-2b          0/349        3/413
55.G5h-6h          22/371       0/413
56.B5c-6b          0/371        16/429
57.P2e-2d          32/403       0/429
58.P2cx2d          0/403        0/429
59.P*2e            0/403        0/429
60.P2dx2e          0/403        8/437
61.N3gx2e          0/403        0/437
62.S3c-2d          0/403        0/437
63.P4ex4d          0/403        0/437
64.S4c-5b          0/403        0/437
65.R4i-4e          1/404        0/437
66.P*4b            0/404        12/449

White is clearly in big trouble. It would have been nice if 66.P3e would
have worked, but after 67.Bx3e Sx3e Px3e the white king position is too
weak (for example P*2c). From now on Sato shows some real Meijin toughness
in defense.

67.B2f-3g          10/414       0/449

The direct 67.P4c+ Bx2f +Px3b Kx3b P*2b N3c Nx3c+ Kx3c P2a+ P4c gives the
white king to much room to escape.

68.S5b-5c          0/414        2/451
69.P*2f            2/416        0/451
70.S5cx4d          0/416        1/452
71.R4e-4i          0/416        0/452
72.P4b-4c          0/416        0/452
73.P*6d            12/428       0/452
74.G6c-5c          0/428        0/452
75.G6h-5h          0/428        0/452
76.B6b-5a          0/428        6/458
77.R4i-6i          0/428        0/458
78.R8b-6b          0/428        0/458
79.K7i-8h          2/430        0/458
80.R6b-6a          0/430        12/470
81.B3g-4f          9/439        0/470
82.P*6e            0/439        2/472
83.S5fx6e          0/439        0/472
84.N7cx6e          0/439        0/472
85.R6ix6e          0/439        0/472
86.S4d-5e          0/439        1/473
87.P6d-6c+         9/448        0/473
88.R6ax6c          0/448        1/474
89.R6ex6c+         0/448        0/474
90.G5cx6c          0/448        0/474
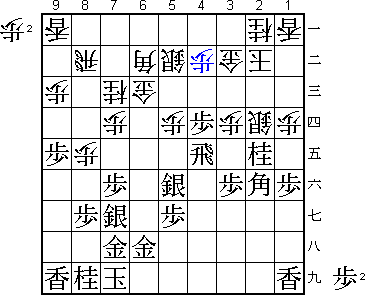
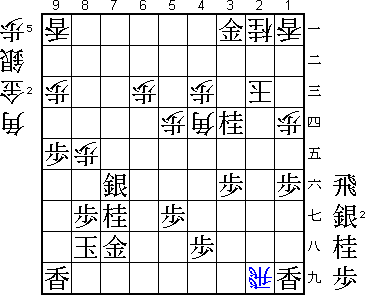
91.R*6a?           0/448        0/474

The general feeling was that this game would be over quickly. This rook drop
seemed to seal it. White can not defend the gold on 6c with 92.B6b because
of Bx2d. The only move is to play Sx4f, but playing the silver away from the
black king looks very bad.....

92.S5ex4f          0/448        0/474
93.R6ax5a+         0/448        0/474
94.R*2h            0/448        1/475

Now Sato is suddenly back into this game. This rook drop is actually very hard
to defend against. For example 95.G5h-6h P*6g G6hx6g P*6f G6g-6h and both
S*6g and B*4e look very strong. If Habu would have realised how powerful this
counter attack actually is, he would have played the correct 91.Bx5e instead
of R*6a. Then 92.Px5e and now 93.R*6a is winning: 94.B6b P*6d S*5b Rx9a+
Gx6d +R9b and after P*6a black plays L*6g.

95.P*4h            12/460       0/475

With regret Habu drops his last pawn.

96.R2hx2f+         0/460        0/475
97.N*3h            0/460        0/475
98.+R2fx2e         0/460        0/475
99.N3hx4f          0/460        0/475
100.S2d-3c         0/460        0/475
101.B*4a           3/463        0/475
102.P7d-7e         0/463        0/475

Sato has had to wait patiently for his chance, but finally he gets the
opportunity to attack.

103.B4ax6c+        2/465        0/475
104.P7ex7f         0/465        0/475
105.S7gx7f         0/465        0/475
106.N*6f           0/465        0/475

This knight drop is as strong as it looks. The game has now gotten very close
with attack for both black and white and white with chances of getting an
entering king.

107.S*4a           6/471        0/475
108.G3b-3a         0/471        2/477
109.+B6c-6d        2/473        0/477
110.S*4b           0/473        0/477
111.G5h-6h         2/475        0/477
112.P*6c           0/475        1/478
113.P*2d           0/475        0/478
114.+R2ex2d        0/475        0/478
115.G*3b           0/475        0/478
116.G3ax3b         0/475        1/479
117.S4ax3b+        0/475        0/479
118.K2bx3b         0/475        0/479
119.G*3a           1/476        0/479
120.K3b-2c         0/476        0/479
121.+B6dx4b        0/476        0/479
122.S3cx4b         0/476        0/479
123.+R5ax4b        0/476        0/479
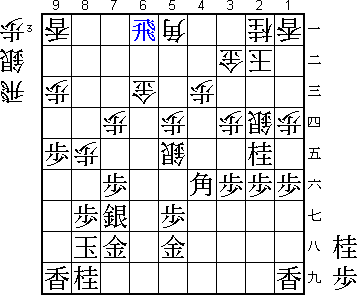
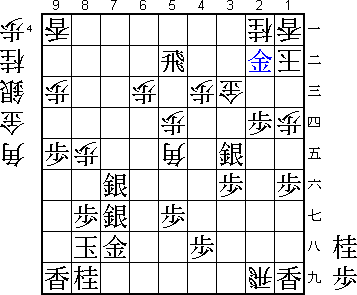
124.B*5e?          0/476        0/479

In byoyomi Sato gives it all away. Correct was 124.Nx7h+ Gx7h (Kx7h leads to
the same variation as B*3c is a mating threat) B*3c +Rx3c
+Rx3c S*2e B*4d B*7g S*6f Sx3d +Rx3d Nx3d Sx7g+ Nx7g R*2i with the
mating threat B*7i Gx7i Bx7g+ Kx7g Rx7i+ R*7h N*6e Sx6e S*6h. A very long and
difficult variation to read in one minute. Furthermore, it is still unclear
how is winning in this position. However, the reply to B*5e is easy, so
Sato should have tried his luck with 124.Nx7h+.
In byoyomi Sato gives it all away. Correct was 124.Nx7h+ Gx7h B*3c +Rx3c

125.S*7g           0/476        0/479
126.N6fx7h+        0/476        0/479
127.G6hx7h         0/476        0/479
128.G*2b           0/476        0/479

At this stage of the game, the switch from attack to defense is in general a
sign of having lost the battle.

129.N4fx3d         1/477        0/479
130.+R2dx3d        0/477        0/479
131.S*3e           0/477        0/479
132.+R3d-3c        0/477        0/479
133.P*2d           0/477        0/479
134.K2c-1b         0/477        0/479
135.+R4bx3c        0/477        0/479
136.G2bx3c         0/477        0/479
137.R*5b           0/477        0/479
138.P*2b           0/477        0/479
139.G3a-3b         0/477        0/479
140.R*2i           0/477        0/479
141.G3bx2b         0/477        0/479
Resigns            0/477        0/479
Time:              07:57:00     07:59:00

A tough game where Sato came very close to winning. Instead, he finds himself
2-0 down after two games. He desperately needs to win game 3 now...
