39th Oi Match Game 1
Black: Sato, Challenger
White: Habu, Oi
39th Oi-sen, Game 1, July 16th and 17th 1998
1.P2g-2f           1/1          0/0

The furigoma gave Meijin Sato Yasumitsu black. Sato likes the Aigakari very
much and it was a bit of a surprise he did not play it in any of the games
in the 1998 Meijin match. His thorough preparation must have given him the
idea that against Habu the Aigakari is the better choice.

2.P8c-8d           0/1          1/1
3.P2f-2e           4/5          0/1
4.P8d-8e           0/5          2/3
5.G6i-7h           0/5          0/3
6.G4a-3b           0/5          15/18
7.P2e-2d           5/10         0/18
8.P2cx2d           0/10         2/20
9.R2hx2d           0/10         0/20
10.P*2c            0/10         0/20
11.R2d-2f          1/11         0/20
12.S7a-6b?!        0/11         2/22

Not a very popular move these days. This game is a good illustration of the
advantages of the normal 12.S7b. It is not clear why Habu chose this move.
Perhaps he wanted to confuse his opponent.

13.P1g-1f          40/51        0/22
14.P1c-1d          0/51         8/30
15.S3i-3h          1/52         0/30
16.P6c-6d          0/52         21/51
17.P7g-7f          1/53         0/51
18.P8e-8f          0/53         1/52
19.P8gx8f          0/53         0/52
20.R8bx8f          0/53         0/52
21.P*8g            2/55         0/52
22.R8f-8b          0/55         0/52
23.P3g-3f          13/68        0/52
24.P3c-3d          0/68         5/57
25.P3f-3e          9/77         0/57
26.P3dx3e          0/77         63/120
27.S3h-3g          2/79         0/120
28.B2bx8h+         0/79         2/122
29.S7ix8h          0/79         0/122
30.S3a-2b          0/79         0/122
31.S3g-4f          22/101       0/122

32.S6b-6c          0/101        18/140

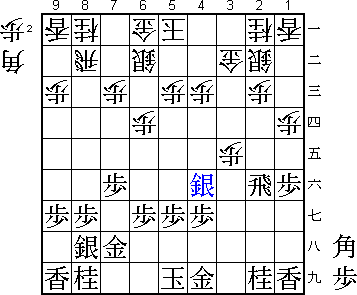
Habu: "I really wanted to move the silver up to 3c, but...". After 32.S3c Sx3e
P*3d P2d Px3e Px2c+ P*2e Rx2e B*3d +Px3c Bx2e +Px3b black is threatening mate.
Therefore white has to defend with S6c, but then B*4b K6b G*3h! is bad for
white. If the silver had been on 7b instead of 6b, then +Px3b would not have
been a mating threat and white would win easily.

33.S4fx3e          60/161       0/140
34.S6c-5d          0/161        4/144
35.K5i-5h          1/162        0/144
36.P*3d            0/162        16/160

37.S3e-4f?         25/187       0/160

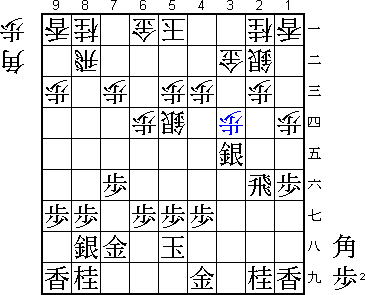
Sato misses a chance to get the clear lead in the game. He should have played
37.Sx3d. Then 38.P2d looks dangerous for black (Rx2d P*3c S2e S2c). For
example 39.B*3e B*4b P*3c Sx3c Sx3c+ Gx3c P*2b N1c P2a+ G3d B4f S*3e is very
bad for black. However, after 39.B*4f! this counter attack is not possible
and black can keep the advantage. Now the game changes pace and both players
take time to put their pieces in the right places.

38.S2b-3c          0/187        5/165
39.P7f-7e          1/188        0/165
40.K5a-4b          0/188        20/185
41.S8h-7g          11/199       0/185
42.G6a-5b          0/199        31/216
43.S4f-3g          16/215       0/216
44.K4b-3a          0/215        23/239
45.R2f-8f          3/218        0/239
46.P*8e            0/218        0/239
47.R8f-2f          0/218        0/239
48.P4c-4d          0/218        3/242
49.S3g-3f          67/285       0/242
50.G5b-4c          0/285        14/256
51.N2i-3g          17/302       0/256
52.S3c-2b          0/302        29/285
53.G4i-4h          7/309        0/285
54.N2a-3c          0/309        8/293
55.P4g-4f          3/312        0/293
56.P6d-6e          0/312        30/323
57.P5g-5f          8/320        0/323
58.K3a-2a          0/320        23/346
59.R2f-2i          5/325        0/346
60.P9c-9d          0/325        1/347
61.P9g-9f          1/326        0/347
62.B*6d            0/326        10/357
63.G4h-4g          33/359       0/357
64.B6dx7e          0/359        3/360
65.P*7b            37/396       0/360

This leads to the promotion of the black bishop and the general impression
was that black was still a little better here.

66.R8bx7b          0/396        22/382
67.S7g-7f          1/397        0/382
68.B7e-6d          0/397        1/383
69.P6g-6f          0/397        0/383
70.P7c-7d          0/397        0/383
71.P6fx6e          0/397        0/383
72.B6d-8b          0/397        0/383
73.B*8c            1/398        0/383
74.R7b-7a          0/398        1/384
75.P*7b            0/398        0/384
76.R7a-6a          0/398        0/384
77.B8cx7d+         0/398        0/384
78.P4d-4e          0/398        0/384
79.G4g-5g          5/403        0/384
80.P4ex4f          0/403        2/386
81.G7h-6g          26/429       0/386
82.P*7e            0/429        32/418

83.+B7dx7e?        4/433        0/418

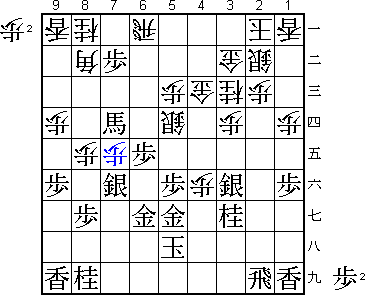
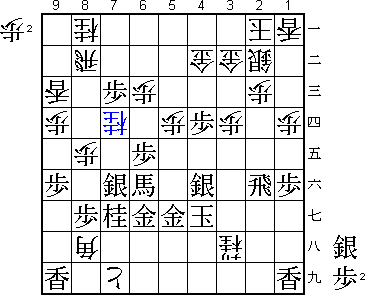
A mistake that turns around the game. 83.Sx7e was the only move. Then 84.Sx6e
+B5b P*6f +Bx6a Px6g+ Kx6g P4g+ Gx4g P*6f looks very dangerous for black and
indeed, black loses after K5g P*4f Gx4f P6g+ or K5h Sx5f Gx5f Bx3g+ or K7h
S7f. However, the most dangerous looking move is actually the winning one.
After P*6f K6h! white does not seem to be able to win in the attack. For
example, Sx5f Gx5f Bx3g+ and now even +Bx3f is not a check, so black can play
his own attack. Also, K6h S7f Sx6f G*6g K5i and the black king escapes from
the white pieces.

Sato: "I did not look at Sx7e that much. I did look at Sx8e, though...".
83.Sx8e N7c P7a+ Rx7a +B8c. Habu: "I see". Sato: "No, I do not think so."
After +B8c, black is allright if white plays B9c S7d Nx6e Sx6e. However,
if white plays P*8a (instead of B9c), then S7d Nx6e Sx6e Sx6e +Bx6e S*3h is
actually good for white. It seems Sato has read this position much deeper than
Habu and he is a little unlucky that he missed the right move.

84.B8b-9c          0/433        8/426

Now black has to exchange the promoted bishop. He can make a new one, but that
takes just the time Habu needs to get his own attack going.

85.+B7ex9c         2/435        0/426
86.L9ax9c          0/435        5/431
87.P7b-7a+         2/437        0/431
88.R6ax7a          0/437        5/436
89.B*8b            0/437        0/436
90.P4f-4g+         0/437        1/437
91.S3fx4g          1/438        0/437
92.R7a-7b          0/438        8/445
93.B8b-6d+         5/443        0/445
94.P*6c            0/443        4/449
95.+B6d-7e?        3/446        0/449

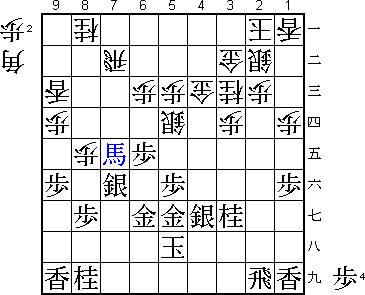
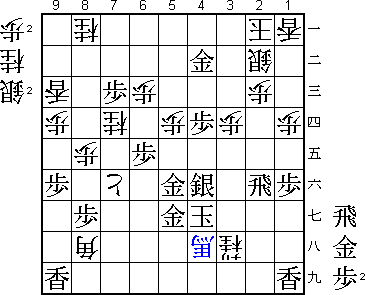
The decisive mistake. I doubt that Sato has seen that the following Habu attack
is very dangerous. If he would have seen it, he would probably have played the
correct +B9g, which makes the next move impossible. After 95.+B9g white can
play N4e, but then Nx4e Sx4e P*4f S5d and the position is very difficult for
both players.

96.B*8h            0/446        5/454
97.N8i-7g          6/452        0/454
98.P*7h!           0/452        0/454

Looks very slow, but this is great judgment by Habu. The attack with the
promoted pawn comes just in time.

99.+B7e-6f         23/475       0/454
100.P7h-7i+        0/475        5/459
101.P*4d           0/475        0/459
102.G4c-4b         0/475        0/459
103.P5f-5e         0/475        0/459
104.N3c-4e         0/475        0/459
105.P5ex5d         0/475        0/459
106.N4ex3g+        0/475        1/460
107.P*7c           1/476        0/460
108.R7b-8b         0/476        2/462
109.S4g-4f         3/479        0/462
110.+N3g-3h        0/479        8/470
111.R2i-2f         0/479        0/470
112.P5cx5d         0/479        0/470
113.K5h-4g         0/479        0/470
114.N*7d!          0/479        0/470

Very painful for black. The promoted bishop is chased away from a good square
and white then wins with the promoted pawn attack.

115.+B6f-7e        0/479        0/470
116.+P7i-7h        0/479        0/470
117.S*4c           0/479        0/470
118.+P7hx7g        0/479        0/470
119.G6g-5f         0/479        0/470
120.+P7gx7f        0/479        0/470
121.+B7ex4b        0/479        0/470
122.G3bx4b         0/479        0/470
123.S4cx4b+        0/479        0/470
124.R8bx4b         0/479        0/470
125.G*4c           0/479        0/470
126.B*5i           0/479        1/471
127.G4cx4b         0/479        0/471
128.B5i-4h+        0/479        0/471
Resigns            0/479        0/471
Time:              07:59:00     07:51:00

One move difference. A close and very interesting game in which both players
showed their strength. This could be a very interesting match, but if Sato
can not win game two, it might all be over very soon.
