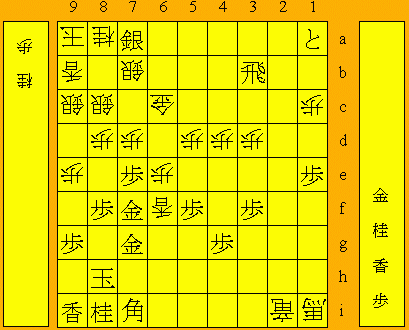
38th Oi Match Game 5
Black: Sato Yasumitsu, Challenger
White: Habu Yoshiharu, Oi
38th Oi-sen, Game 5, August 28th and 29th 1997
1.P7g-7f 2/2 0/0
2.P3c-3d 0/2 1/1
3.P2g-2f 3/5 0/1
4.P4c-4d 0/5 1/2
5.P2f-2e 4/9 0/2
6.B2b-3c 0/9 1/3
7.S3i-4h 0/9 0/3
8.R8b-4b 0/9 1/4
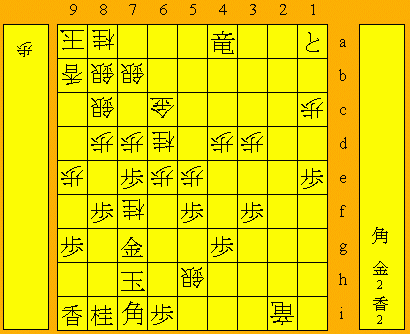
For the first time in this match a Furibusha game. The convincing win in the
third game seems to have given Habu confidence. He has played Furibisha often
enough, but he is not a Ranging Rook player by nature.
9.P5g-5f 3/12 0/4
10.S7a-7b 0/12 16/20
11.K5i-6h 2/14 0/20
12.K5a-6b 0/14 13/33
13.K6h-7h 0/14 0/33
14.K6b-7a 0/14 0/33
15.G4i-5h 11/25 0/33
16.P9c-9d 0/25 11/44
17.S4h-5g 14/39 0/44
18.S3a-3b 0/39 2/46
19.P6g-6f 38/77 0/46
20.P9d-9e 0/77 34/80
21.P6f-6e 4/81 0/80
22.R4b-6b!? 0/81 40/120
Interesting idea. Habu did not like his position if he would allow black to
play B6f followed by N7g, so he chose this counter attack against the advanced
pawn on 6e. Black still manages to make a high position on the 6th and 7th
files, so it is unclear whether white's plan is actually working.
23.S7i-6h 26/107 0/120
24.P6c-6d 0/107 42/162
25.P6ex6d 5/112 0/162
26.R6bx6d 0/112 0/162
27.S6h-6g 2/114 0/162
28.R6d-6b 0/114 18/180
29.P7f-7e 8/122 0/180
30.S3b-4c 0/122 43/223
31.G6i-6h 14/136 0/223
32.P8c-8d 0/136 21/244
33.S6g-7f 17/153 0/244
34.S7b-8c 0/153 6/250
35.G5h-6g 12/165 0/250
36.G6a-7b 0/165 3/253
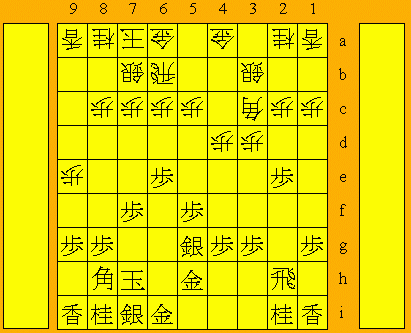
37.P3g-3f 43/208 0/253
The sealed move. Morishita expected P1f or P8f first. Especially P8f would have
been a good move.
38.K7a-8b 0/208 1/254
39.P1g-1f?! 1/209 0/254
Here P8f would definitely have been better.
40.G4a-5b 0/209 19/273
41.S5g-6f 16/225 0/273
42.G5b-6c 0/225 23/296
Habu was not very happy with his position here. However, he finds an ingenious
gold manoeuvre to mess up black's position.
43.P*6e 12/237 0/296
44.P7c-7d 0/237 4/300
45.P7ex7d 4/241 0/300
46.G6cx7d 0/241 0/300
47.P*7e 0/241 0/300
48.G7d-8e! 0/241 0/300
Sato did not give this move much thought, but now regretted not having played
P8f earlier to prevent it. This weird looking gold move give white good
fighting chances.
49.G6h-7g 27/268 0/300
50.G8ex7f 0/268 30/330
51.G7gx7f 0/268 0/330
52.L9a-9b 0/268 0/330
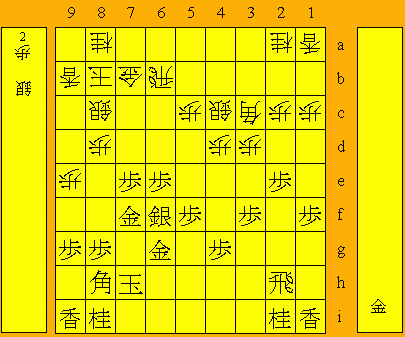
53.P8g-8f? 38/306 0/330
A mistake which gives white the advantage. It is hard to start fighting if
your king looks unsafe, but that is what Sato should have done. Referee
Kiriyama (9-dan) gave the following variation: 53.G*6d B4b (S*5b then G7d)
S5e P*7c Sx4d S5b B5e! and now white can not win the gold with P*6c because
the bishoppin makes G7d possible. Sato has a classic style of shogi and that
now works against him. He underestimated two unnatural looking goldmoves and
is now in trouble.
54.P*7c 0/306 0/330
55.P1f-1e 29/335 0/330
Black has nothing to do.
56.K8b-9a 0/335 0/330
57.K7h-8g 0/335 0/330
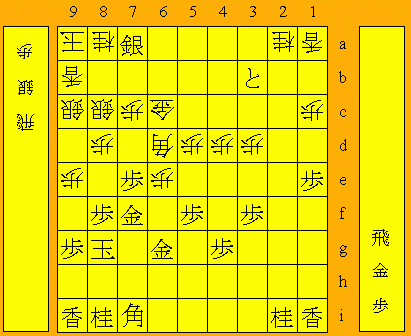
58.B3c-4b! 0/335 22/352
Great move. The plan is P5d followed by P*6d and it is surprisingly hard to
defend against that. After 59.P5e white also plays P5d and after 59.R5h the
rook is on a very awkward spot with possible bishopdrops on 6i and 4i.
59.B8h-7i 27/362 0/352
60.P5c-5d 0/362 9/361
61.P2e-2d 2/364 0/361
62.P*6d! 0/364 2/363
Ignores the faraway pawnpromotion and goes directly for the black king.
63.P2dx2c+ 32/396 0/363
64.P6dx6e 0/396 0/363
65.S6fx6e 29/425 0/363
66.P*6d 0/425 4/367
67.+P2c-3b 0/425 0/367
68.B4b-5c 0/425 1/368
69.R2h-2c+ 3/428 0/368
70.P6dx6e 0/428 52/420
71.+R2cx4c 3/431 0/420
72.B5c-6d 0/431 7/427
73.P*6c 7/438 0/427
74.R6bx6c 0/438 0/427
75.+R4cx6c 0/438 0/427
76.G7bx6c 0/438 0/427
77.S*7a 0/438 0/427
78.S*9c 0/438 3/430
79.R*6a?           7/445        0/430

The losing move. This does not threaten mate, so white has a very important
extra tempo. The only move to stay in the game was 79.R*5b. Then after
80.S*8b 81.G*7b white loses if he plays 82.Sx7a Gx7a R*6i S*6h because he
can not continue his attack. So he has to play 82.Sx7b Rx7b+ Sx7a +Rx7a S*8b
+Rx2a. This variation looks like the actual game sequence, but there is a
very important difference...

80.R*2h!           0/445        9/439

This threatens S*7h and at the same time defends the knight on 2a, thus
forcing a rook exchange and thus wins another tempo for the attack.

81.G7f-7g          12/457       0/439
82.S*7b            0/457        1/440
83.R6ax2a+         0/457        0/440
84.R2hx2a+         0/457        0/440
85.+P3bx2a         0/457        0/440

The difference between this position and the position in the variation on move
79 is clear. Black does not have a dragon on 2a and so has no attack.

86.R*6i            0/457        3/443
87.K8g-8h          1/458        0/443
88.R6ix2i+         0/458        5/448
89.+P2ax1a         0/458        0/448
90.B6dx1i+         0/458        9/457
91.R*3b            1/459        0/457
92.L*6f            0/459        5/462
93.G6g-7f          15/474       0/462
94.P7c-7d!         0/474        2/464
Another good move. White threatens to make his position completely safe by
95.S8b Sx8b+ +Bx8b. If black allows that, he will lose by a wide margin.

95.N*5e!           1/475        0/464

Great fighting move.

96.N*6d!           0/475        7/471

The correct reply. If 95.Px5e?? then L*9d and black wins.

97.G7fx6f          3/478        0/471
98.+B1ix5e         0/478        6/477
99.G6fx5e          0/478        0/477
100.N*7f           0/478        0/477
101.K8h-7h         0/478        0/477
102.P5dx5e         0/478        0/477
103.P*6i           0/478        0/477
104.G*6a           0/478        0/477
105.R3b-3a+        0/478        0/477
106.G6ax7a         0/478        0/477
107.+R3ax7a        0/478        0/477
108.S9c-8b         0/478        0/477
109.+R7a-4a        0/478        0/477
110.S*5h           0/478        0/477
Resigns            1/479        0/477
Time:              07:59:00     07:57:00

White is clearly not under threat. If black tries to run away by 111.K8g then
Sx6i+ Bx1c+ +S6h is another mating threat and black has no defense. With this
win Habu took his fifth consecutive Oi title and is now Lifetime Oi.