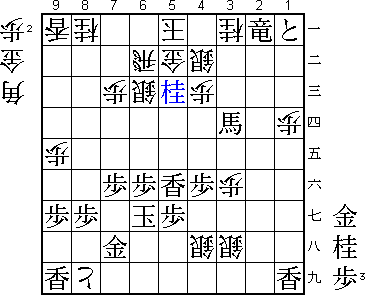
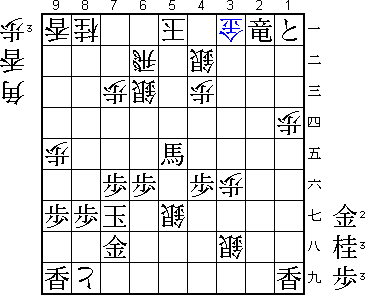
38th Oi Match Game 3
Black: Sato Yasumitsu, Challenger
White: Habu Yoshiharu, Oi
38th Oi-sen, Game 3, August 5th and 6th 1997
1.P2g-2f           4/4          0/0

Sato's loss in the first game was not caused by his choice of opening, so
playing the Aigakari again was not a surprise. However, this time it goes
a little different.

2.P8c-8d           0/4          3/3
3.P2f-2e           0/4          0/3
4.P8d-8e           0/4          0/3
5.G6i-7h           0/4          0/3
6.G4a-3b           0/4          1/4
7.P2e-2d           0/4          0/4
8.P2cx2d           0/4          0/4
9.R2hx2d           0/4          0/4
10.P*2c            0/4          0/4
11.R2d-2f          0/4          0/4
12.S7a-7b          0/4          6/10
13.K5i-5h          7/11         0/10
14.K5a-4b          0/11         18/28
15.P1g-1f          26/37        0/28
16.P9c-9d          0/37         6/34
17.P1f-1e          36/73        0/34
18.P9d-9e          0/73         12/46
19.G4i-3h          3/76         0/46
20.P3c-3d          0/76         8/54
21.S3i-4h          4/80         0/54
22.P6c-6d          0/80         77/131
23.P7g-7f          17/97        0/131
24.P8e-8f          0/97         2/133
25.P8gx8f          0/97         0/133
26.R8bx8f          0/97         0/133
27.P*8g            1/98         0/133
28.R8f-8d          0/98         1/134
29.P3g-3f?!        101/199      0/134

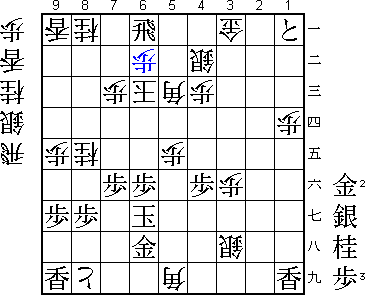
Played after long thought, but probably not good. After 29.P3f Habu gets the
upper hand. Better is probably 29.P*2d Px2d Rx2d P*6e (to defend the pawn on
3d) R2e R6d Bx2b+ Sx2b B*5e P*2d Rx2d P*2c Rx2c+ Sx2c Bx6d. A little strange
variation, but Sato agreed that in the actual game he had problems finding
good moves ("sakusenmake").

30.P6d-6e          0/199        142/276
31.N2i-3g          24/223       0/276
32.S7b-6c          0/223        2/278
33.P4g-4f          8/231        0/278

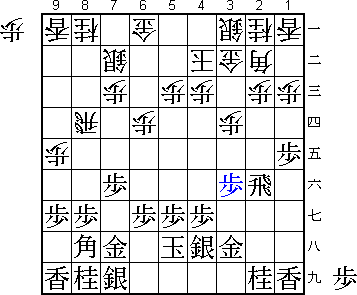
This move is unusual in this type of position and an indication that
Sato has no good continuation.

34.G6a-5b          0/231        29/307
35.S4h-4g          1/232        0/307
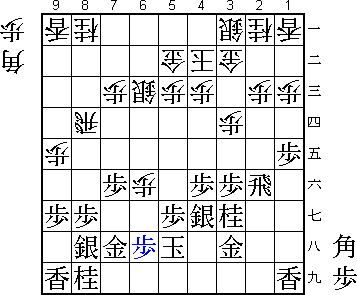
36.P6e-6f!         0/232        20/327

Habu takes the initiative with this perfectly timed pawn sacrifice.

37.B8hx6f          38/270       0/327
38.B2bx6f          0/270        1/328
39.P6gx6f          0/270        0/328
40.P*6e            0/270        2/330
41.S7i-8h          5/275        0/330

Black can not take the pawn: 41.Px6e B*4d R2i Bx9i+ S8h +Bx8i! (not +B9h
because of B*6f and black has a strong counterattack) Rx8i N*6f and white has
a big advantage.

42.P6ex6f          0/275        0/330
43.P*6h            0/275        0/330

This move is defense only and therefore very painful. Still, even though white
is a little better, the position is still very difficult.

44.R8d-8b          0/275        30/360
45.S8h-7g          3/278        0/360
46.R8b-6b?!        0/278        0/360

Shukan Shogi passes over this move without comment, but in Igo-Shogi weekly
Yashiki suggested 46.S5d as better. Black can not take the pawn on 6f because
of B*4d, and if black plays the same attack as in the game, the silver on 5d
is much better than on 6c. If black waits, white plays R6b and has a great
position to attack from.

47.P3f-3e!?        45/323       0/360

Black has to attack now, good or not. If he waits until after S5d he will have
no chance to win.

48.P3dx3e          0/323        2/362
49.P1e-1d          1/324        0/362
50.P1cx1d          0/324        0/362
51.P*2d            0/324        0/362
52.S3a-2b          0/324        16/378
53.P2dx2c+         2/326        0/378
54.G3bx2c          0/326        0/378
55.P*2d            1/327        0/378
56.G2c-3d          0/327        2/380
57.B*5f            12/339       0/380
58.P*2e            0/339        2/382
59.N3gx2e          7/346        0/382
60.G3dx2d          0/346        0/382
61.P*1b            0/346        0/382
62.N2a-3c          0/346        1/383
63.N2ex3c+         12/358       0/383
64.S2bx3c          0/358        0/383
65.P1bx1a+         0/358        0/383
66.P*2e            0/358        0/383
67.R2f-2h          9/367        0/383
68.N*5e            0/367        12/395
69.B5f-1b+         17/384       0/395
70.N5ex4g+         0/384        10/405
71.G3hx4g          0/384        0/405
72.K4b-5a          0/384        1/406
73.S7gx6f          6/390        0/406
74.P3e-3f?!        0/390        17/423

The wrong way around. If white plays 74.P*8h first, black cannot ignore this
move and has to play Gx8h. Then 76.P3f is the right continuation. Sato planned
to play 77.P*3h P2f R2i and wait for better times.

75.L*5f            19/409       0/423
76.P*8h            0/409        4/427
77.N*4e!           9/418        0/427

Now black can ignore the pawn attack and go for the white king. It seems that
black is getting the better game now.

78.S3c-4b          0/418        1/428
79.N*3d            6/424        0/428
80.G2dx3d          0/424        16/444
81.+B1bx3d         0/424        0/444
82.N*7d            0/424        0/444
83.P6h-6g          6/430        0/444
84.P8hx8i+         0/430        5/449
85.R2hx2e          3/433        0/449
86.S*3h            0/433        2/451
87.R2e-2a+         1/434        0/451

Everybody expected Sato to win from here. However, Habu still has his endgame
magic...

88.N*3a            0/434        3/454
89.G4g-4h          7/441        0/454
90.N7dx6f          0/441        1/455
91.P6gx6f          0/441        0/455
92.S*4g            0/441        0/455
93.K5h-6g          12/453       0/455
94.S4gx4h=!        0/453        3/458

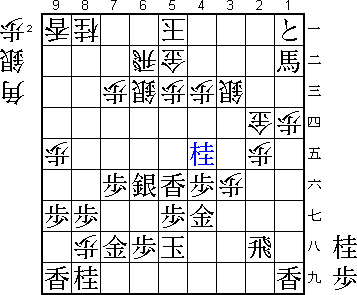
Non promoting is vital. This silver has to threaten to take the pawn on 5g with
check.

95.N4ex5c=?        8/461        0/458

Here Sato misses his best chance to win. After the tame looking 95.+B2d, white
has no good defense. For example 96.K6a +Bx4b Gx4b +Rx3a K7b (G*4a Nx5c= K7a
Nx4a+ also wins) S*7a B*4i K7g and white has no mate.

96.G5bx5c          0/461        5/463
97.L5fx5c+         1/462        0/463
98.S4bx5c          0/462        4/467
99.+R2ax3a         11/473       0/467
100.G*4a           0/473        0/467
101.+R3a-2a        0/473        0/467
102.N*5e           0/473        2/469
103.K6g-7g         0/473        0/469
104.S4hx5g=!       0/473        5/474

Another non promotion of the silver, this time to take an interposing piece on
6h with check after B*5i.

105.+B3d-3c        6/479        0/474
106.S5c-4b         0/479        1/475
107.+B3cx5e        0/479        0/475
108.G4a-3a!        0/479        0/475

It is hard to play a tough endgame like this in byoyomi, especially when your
opponent plays moves like this.

109.+R2a-2d?       0/479        0/475

Looks natural, but is not good. Best chance would have been 109.+Rx3a Sx3a
G*5c B*5i K6g and the outcome of the game is still anybody's guess.

110.P*5d           0/479        2/477
111.N*7e           0/479        0/477
112.B*5i           0/479        0/477
113.N*6h           0/479        0/477
114.S5gx6h=        0/479        1/478

Finally the work of this unpromoted silver is done. Sx4h=, Sx5g=, Sx6h= is the
manoeuvre that gives Habu the game.

115.G7hx6h         0/479        0/478
116.N*8e           0/479        0/478
117.K7g-6g         0/479        0/478
118.P5dx5e         0/479        0/478
119.N7ex6c=        0/479        0/478
120.R6bx6c         0/479        0/478
121.S*5b?          0/479        0/478

The final mistake. 121.P*5b is the last fighting chance. Of course Habu would
not miss 122.K6a G*5a K6b G*6a and black wins, but after 122.K6b black still
has some chances to win.

122.K5ax5b         0/479        0/478
123.+R2d-5d        0/479        0/478
124.B*5c!          0/479        0/478

Only the bishop as will become clear in the final position.

125.+R5dx6c        0/479        0/478
126.K5bx6c         0/479        0/478
127.R*6a           0/479        0/478
128.P*6b           0/479        0/478

Because of the bishop on 5c, N*7e does not lead to mate and black has no
defense.

Resigns            0/479        0/478
Time:              07:59:00     07:58:00

A difficult game where Habu's perfect endgame technique gave him the victory.
