38th Oi Match Game 2
Black: Habu Yoshiharu, Oi
White: Sato Yasumitsu, Challenger
38th Oi-sen, Game 2, July 23rd and 24th 1997
1.P7g-7f 0/0 0/0
2.P3c-3d 0/0 11/11
After Habu played his first move, Sato stood up and left the playing room.
Some thought this the pressure was getting to Sato in this game that he could
not afford to lose, but Sato's explanation was more simple: "I forgot my fan
and went to my room to get it".
3.P2g-2f 1/1 0/11
4.P8c-8d 0/1 0/11
5.P2f-2e 2/3 0/11
6.P8d-8e 0/3 0/11
7.G6i-7h 1/4 0/11
8.G4a-3b 0/4 0/11
9.P2e-2d 3/7 0/11
10.P2cx2d 0/7 0/11
11.R2hx2d 0/7 0/11
12.P8e-8f 0/7 2/13
13.P8gx8f 1/8 0/13
14.R8bx8f 0/8 0/13
15.R2dx3d 1/9 0/13
16.B2b-3c 0/9 3/16
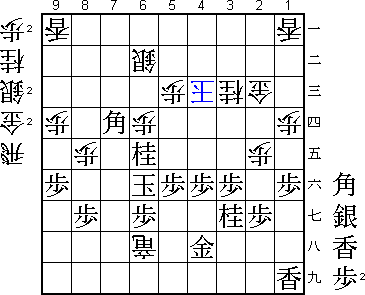
The difficult B3c variation in the Yokofudori (Side pawn) opening. An opening
in which every move can be your last :-).
17.R3d-3f 20/29 0/16
18.R8f-8d 0/29 8/24
19.R3f-2f 1/30 0/24
20.S3a-2b 0/30 0/24
21.P*8g 0/30 0/24
22.K5a-5b 0/30 3/27
23.K5i-5h 15/45 0/27
24.P1c-1d 0/45 11/38
25.P1g-1f 33/78 0/38
26.B3cx8h+ 0/78 14/52
27.S7ix8h 1/79 0/52
28.N2a-3c 0/79 0/52
29.G4i-3h 74/153 0/52
30.P*2e 0/153 8/60
31.R2f-5f 1/154 0/60
32.S7a-6b 0/154 60/120
33.P*2g 22/176 0/120
34.G6a-7b 0/176 11/131
35.S3i-4h 17/193 0/131
36.P7c-7d 0/193 9/140
37.P3g-3f 41/234 0/140
38.N8a-7c 0/234 117/257
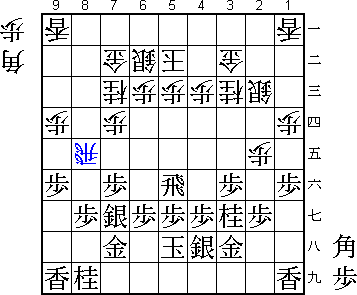
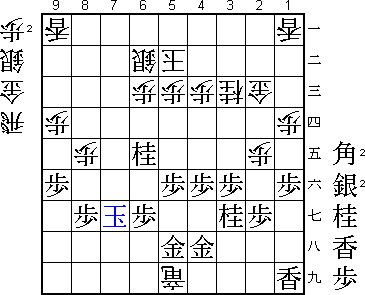
The sealed move. From the time taken by the two players for the moves around
this point one can conclude that the position is extremely difficult.
39.S8h-7g 87/321 0/257
40.S2b-2c 0/321 7/264
41.N2i-3g 13/334 0/264
42.P9c-9d 0/334 21/285
43.P9g-9f 11/345 0/285
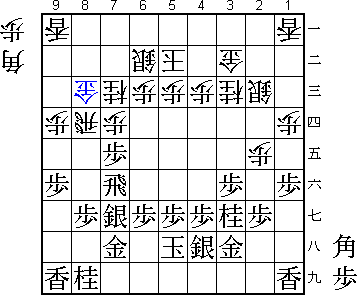
44.R8d-8e!? 0/345 23/308
A very interesting rook move. Sato wants to get the rook to the other side of
the board without sacrificing the pawn on 7d to do so. The planned route was
R8e-6e-6d-2d. If this plan succeeds, white will have a very comfortable
position, so Habu has to do something.

45.P7f-7e          26/371       0/308
46.R8e-8d          0/371        15/323

The only move. After 46.Rx7e S7f white loses the rook and after 46.Px7e P*7d
N6e S6f P6d Sx6e Px6e N*6d black is clearly better. 46.R8d seems to lose two
moves (R8d-8e-8d), but things are not that simple.

47.R5f-7f?         15/386       0/323

Underestimates white's next move. After 47.S7f both B*5d and Px7e Sx7e R8e lead
to very difficult positions.

48.G7b-8c!         0/386        17/340
This move, which moves the defending gold from the king and leaves the rook
with very little room, actually gives white the advantage.

49.B*5f            46/432       0/340

Habu planned to play 49.R8f, but after P*8e R5f Px7e S6f G7d white has clearly
the better position.

50.B*5d            0/432        17/357
51.P7ex7d          6/438        0/357
52.N7c-6e          0/438        6/363
53.R7f-8f          5/443        0/363
54.P*8e            0/443        9/372
55.B5fx2c+!?       1/444        0/372
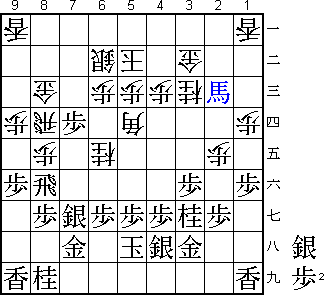
This was a big surprise for Sato. Habu feels that he will be pushed off the
board slowly and tries something drastic.

56.G3bx2c?!        0/444        25/397

White has a difficult win here. After 56.Px8f 57.+Bx3b 58.Px8g+ the white king
seems to be in at least as much danger as black's king, but it turns out that
the white king can not be mated easily. For example 59.G*7e +Px7h Gx8d black
has no mate, even with the extra rook. Or 59.G*7b +Px7h P7c+ Sx7c S*4b which
looks like hisshi, but after P4d is no hisshi at all. Finally 59.S*7b S5a is
also not enough. Still, after 56.Gx2c Sato still has the clear advantage and
one can hardly blame him for taking the safer albeit longer route.

57.R8f-5f          0/444        0/397
58.N6ex7g+         0/444        2/399
59.N8ix7g          0/444        0/399
60.G8cx7d          0/444        1/400
61.N*6f            5/449        0/400
62.B5d-6e          0/449        5/405

Sato has calculated that after this move he would still have a big advantage.
Black can not take this bishop: 63.Nx6e Gx6e R4f N*3d S*4a Kx4a Rx4c+ P*4b and
black has no continuation.

63.R5f-4f          4/453        0/405
64.S*5e            0/453        7/412
65.N7gx6e          2/455        0/412
66.S5ex4f          0/455        0/412
67.N6fx7d          0/455        0/412
68.R8dx7d          0/455        2/414
69.P*7g            0/455        0/414
70.R*8i            0/455        30/444
71.G*7i            0/455        0/444
72.R8ix9i+         0/455        1/445
73.P4gx4f          1/456        0/445
74.R7dx7g+         0/456        6/451
75.G7hx7g          1/457        0/451
76.+R9ix7i         0/457        0/451
77.S*5i            0/457        0/451
78.G*6h            0/457        19/470
79.K5h-4i          0/457        0/470
80.N*5f            0/457        0/470
81.P5gx5f          2/459        0/470
82.B*5g            0/459        0/470
83.R*5h            2/461        0/470
84.G6hx5h          0/461        2/472
85.K4ix5h          0/461        0/472
86.B5gx4h+         0/461        2/474
87.G3hx4h          10/471       0/474
88.L*5g            0/471        0/474
89.K5hx5g          0/471        0/474
90.+R7ix5i         0/471        0/474
91.G*5h            0/471        0/474
92.S*6h            0/471        0/474
93.K5g-6f          1/472        0/474
94.S6hx7g=         0/472        3/477
95.K6fx7g          0/472        0/477
96.+R5i-7i?!       0/472        1/478

A mistake which almost throws the game. After 96.P*7f 97.K6f 98.S*7g 99.K5g
100.S6h= white wins in great style. For example 101.K6f P7g+ is hisshi and
101.K4g G*5g G4hx5g R*4h Gx4h Sx5g+ is a beautiful mate. After 96.+R7i Sato
gives up an extra silver and he is lucky that this does not give Habu a chance
to reverse the game.

97.K7g-6f          0/472        0/478
98.S*6h            0/472        1/479
99.G5hx6h          3/475        0/479
100.+R7ix6h        0/475        0/479
101.N*6d?!         3/478        0/479

Habu goes for the "katachizukuri", but could have resisted a little longer by
101.B*7f. Still, Sato planned to play the great 102.G*6d! B*8d R*7d which is
also winning for white.

102.P6cx6d         0/478        0/479
103.B*7d           0/478        0/479
104.K5b-4b         0/478        0/479
105.S*5a           1/479        0/479
106.K4bx5a         0/479        0/479
107.S*5b           0/479        0/479
108.K5a-4b         0/479        0/479
109.S5bx4c+        0/479        0/479
110.K4bx4c         0/479        0/479
Resigns            0/479        0/479
Time:              07:59:00     07:59:00

Black has no mate and no defence. Sato wins this game by a noselength and
levels the match at 1-1.