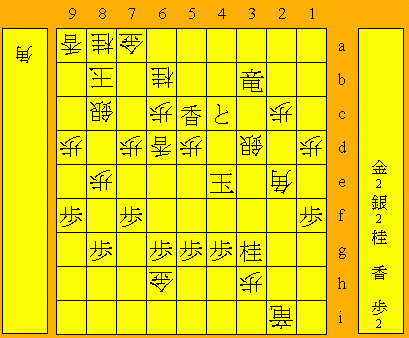
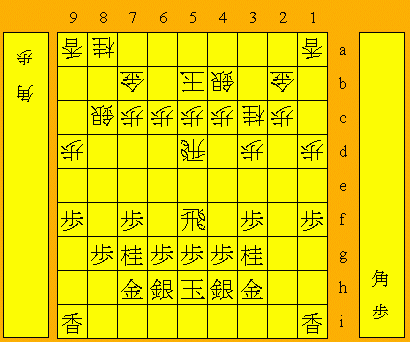
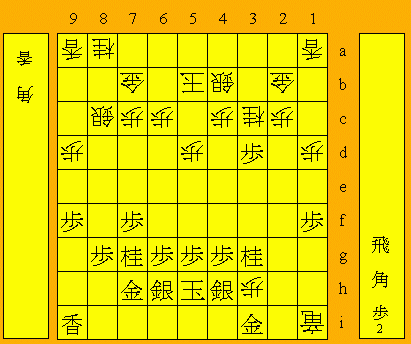
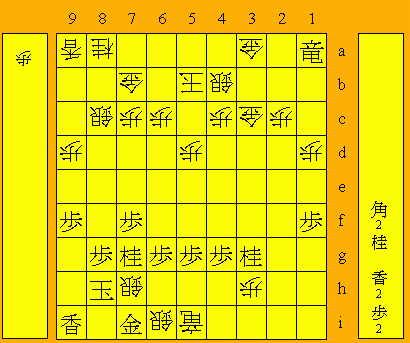
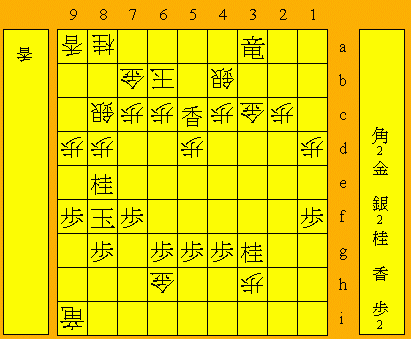
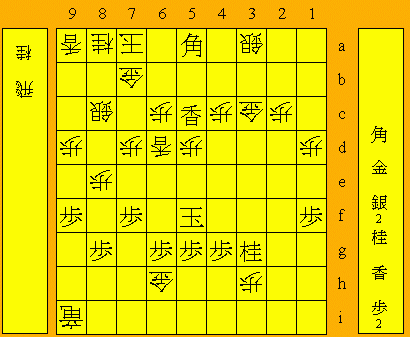
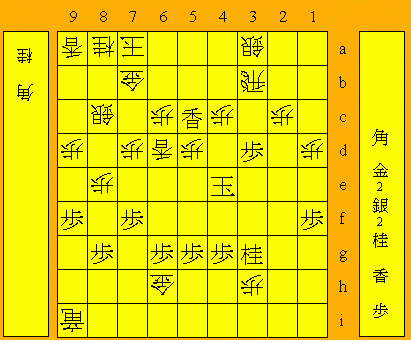
38th Oi Match Game 1
Black: Sato Yasumitsu, Challenger
White: Habu Yoshiharu, Oi
38th Oi-sen, Game 1, July 8th and 9th 1997
1.P2g-2f           4/4          0/0

A little unexpected. Sato is a specialist in the Yagura and commentators
expected that he would choose his favourite strategy in this all-important
first game. However, recently Sato has played Ai-gakari a lot, so this is
far from unfamiliar ground for him.

2.P8c-8d           0/4          3/3
3.P2f-2e           1/5          0/3
4.P8d-8e           0/5          0/3
5.G6i-7h           1/6          0/3
6.G4a-3b           0/6          1/4
7.P2e-2d           0/6          0/4
8.P2cx2d           0/6          1/5
9.R2hx2d           0/6          0/5
10.P*2c            0/6          3/8
11.R2d-2f          0/6          0/8
12.S7a-7b          0/6          3/11
13.K5i-5h          15/21        0/11

This move is unusual, but Sato is known for his thorough preparation and has
undoubtedly deeply studied this line of play.

14.P1c-1d          0/21         26/37
15.P7g-7f          50/71        0/37
16.P8e-8f          0/71         33/70
17.P8gx8f          0/71         0/70
18.R8bx8f          0/71         0/70
19.P*8g            5/76         0/70
20.R8f-8d          0/76         6/76
21.P1g-1f          19/95        0/76
22.K5a-5b          0/95         43/119
23.G4i-3h          50/145       0/119
24.R8d-7d          0/145        16/135
25.P9g-9f          12/157       0/135
26.P9c-9d          0/157        11/146
27.R2f-5f          8/165        0/146
28.S3a-4b          0/165        26/172
29.P3g-3f          13/178       0/172
30.S7b-8c          0/178        15/187
31.S7i-6h          8/186        0/187
32.G6a-7b          0/186        0/187
33.N2i-3g          23/209       0/187
34.P3c-3d!?        0/209        71/258

Habu has been unable to find the right plan against black's opening strategy.
"If I allow P3e I have no more moves" (Habu). 34.P3d is a move white hates
to play, as it puts the gold in an awkward position after the bishop exchange,
but white feels he has no choice.

35.B8hx2b+         31/240       0/258
36.G3bx2b          0/240        0/258
37.S3i-4h          0/240        0/258
38.N2a-3c          0/240        29/287
39.N8i-7g          38/278       0/287
40.R7d-5d!         0/278        44/331

A very brave move and the only way to stay in the game.

41.R5fx5d          87/365       0/331
42.P5cx5d          0/365        0/331
43.P3f-3e          0/365        0/331
44.R*2i            0/365        29/360
45.G3h-3i          4/369        0/360
46.R2ix1i+         0/369        3/363
47.P3ex3d          0/369        0/363
48.P*3h            0/369        34/397

49.G3i-4i?         21/390       0/397

"I was a little over-optimistic" (Sato). This natural gold move is a mistake
that gives Habu the advantage. Better would have been 49.Px3c+ Gx3c N*5c!
(N*4e is another possibility) Px3i+ B*6a K5c R*5b K4d Bx7b+ and black seems to
be winning even though after K3e things are not 100% clear.

50.B*6i            0/390        8/405
51.K5hx6i          44/434       0/405
52.+R1ix4i         0/434        0/405
53.S4h-5i          1/435        0/405
54.L*5h            0/435        23/428
55.P3dx3c+         1/436        0/428
56.G2bx3c          0/436        1/429
57.R*2a            4/440        0/429
58.G*3a            0/440        15/444
59.R2ax1a+         1/441        0/444
60.L5hx5i+         0/441        0/444
61.S6hx5i          0/441        0/444
62.S*5h            0/441        0/444
63.K6i-7i          0/441        0/444
64.+R4ix5i         0/441        1/445
65.K7i-8h          0/441        0/445
66.S5h-6i=         0/441        1/446
67.G7h-7i          34/475       0/446
68.S*7h?           0/475        5/451

Habu's turn to make a big mistake that might have cost him the game. 68.S6h is
better, even though the situation is by far not as easy as it looks.

69.L*5c!           4/479        0/451

"Sato Magic". Sato plays a kind of surprising endgame move that has been played
by Habu so many times in the past. From now on the advantage again shifts to
black, but Sato used his final minutes before byoyomi for this move.

70.K5b-6b          0/479        5/456
71.G7ix7h          0/479        0/456
72.S6ix7h+         0/479        6/462
73.K8hx7h          0/479        0/462
74.G*6h            0/479        8/470

It seems like 74.G*7i is an easy win after K8h +R6h K9g +Rx7g because black
does not seem to have a defense against N*8e K9h +R7h Any*8h +R8i. For example,
S*8e N*8e P*8f and black wins. However, there is a hidden defence: +Rx3a!. Now
N*8e K9h +R7h G*8h Sx3a Gx7h is winning for black. Also N*8e K9h +R6h N*8h Sx3a
S*5a K7a S*6b and black just has enough material to mate the white king.

75.K7h-8h          0/479        0/470
76.+R5i-7i         0/479        0/470
77.K8h-9g          0/479        0/470
78.+R7ix9i         0/479        0/470
79.K9g-8f          0/479        0/470
80.L*8d            0/479        1/471
81.L*8e            0/479        0/471
82.L8dx8e          0/479        1/472
83.N7gx8e          0/479        0/472
84.P*8d            0/479        1/473
85.+R1ax3a!        0/479        0/473

If Sato would have won, this would have been the decider.

86.P8dx8e          0/479        0/473
87.K8f-7e          0/479        0/473
88.P7c-7d          0/479        2/475

Creates an excape route for the king and thereby complicates the black task.

89.K7e-6f          0/479        0/475
90.L*6d            0/479        0/475
91.K6f-5f          0/479        0/475
92.S4bx3a          0/479        0/475
93.B*5a            0/479        0/475
94.K6b-7a          0/479        0/475

95.B5ax3c+?        0/479        0/475

Until now Sato has played the endgame perfectly, but finally byoyomi is costing
him the game. White has no mate, so if black can make a strong mating threat
he will win. Sato planned to play 95.L5b+ but calculated just in time that
P5e K4e G*4d K3f R*3b would cost him the lance. With no time left to look for
another mating threat he plays the safety Bx3c+. Black could have won here by
playing 95.N*8d Sx8d L*8c. If Gx8c then S*7b Kx7b B*6a K8b S*7a K9c Bx8c+ leads
to mate.

96.R*3f            0/479        0/475
97.K5f-4e          0/479        0/475
98.R3fx3c          0/479        0/475
99.P*3d            0/479        0/475
100.R3c-3b         0/479        3/478

101.S*3c?          0/479        0/478

The final mistake. If black plays 101.L*3c white would have found it much
harder to win.

102.+R9i-2i        0/479        0/478
103.S3cx3b=        0/479        0/478
104.S3ax3b         0/479        0/478
105.R*3a           0/479        0/478
106.K7a-8b         0/479        0/478
107.B*7a           0/479        0/478
108.G7bx7a         0/479        0/478
109.R3ax3b+        0/479        0/478
110.N*6b           0/479        0/478
111.P3d-3c+        0/479        0/478
112.B*2e           0/479        1/479
113.+P3cx4c        0/479        0/479
114.S*3d           0/479        0/479
Resigns            0/479        0/479
Time:              07:59:00     07:59:00
