37th Kio Match Game 2
[Black "Kubo Toshiaki, Kio"]
[White "Goda Masataka, Challenger"]
[Event "37th Kio-sen, Game 2"]
[Date "February 25th 2012"]
1.P7g-7f     00:00:00  00:00:00
2.P3c-3d     00:00:00  00:00:00
3.P7f-7e     00:00:00  00:00:00
4.P8c-8d     00:00:00  00:00:00
5.R2h-7h     00:00:00  00:00:00
6.P8d-8e     00:00:00  00:00:00
7.K5i-4h     00:00:00  00:00:00
8.S7a-6b     00:00:00  00:00:00
9.R7h-7f     00:00:00  00:00:00
10.B2bx8h+   00:00:00  00:03:00
11.S7ix8h    00:00:00  00:03:00
12.S3a-2b    00:00:00  00:03:00

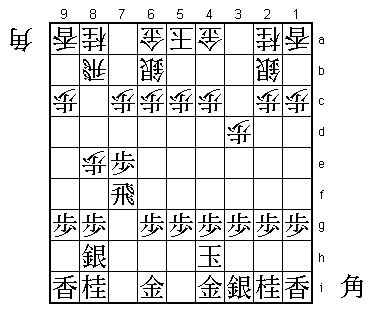
13.P7e-7d?!  00:02:00  00:03:00

This was a surprise. Two days earlier, this position also appeared in the 4th game
 of the Osho match and there Kubo played the solid 13.K3h. He won that game, so
there didn't seem to be any reason to play something different here. Furthermore,
13.P7d leads to a very sharp fight and is much more risky than 13.K3h.

14.P7cx7d    00:02:00  00:11:00
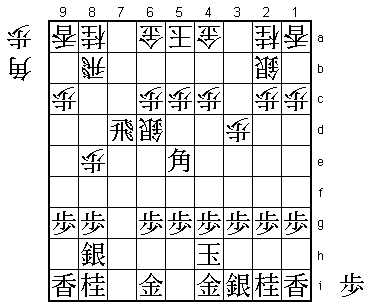
15.B*5e      00:07:00  00:11:00

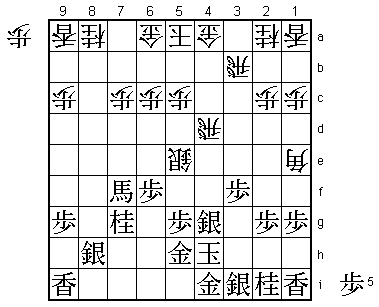
Now there is no turning back. The final chance to keep this game in reasonably quiet
waters is 15.Rx7d. Then 16.S3c N7g K4b R7e P8f Px8f Rx8f G7h B*5d is a variation that
has been played in only one official game: Nagase against Murayama in the Ginga-sen,
a game Murayama won. However, it seems that this position is unclear, giving both
sides chances to win. The move 15.B*5e is a new move, but Kubo admitted after the
game that he had played it multiple times in training games.

16.S6b-7c    00:07:00  00:20:00
17.R7fx7d    00:07:00  00:20:00
18.S7c-6d    00:07:00  00:25:00

The most natural way to defend, but this needed careful calculation as it seems
risky with all the open lines. It seems like 18.B*6d is more solid, but after 19.Rx7c+
Bx5e +Rx8b Bx8b R*8d the white position is hard to defend. For example, G7b fails to
P*7c Nx7c S*8c which is good for black. The important point in this variation is that
the black king is on 4h instead of 5i, so a bishop fork on 9e is not possible.

19.R7d-8d!   00:33:00  00:25:00

Only 19 moves have been played in this game and we are not even at the one hour mark,
but Kubo already sacrifices his rook. The alternative is 19.Rx6d Px6d Bx6d but he
judged that despite being able to make a promoted bishop, the black attack would
not be strong enough.

20.R8bx8d    00:33:00  00:28:00
21.B5ex2b+   00:33:00  00:28:00
22.B*4d      00:33:00  01:41:00

Goda was not really sure whether to play 22.B*5e or 22.B*4d here. He didn't like
22.B*5e +Bx5e Sx5e B*9e R*9d B7g R5d P5f S4d S6e because it seems like black also
gets fighting chances.

23.+B2bx4d   00:35:00  01:41:00
24.P4cx4d    00:35:00  01:41:00
25.B*2b      01:07:00  01:41:00

Kubo was counting on this bishop drop, because if he can pick up the lance and
knight, he will no longer be behind in material and the white position seems hard
to defend because there is no safe area for the king. The professionals in the
press room agreed and thought that Kubo had a good position here. However, Goda
has found a rather difficult but brilliant counter. Again, Kubo didn't have much
choice here, because 25.B*9e is not a big deal after 26.R*9d and 27.Bx8d Rx8d R*2b
B*3b or 27.B7g R8b is good for white.

26.P8e-8f    01:07:00  01:56:00
27.P8gx8f    01:10:00  01:56:00
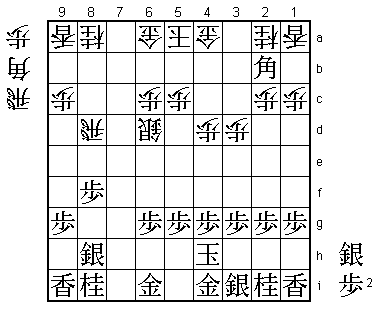
28.R*1b!     01:10:00  01:56:00

Great move, but not in itself. If white is unable to activate this rook, it will
just be a worthless piece of wood.

29.B2bx4d+   01:10:00  01:56:00
30.P*4f!     01:10:00  01:56:00

The combination of this move with the earlier 26.P8f pawn sacrifice is the great
part of Goda's counter plan. Note that white has forced black to take the pawn on
4d, so this pawn drop on 4f is now possible.

31.P4gx4f    01:21:00  01:56:00
32.R8dx8f    01:21:00  01:56:00
33.+B4d-7g   01:22:00  01:56:00

No choice, because white threatens the fork Rx4f next. Again, this is made possible
by the rook drop on 1b.

34.R8fx4f    01:22:00  01:56:00
35.P*4g      01:22:00  01:56:00
36.R4f-4b    01:22:00  01:56:00

Now the two rooks are connected, and this rook in particular is pointing straight
at the head of the king. Still, white needs to bring the rook on 1b into play.

37.+B7g-9e   01:27:00  01:56:00
38.P*7c      01:27:00  02:00:00

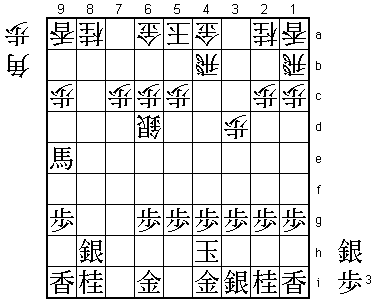
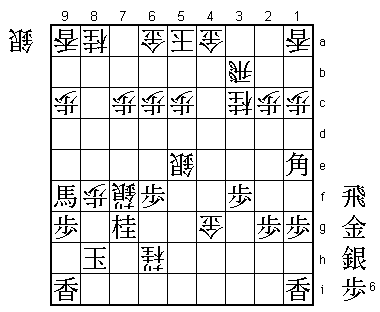
39.G6i-5h?   01:36:00  02:00:00

It seems like Goda is outplaying Kubo here, but the position is actually still quite
close. It is only here that Kubo makes an important mistake. If he would have played
39.P*8d here, things would still have been complicated. The obvious threat is to
promote the pawn, but the defense-only 40.P*8b is a move that few professionals like
to play and Goda is no exception. He had planned to answer 39.P*8d with 40.R4e but
after 41.+B9f P*4f Px4f Rx4f P*4g Rx9f Px9f the rook that was attacking the head of
the king is gone and it looks like black has a chance to put his position back in
order.

40.P3d-3e    01:36:00  02:14:00
41.N8i-7g    01:54:00  02:14:00
42.R1b-3b    01:54:00  02:27:00

Goda has managed to also get the sleeping rook on 1b back into play, attacking the
black king with both rooks. He now has a winning position.

43.P6g-6f    02:26:00  02:27:00
44.P3e-3f    02:26:00  02:39:00
45.P3gx3f    02:27:00  02:39:00
46.P*4f      02:27:00  02:40:00
47.P4gx4f    02:30:00  02:40:00
48.R4bx4f    02:30:00  02:40:00
49.S*4g      02:43:00  02:40:00
50.R4f-4d    02:43:00  02:40:00
51.+B9e-8e   02:46:00  02:40:00
52.S6d-5e    02:46:00  02:50:00
53.+B8e-7f   02:53:00  02:50:00
54.B*1e!     02:53:00  03:13:00

Very powerful bishop drop after which the black position crumbles instantly.

55.N2i-3g    02:58:00  03:13:00

Of course 55.K3h fails to P*4f, but also after 55.N3g, the rest of the game becomes
a clinic in picking off all the defensive pieces and running down the naked king.

56.R4dx4g+   02:58:00  03:14:00
57.G5hx4g    02:58:00  03:14:00
58.P*4f      02:58:00  03:14:00
59.S3i-3h    02:58:00  03:14:00
60.P4fx4g+   02:58:00  03:14:00
61.S3hx4g    02:58:00  03:14:00
62.S*4f      02:58:00  03:18:00
63.G4i-3h    02:58:00  03:18:00
64.S4fx3g+   02:58:00  03:24:00
65.G3hx3g    02:58:00  03:24:00
66.B1ex3g+   02:58:00  03:24:00
67.K4hx3g    02:58:00  03:24:00
68.N*4e      02:58:00  03:24:00
69.K3g-4h    02:58:00  03:24:00
70.G*3g      02:58:00  03:24:00
71.K4h-5h    02:58:00  03:24:00
72.G3gx4g    02:58:00  03:24:00
73.K5h-6i    02:59:00  03:24:00
74.N4ex5g+   02:59:00  03:24:00
75.K6i-7i    02:59:00  03:24:00
76.S*6g      02:59:00  03:24:00
77.+B7f-8g   02:59:00  03:24:00
78.P*8f      02:59:00  03:25:00
79.B*1e      03:01:00  03:25:00
80.N2a-3c    03:01:00  03:25:00
81.+B8g-9f   03:06:00  03:25:00
82.+N5g-6h   03:06:00  03:29:00
83.K7i-8i    03:07:00  03:29:00
84.G*7h      03:07:00  03:29:00
85.K8i-9h    03:07:00  03:29:00
86.G7hx8h    03:07:00  03:29:00
87.K9hx8h    03:07:00  03:29:00
88.S6g-7f+   03:07:00  03:29:00
Resigns      03:07:00  03:29:00

Finally, Kubo resigns. There is a simple mate after S*8g next, but no defense. For
example, after 89.G*9h there is no mate, but white just brings in another general
with 90.Sx6f and wins. A great win for Goda with the white pieces against Kubo's ace
opening. He is now right back in the match and Kubo may have regretted his opening
experiment here. Game three will now become very important in this best-of-five match
and Goda has the black pieces in that game.
