37th Kio Match Game 1
[Black "Goda Masataka, Challenger"]
[White "Kubo Toshiaki, Kio"]
[Event "37th Kio-sen, Game 1"]
[Date "February 5th 2012"]
1.P2g-2f     00:00:00  00:00:00
2.P3c-3d     00:00:00  00:00:00
3.P7g-7f     00:00:00  00:00:00
4.P5c-5d     00:00:00  00:00:00
5.P2f-2e     00:00:00  00:00:00
6.R8b-5b     00:00:00  00:00:00

The furigoma gave the black pieces to challenger Goda and as expected, Kubo picks
his favorite opening, the Gokigen Nakabisha. From the pre-match comments by both
players, it seemed clear that this match was going to be a Furibisha (Kubo) against
Ibisha (Goda) battle and this is how the opening of the first game is being played.

7.S3i-4h     00:00:00  00:00:00
8.P5d-5e     00:00:00  00:00:00
9.K5i-6h     00:00:00  00:00:00
10.B2b-3c    00:00:00  00:00:00
11.P3g-3f    00:00:00  00:00:00
12.S3a-4b    00:00:00  00:00:00
13.S4h-3g    00:00:00  00:00:00
14.S4b-5c    00:00:00  00:00:00
15.S3g-4f    00:00:00  00:00:00
16.S5c-4d    00:00:00  00:00:00
17.G4i-5h    00:00:00  00:00:00
18.K5a-6b    00:00:00  00:00:00
19.K6h-7h    00:00:00  00:00:00
20.K6b-7b    00:00:00  00:00:00
21.P6g-6f    00:00:00  00:00:00
22.K7b-8b    00:00:00  00:00:00
23.G5h-6g    00:00:00  00:00:00
24.P6c-6d    00:00:00  00:00:00
25.B8h-7g    00:00:00  00:00:00
26.L9a-9b    00:00:00  00:00:00
27.K7h-8h    00:00:00  00:00:00
28.K8b-9a    00:00:00  00:00:00
29.S7i-7h    00:00:00  00:00:00
30.S7a-8b    00:00:00  00:00:00
31.P9g-9f    00:00:00  00:00:00
32.G6a-7a    00:00:00  00:05:00
33.P9f-9e    00:00:00  00:05:00
34.R5b-6b    00:00:00  00:15:00
35.P8g-8f    00:26:00  00:15:00
36.G4a-5b    00:26:00  00:23:00
37.S7h-8g    00:26:00  00:23:00

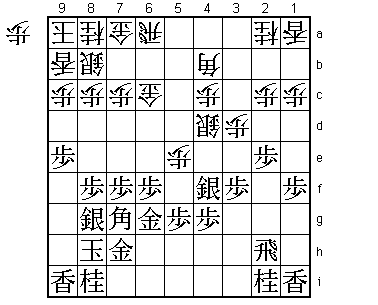
Goda started with the aggressive S3g quick attack, but after S4d, the game has
turned into a strategic battle with Kubo moving into the Anaguma and Goda responding
by moving into the Silver Crown formation.

38.P6d-6e    00:26:00  00:25:00
39.P6fx6e    00:26:00  00:25:00
40.R6bx6e    00:26:00  00:25:00
41.G6i-7h    00:26:00  00:25:00
42.R6e-6a    00:26:00  00:25:00
43.P*6f      00:45:00  00:25:00
44.G5b-6c    00:45:00  00:49:00
45.P1g-1f    01:00:00  00:49:00
46.B3c-4b    01:00:00  00:53:00

47.R2h-3h    01:55:00  00:53:00

Goda spend 55 minutes on this move (and probably thought about during most of the
lunch break) because here he realized that there is a problem with moving the rook
to 3h. However, he couldn't find anything else, so was forced to play it anyway.

48.P7c-7d    01:55:00  01:05:00

This is the problem. Black's plan is to push the pawn on the third file, but after
49.P3e Px3e Sx3e R3a S3d S4e black is stuck for good moves. For example, P*3c P*3g
Rx3g P*3f P3b+ Rx4b Sx4c+ R3e R2g B6d P6e B7c (the point of 48.P7d) and because
white's major pieces are working better, it looks like white is better and this is
the reason why Goda felt like he was in trouble. However, things may not have been
that bad for black after +S4d next.

49.L9i-9h    02:19:00  01:05:00

After the lunch break, Goda could be seen taking off his glasses and repeatedly
wiping his face with his hands, sighing deeply. He clearly seemed unhappy. Despite
this, Goda is not the type of player to easily throw the towel in a slightly inferior
position, as we will see.

50.L1a-1b    02:19:00  01:21:00
51.K8h-9i    02:19:00  01:21:00
52.G6c-7c    02:19:00  01:23:00
53.G7h-8h    02:22:00  01:23:00
54.P8c-8d    02:22:00  01:24:00
55.R3h-2h    02:33:00  01:24:00
56.P1c-1d    02:33:00  01:30:00
57.G6g-6h    02:36:00  01:30:00
58.R6a-5a    02:36:00  01:41:00
59.G6h-7h    02:47:00  01:41:00
60.P5e-5f    02:47:00  01:53:00
61.P5gx5f    02:47:00  01:53:00
62.R5ax5f    02:47:00  01:53:00
63.P6f-6e    02:47:00  01:53:00
64.R5f-5a    02:47:00  02:00:00
65.P2e-2d    02:56:00  02:00:00
66.B4bx2d    02:56:00  02:04:00
67.P*5g      02:58:00  02:04:00
68.R5a-5b    02:58:00  02:08:00
69.R2h-6h    03:05:00  02:08:00
70.R5b-6b    03:05:00  02:18:00

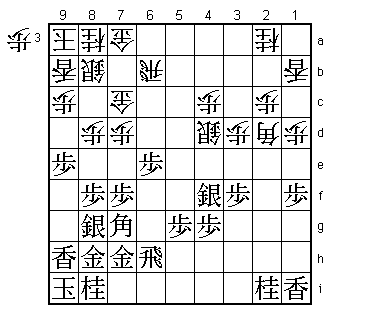
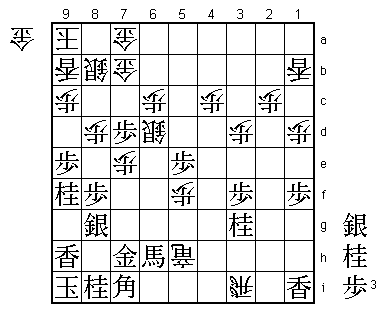
Black has moved into an Anaguma to strengthen the defense, but white has three pawns
in hand against none for black, so this position is clearly better for white, albeit
an advantage that will be very hard to cash in.

71.N2i-3g?   03:10:00  02:18:00

This makes white task considerably easier. Correct would have been to play P6d
immediately. Then 72.S5c as in the game doesn't work because the black bishop can
promote. Therefore, after 71.P6d, white again has to play 72.N3c, but the difference
in tempo is significant after 73.Bx4d Px4d S*5c R6a S5b= Rx6d Rx6d Gx6d R*1a R*6i
S6a+ G7b Rx1b+ G7c and the position is quite unclear.

72.N2a-3c    03:10:00  02:22:00
73.P6e-6d    03:14:00  02:22:00
74.S4d-5c    03:14:00  02:26:00
75.P6d-6c+   03:25:00  02:26:00
76.G7cx6c    03:25:00  02:26:00

77.S8g-9f!   03:25:00  02:26:00

Goda is not giving up. This silver threatens to exchange pawns on the 8th file,
which gives black a pawn for the nasty threat P*2e B1c Bx3c+.

78.N8a-7c    03:25:00  02:52:00

Defends against the pawn exchange, but moving this knight up importantly weakens
the Anaguma castle.

79.S9f-8g    03:25:00  02:52:00

Simply moving back into the castle. Maybe not much fireworks in this sequence, but
by moving the silver back and forth Goda has scored an important point against the
Anaguma. In bad positions, most players have the tendency to force the issue and
put all their eggs in one basket. Goda shows the importance of trying to slowly
claw your way back into the game with subtle maneuvers inviting weaknesses.

80.S5c-6d    03:25:00  03:02:00
81.R6h-2h    03:25:00  03:02:00
82.N7c-6e    03:25:00  03:04:00
83.B7g-6f    03:25:00  03:04:00
84.G6c-7c    03:25:00  03:04:00
85.S4f-5e    03:32:00  03:04:00
86.S6d-5c    03:32:00  03:08:00
87.P7f-7e    03:32:00  03:08:00
88.P*5d      03:32:00  03:22:00
89.S5e-4f    03:32:00  03:22:00
90.P7dx7e    03:32:00  03:22:00
91.P5g-5f    03:40:00  03:22:00
92.S5c-6d    03:40:00  03:23:00
93.P5f-5e    03:40:00  03:23:00
94.R6b-5b    03:40:00  03:24:00
95.R2h-5h    03:46:00  03:24:00
96.P*6g      03:46:00  03:32:00
97.P5ex5d    03:48:00  03:32:00
98.P*5g      03:48:00  03:32:00
99.R5h-2h    03:48:00  03:32:00
100.R5bx5d   03:48:00  03:32:00
101.P*7d     03:51:00  03:32:00
102.G7c-7b   03:51:00  03:33:00
103.G7hx6g   03:53:00  03:33:00
104.P5g-5h+  03:53:00  03:38:00
105.P*5e     03:53:00  03:38:00

106.R5d-4d!  03:53:00  03:38:00

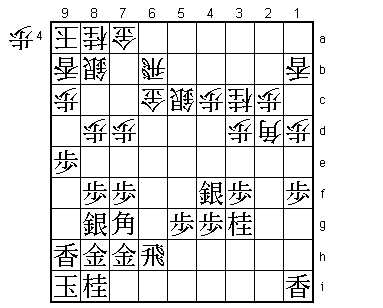
This is not an easy move to play, as white is going to exchange the bishop for the
bad silver on 4f. However, Kubo has judged correctly that the promotion of the rook
is more important here.

107.R2hx5h   03:53:00  03:38:00
108.B2dx4f   03:53:00  03:38:00
109.P4gx4f   03:53:00  03:38:00
110.R4dx4f   03:53:00  03:38:00
111.B*4b     03:55:00  03:38:00
112.P*6c     03:55:00  03:41:00
113.B4bx3c+  03:55:00  03:41:00
114.R4f-4g+  03:55:00  03:42:00

After the game, Goda admitted that here he felt that there was no way to win this
position. This may be true, but for someone who has more or less given up, he puts
up a very decent fight.

115.G6g-6h   03:55:00  03:42:00
116.S*7i     03:55:00  03:45:00
117.G8h-7h   03:55:00  03:45:00
118.P*5g     03:55:00  03:47:00
119.G6hx5g   03:55:00  03:47:00
120.+R4g-4i  03:55:00  03:48:00
121.+B3cx3d  03:55:00  03:48:00
122.N6ex5g+  03:55:00  03:48:00
123.B6fx5g   03:55:00  03:48:00
124.+R4ix5h  03:55:00  03:48:00
125.B5gx7i   03:55:00  03:48:00
126.R*3i     03:55:00  03:49:00
127.N*9f     03:55:00  03:49:00
128.P*5f     03:55:00  03:50:00
129.+B3d-3e  03:55:00  03:50:00
130.P*3d     03:55:00  03:51:00
131.+B3e-6h  03:55:00  03:51:00

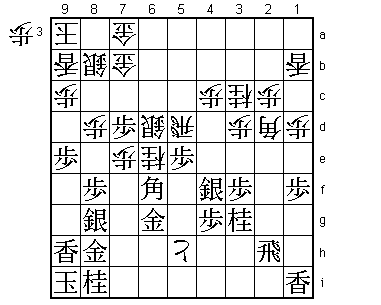
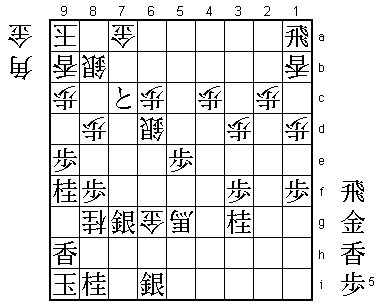
Black has managed to weave a little hope for a counter attack in the position. If
he is allowed to play Nx8d, things will suddenly become much more interesting.

132.+R5hx6h  03:55:00  03:51:00
133.B7ix6h   03:55:00  03:51:00
134.P7e-7f!  03:55:00  03:51:00

The decisive move. Kubo not only creates an attacking base on 7f, but also indirectly
defends 8d because Nx8d fails to the fork B*6f.

135.S*8h     03:58:00  03:51:00
136.B*7e     03:58:00  03:55:00
137.S8gx7f   03:59:00  03:55:00
138.P5f-5g+  03:59:00  03:55:00
139.B6h-7g   03:59:00  03:55:00
140.G*6g     03:59:00  03:55:00

He may have been just polite to his opponent, but after the game Kubo said that only
here he felt confident that he would win the game.

141.G7hx6g   03:59:00  03:55:00
142.+P5gx6g  03:59:00  03:55:00
143.S7fx6g   03:59:00  03:55:00
144.B7e-5g+  03:59:00  03:55:00
145.S6g-7h   03:59:00  03:55:00
146.G*6g     03:59:00  03:56:00
147.G*6i     03:59:00  03:56:00
148.R3ix1i+  03:59:00  03:56:00
149.R*1a     03:59:00  03:56:00
150.L*7f     03:59:00  03:56:00
151.N*7c     03:59:00  03:56:00
152.L7fx7g+  03:59:00  03:56:00
153.S8hx7g   03:59:00  03:56:00
154.+R1ix6i  03:59:00  03:57:00
155.S7hx6i   03:59:00  03:57:00
156.G7bx7c   03:59:00  03:57:00
157.P7dx7c+  03:59:00  03:57:00
158.N*8g     03:59:00  03:57:00
Resigns      03:59:00  03:57:00

Mate after 159.K8h +B7i Kx8g B*7h Sx7h +Bx7h K7f G*7e so Goda resigned here. A good
start is very important in a short match like the Kio and Kubo couldn't have wished
for a better start: a solid win with the white pieces. Can Goda bounce back in game
two?
