36th Kio Match Game 3
[Black "Kubo Toshiaki, Kio"]
[White "Watanabe Akira, Challenger"]
[Event "36th Kio-sen, Game 3"]
[Date "March 6th 2011"]
1.P7g-7f     00:00:00  00:00:00
2.P8c-8d     00:00:00  00:00:00
3.P5g-5f     00:01:00  00:00:00
4.P8d-8e     00:01:00  00:01:00
5.B8h-7g     00:01:00  00:01:00
6.P5c-5d     00:01:00  00:01:00
7.R2h-5h     00:01:00  00:01:00

The Gokigen Nakabisha, which usually leads to a sharp game, often skipping the middle
game and going straight from the opening to the endgame. However, in this game both
players go for a much slower build-up, in sharp contrast with the first two games
of this match.

8.S7a-6b     00:01:00  00:02:00
9.K5i-4h     00:01:00  00:02:00
10.K5a-4b    00:01:00  00:02:00
11.K4h-3h    00:01:00  00:02:00
12.P3c-3d    00:01:00  00:02:00
13.S7i-6h    00:01:00  00:02:00
14.K4b-3b    00:01:00  00:04:00
15.K3h-2h    00:01:00  00:04:00
16.G6a-5b    00:01:00  00:04:00
17.P1g-1f    00:01:00  00:04:00
18.S6b-5c    00:01:00  00:05:00
19.P1f-1e    00:01:00  00:05:00
20.P4c-4d    00:01:00  00:08:00
21.L1i-1h    00:01:00  00:08:00
22.G5b-4c    00:01:00  00:08:00
23.K2h-1i    00:01:00  00:08:00
24.B2b-3c    00:01:00  00:10:00
25.S3i-2h    00:03:00  00:10:00
26.K3b-2b    00:03:00  00:10:00
27.G4i-3i    00:04:00  00:10:00
28.S3a-3b    00:04:00  00:14:00
29.S6h-5g    00:23:00  00:14:00
30.P2c-2d    00:23:00  00:14:00
31.P2g-2f    00:23:00  00:14:00
32.S3b-2c    00:23:00  00:34:00
33.S2h-2g    00:23:00  00:34:00

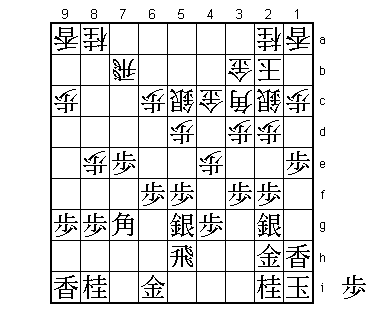
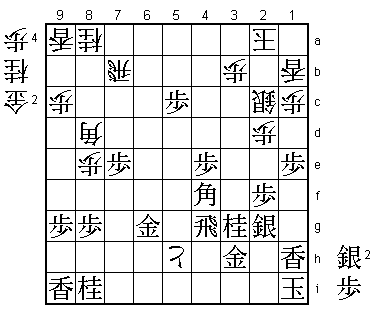
Kubo is playing an interesting castle strategy in this game. First pushing the edge
pawn and then moving into the Anaguma looks like a strange combination, and moving
up this silver next further seems to weaken the king formation. Although Watanabe
likes to play the Anaguma himself, he decided to play a Ginkanmuri formation to
attack the high Anaguma.

34.G4a-3b    00:23:00  00:34:00
35.G3i-2h    00:28:00  00:34:00
36.P4d-4e    00:28:00  00:35:00
37.P6g-6f    00:29:00  00:35:00
38.P7c-7d    00:29:00  00:38:00
39.P3g-3f    00:30:00  00:38:00
40.P7d-7e    00:30:00  00:57:00
41.P7fx7e    00:31:00  00:57:00
42.R8b-7b    00:31:00  00:57:00

43.N2i-3g    00:50:00  00:57:00

It is hard to judge this move. From an Anaguma point of view, moving up this knight
is a cardinal sin and is described as "having the bear take off his underwear".
Without the knight protecting the side, the king is very exposed. The reason for
43.N3g is that it indirectly defends the pawn on 7e, because 44.Rx7e is answered by
45.P*7f Rx7f Nx4e. Watanabe must have been licking his chops here, but strangely
 enough Kubo seems to be getting away with this experiment, although after the
game he admitted that he had no confidence in his position here.

44.S5c-4d    00:50:00  01:08:00
45.P4g-4f    01:25:00  01:08:00
46.P4ex4f    01:25:00  01:08:00
47.S5gx4f    01:30:00  01:08:00
48.R7bx7e    01:30:00  01:09:00
49.P*4e      01:30:00  01:09:00
50.S4d-5c    01:30:00  01:09:00
51.G6i-7h    01:34:00  01:09:00
52.L1a-1b    01:34:00  01:21:00
53.G7h-6g    01:35:00  01:21:00
54.K2b-1a    01:35:00  01:21:00
55.P*7f      01:36:00  01:21:00
56.R7e-7b    01:36:00  01:21:00
57.R5h-4h    01:53:00  01:21:00
58.S5c-4b    01:53:00  01:27:00
59.G2h-3h    01:56:00  01:27:00
60.S4b-3a    01:56:00  01:27:00

This is vintage Watanabe. His opponent has a position where very careful play is
required. Instead of attacking, Watanabe keeps the pressure up by transforming
his own position into an Anaguma. Ideally, the opponent can only watch helplessly
while Watanabe builds an impenetrable position before going for the kill, but Kubo
finds a way to do something positive while Watanabe rearranges his pieces.

61.P3f-3e    01:56:00  01:27:00
62.S3a-2b    01:56:00  01:29:00
63.P3ex3d    02:06:00  01:29:00
64.S2cx3d    02:06:00  01:29:00
65.P*3f      02:06:00  01:29:00
66.B3c-5a    02:06:00  01:39:00
67.P6f-6e    02:10:00  01:39:00
68.P*7e      02:10:00  02:01:00
69.P6e-6d    02:25:00  02:01:00
70.P6cx6d    02:25:00  02:07:00
71.P4e-4d    02:32:00  02:07:00
72.G4c-4b    02:32:00  02:07:00
73.S4f-4e    02:37:00  02:07:00
74.S3dx4e    02:37:00  02:07:00
75.R4hx4e    02:37:00  02:07:00
76.S*3d      02:37:00  02:08:00
77.R4e-4g    02:39:00  02:08:00
78.P7ex7f    02:39:00  02:13:00
79.B7g-6h    02:39:00  02:13:00
80.B5a-8d    02:39:00  02:16:00
81.P3f-3e    02:53:00  02:16:00
82.S3d-2c    02:53:00  02:16:00

83.S*6c!     03:08:00  02:16:00

Strong move. A lot of players would not be able to resist the temptation of 83.S*4c,
but after 84.G4bx4c Px4c+ S*5h is a strong counter. For example, Rx4e Sx6g= +Px3b
Sx3b and the white position stays pretty solid.

84.R7b-8b    03:08:00  02:16:00
85.S6cx5d+   03:14:00  02:16:00
86.P*5c      03:14:00  02:16:00
87.+S5dx6d   03:15:00  02:16:00
88.R8b-6b    03:15:00  02:26:00
89.P*6c      03:15:00  02:26:00
90.R6b-7b    03:15:00  02:26:00
91.P*7d      03:17:00  02:26:00

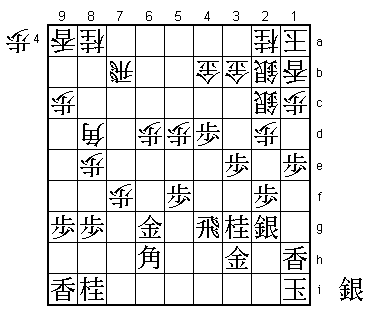
This is the position that Kubo was aiming for when he played 83.S*6c. He has managed
to contain white's major pieces, thereby taking away most of Watanabe's attacking
options. Watanabe has been called "Little Oyama" when he was in the Shoreikai (more
for his physical likeness than playing style), but here Kubo shows how to play in the
style of the greatest defender that ever played the game.

92.G4b-3c    03:17:00  02:56:00
93.+S6dx5c   03:18:00  02:56:00
94.P*4b      03:18:00  02:56:00
95.B6h-4f    03:21:00  02:56:00
96.R7bx7d    03:21:00  03:03:00
97.P6c-6b+   03:21:00  03:03:00
98.P7f-7g+   03:21:00  03:04:00
99.G6gx7g    03:23:00  03:04:00
100.P*5g     03:23:00  03:07:00
101.+P6b-5b  03:28:00  03:07:00
102.P5g-5h+  03:28:00  03:07:00
103.P3e-3d   03:32:00  03:07:00
104.S2cx3d   03:32:00  03:15:00
105.+P5bx4b  03:32:00  03:15:00
106.G3bx4b   03:32:00  03:15:00
107.+S5cx4b  03:32:00  03:15:00
108.R7dx4d   03:32:00  03:16:00

Counting on the difference in king position, Watanabe has decided to invest a full
gold to get his pieces working again. It seems like an overplay, but with the limited
thinking time of the Kio match, it may have been his best chance.

109.G*3b     03:32:00  03:16:00
110.P*3a     03:32:00  03:18:00
111.+S4bx3a  03:37:00  03:18:00
112.S2bx3a   03:37:00  03:18:00
113.G3bx3a   03:37:00  03:18:00
114.S*2b     03:37:00  03:18:00
115.S*3b     03:40:00  03:18:00
116.S2bx3a   03:40:00  03:19:00
117.S3bx3a+  03:40:00  03:19:00

118.G*2b     03:40:00  03:38:00

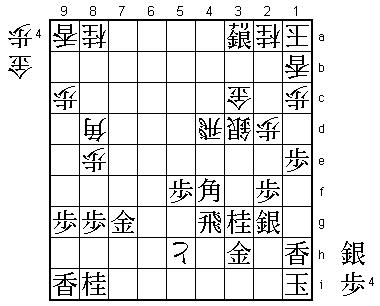
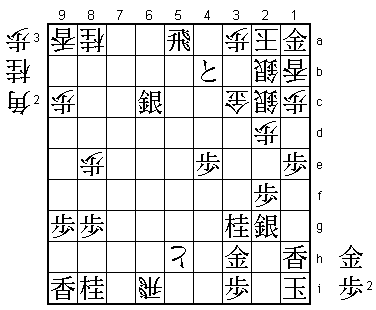
Hard to criticize this move, because there wasn't a good alternative. White really
wants to play 118.+P5g here, but black can answer this with 119.S*3b G*2b B5e! and
+Px4g Bx4d (threatens mate after Sx2a+) G3cx3b (Gx4d R*4a and no defense) +Sx3b and
even with the extra silver white has no mate because the black king can escape
through the chimney of the first file. Still, after 118.G*2b Kubo gets a very clear
advantage.

119.P*4e     03:42:00  03:38:00
120.R4d-5d   03:42:00  03:39:00
121.S*4d     03:42:00  03:39:00
122.P*3b     03:42:00  03:41:00
123.S4dx3c+  03:43:00  03:41:00
124.P3bx3c   03:43:00  03:43:00
125.G*3b     03:43:00  03:43:00
126.S*2c     03:43:00  03:43:00
127.G3bx2b   03:45:00  03:43:00
128.K1ax2b   03:45:00  03:43:00
129.G*4d?    03:48:00  03:43:00

A mistake that makes the game very close. Correct was 129.P*3e first to build up
some extra pressure at the head of the king.

130.R5dx5f   03:48:00  03:43:00
131.G7g-6g   03:51:00  03:43:00

132.R5f-5a   03:51:00  03:44:00

Here Watanabe could have put all his eggs in one basket with 132.+P4h. It just
doesn't work after 133.Gx5f +Px3h (+Px4g R*5b K1a Gx3d and there is no mate against
the black king) Sx3h B3i+ R*8b K1a N2e! is a mating threat that defends against a
mating threat (+Bx3h +Sx2a Kx2a Nx3c= and mate). With 132.R5a Watanabe picks a slower
death, but a more certain one. Kubo needs some accurate play, but he doesn't give
Watanabe another chance.

133.+S3ax2a  03:51:00  03:44:00
134.K2bx2a   03:51:00  03:44:00
135.P*5b     03:51:00  03:44:00
136.R5ax5b   03:51:00  03:44:00
137.P*5c     03:51:00  03:44:00
138.R5b-7b   03:51:00  03:45:00

With this rook out of the way, Kubo can start his decisive attack.

139.G4dx3c   03:51:00  03:45:00
140.P*3b     03:51:00  03:49:00
141.G3cx2c   03:51:00  03:49:00
142.S3dx2c   03:51:00  03:49:00
143.N*3e     03:51:00  03:49:00
144.S*3d     03:51:00  03:53:00
145.N3ex2c+  03:51:00  03:53:00
146.S3dx2c   03:51:00  03:53:00
147.P*7e!    03:51:00  03:53:00

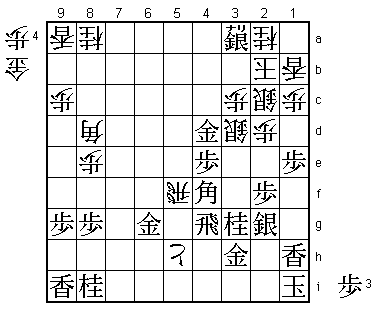
This the decisive move. White has the option of blocking the rook, blocking the
bishop or blocking both.

148.B8dx7e   03:51:00  03:53:00

Watanabe decides to block the bishop, but without the threat of promoting the rook,
his attack is slowed down decisively. However, after 148.Rx7e P2e it also seems that
black is winning.

149.B4f-5e   03:53:00  03:53:00

This bishop has been dormant, but now enters the attack.

150.G*2b     03:53:00  03:54:00

The cheap alternative 150.P3c fails to 151.P*3d G*3i Gx3i Bx3i+ G*2i N*3e Gx3i Nx2g=
K2h because Nx3i+ is not a mating threat and can be simply answered with Px3c+ and
black wins.

151.S*6c!    03:54:00  03:54:00

Another good move by Kubo. White cannot afford to give up the rook and this rook
also must stay on the second rank to defend, so Watanabe has no choice but to move
it into a completely harmless position as far as attacking is concerned.

152.R7b-9b   03:54:00  03:54:00
153.G6g-6f   03:55:00  03:54:00

This makes the black king completely safe. Black wins.

154.G*5g     03:55:00  03:59:00
155.R4gx5g   03:57:00  03:59:00
156.B7ex6f   03:57:00  03:59:00
157.R5gx5h   03:57:00  03:59:00
158.P*5g     03:57:00  03:59:00
159.B5ex6f   03:57:00  03:59:00
160.P5gx5h+  03:57:00  03:59:00
161.P*3i     03:57:00  03:59:00
162.R*6i     03:57:00  03:59:00
163.B*5e     03:58:00  03:59:00
164.P3b-3c   03:58:00  03:59:00
165.B5ex3c+  03:58:00  03:59:00
166.G*3b     03:58:00  03:59:00
167.S*4b     03:58:00  03:59:00
168.R9bx4b   03:58:00  03:59:00
169.P5c-5b+  03:58:00  03:59:00
170.G2bx3c   03:58:00  03:59:00
171.B6fx3c+  03:58:00  03:59:00
172.G3bx3c   03:58:00  03:59:00
173.+P5bx4b  03:59:00  03:59:00
174.P*3a     03:59:00  03:59:00
175.R*5a     03:59:00  03:59:00
176.S*2b     03:59:00  03:59:00
177.G*1a     03:59:00  03:59:00
Resigns      03:59:00  03:59:00

Hisshi after 178.Kx1a +Px3a and white has no mate, so Watanabe resigned here. A
tough game to lose for Watanabe, as he must have felt pretty good in the middle game
considering Kubo's unusual castling formation. Still, Kubo played very well from a
position that seemed to lack the right balance and in the end won quite convincingly
as there didn't seem to have been a position where Watanabe had the advantage. This
puts Kubo on the brink of defending his Kio title, but Watanabe can try to take
this match the full distance by winning game 4 with the black pieces.
