35th Kio Match Game 4
[Black "Sato Yasumitsu, Challenger"]
[White "Kubo Toshiaki, Kio"]
[Event "35th Kio-sen, Game 4"]
[Date "March 19th 2010"]
1.P7g-7f     00:00:00  00:00:00
2.P3c-3d     00:00:00  00:00:00
3.P2g-2f     00:00:00  00:00:00
4.P5c-5d     00:00:00  00:00:00
5.P2f-2e     00:00:00  00:00:00
6.R8b-5b     00:00:00  00:01:00
7.G6i-7h     00:00:00  00:01:00
8.K5a-6b     00:00:00  00:02:00
9.K5i-6i     00:00:00  00:02:00
10.K6b-7b    00:00:00  00:03:00
11.B8h-7g    00:01:00  00:03:00
12.K7b-8b    00:01:00  00:06:00
13.S7i-6h    00:01:00  00:06:00
14.S7a-7b    00:01:00  00:07:00
15.K6i-7i    00:01:00  00:07:00
16.P9c-9d    00:01:00  00:07:00
17.P9g-9f    00:01:00  00:07:00
18.G4a-3b    00:01:00  00:11:00
19.S3i-4h    00:11:00  00:11:00
20.B2b-3c    00:11:00  00:13:00
21.B7gx3c+   00:37:00  00:13:00
22.N2ax3c    00:37:00  00:13:00
23.P6g-6f    00:37:00  00:13:00
24.R5b-5a    00:37:00  00:14:00
25.K7i-8h    00:37:00  00:14:00
26.S3a-4b    00:37:00  00:15:00
27.S6h-6g    00:37:00  00:15:00
28.S4b-5c    00:37:00  00:17:00
29.P3g-3f    00:37:00  00:17:00
30.R5a-2a    00:37:00  00:18:00
31.G4i-5h    00:57:00  00:18:00
32.P6c-6d    00:57:00  00:28:00
33.N2i-3g    01:01:00  00:28:00
34.P7c-7d    01:01:00  00:30:00
35.P1g-1f    01:38:00  00:30:00
36.P4c-4d    01:38:00  00:33:00
37.P5g-5f    01:39:00  00:33:00
38.S7b-6c    01:39:00  00:40:00
39.S4h-5g    01:39:00  00:40:00
40.G6a-7b    01:39:00  00:40:00
41.P1f-1e    01:45:00  00:40:00
42.S5c-6b    01:45:00  00:41:00
43.P4g-4f    01:48:00  00:41:00
44.S6b-7c    01:48:00  00:55:00
45.S5g-6h    01:50:00  00:55:00
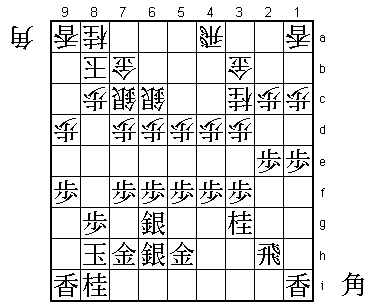
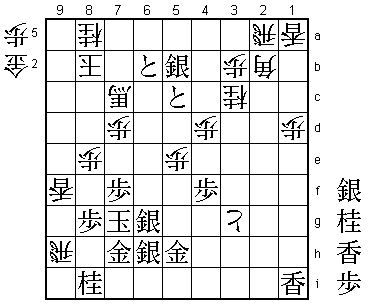
46.R2a-4a?!  01:50:00  01:07:00

In this game, both players have taken their time to build the castle and attacking
formations. Here Kubo invites the black attack, but after the game admitted that
this was probably too risky here. This being said, he didn't have much choice.
Instead of 46.R4a, it seems like the only plan white can play is to move into an
Anaguma formation with L9b followed by K9a, but then black plays G4h followed by
R2i, L1h and R1i after which the attack on the first file is very promising for
black. It seems that Kubo's opening strategy has been suspect.

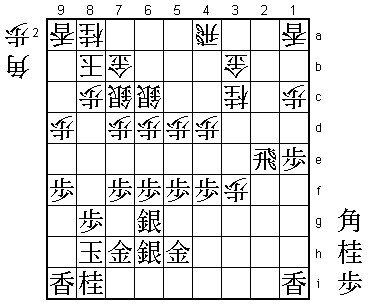
47.P3f-3e    02:09:00  01:07:00

Even though pushing this pawn at the head of the knight can be a problem (and will
be a problem as we will see), black has to play this pawn push first. After 37.P2d
immediately, it follows 38.Px2d Px2d Rx2d P4e Nx4e Nx4e Px4e B*4f which is not good
for black.

48.P3dx3e    02:09:00  01:13:00
49.P2e-2d    02:09:00  01:13:00
50.P2cx2d    02:09:00  01:13:00
51.R2hx2d    02:09:00  01:13:00
52.P3e-3f    02:09:00  01:16:00
53.N3g-2e    02:10:00  01:16:00
54.N3cx2e    02:10:00  01:16:00
55.R2dx2e    02:11:00  01:16:00
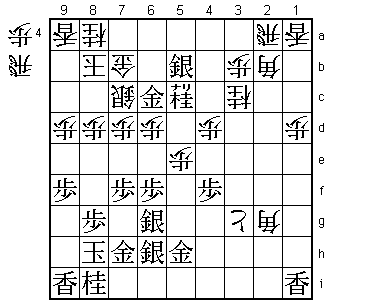
56.N*3c!     02:11:00  01:31:00

Strong fighting move. Nobody wants to drop this knight here immediately after it was
exchanged, but Kubo realizes that his only chance is to make a promoted pawn on 3g
(56.P3g+ of course fails to R3e). Sato agreed, saying after the game that he had seen
N*3c, but thought that black would have something after this. When play continued,
he realized that things were not so easy.

57.R2e-2d    02:46:00  01:31:00
58.P3f-3g+   02:46:00  01:39:00
59.P5f-5e    02:49:00  01:39:00

Here Kubo thought he was in trouble, but Sato is not playing the attack optimally.

60.P5dx5e    02:49:00  01:54:00
61.P1e-1d    02:56:00  01:54:00

No comments on this move in Shukan Shogi, but the Internet commentary during the
game criticized this move, because it opened a square on 1c for a bishop drop.

62.P1cx1d    02:56:00  02:00:00
63.P*5d      03:27:00  02:00:00
64.S6cx5d    03:27:00  02:08:00
65.B*2a      03:34:00  02:08:00
66.P*3a      03:34:00  02:26:00
67.B2ax3b+   03:35:00  02:26:00
68.P3ax3b    03:35:00  02:26:00
69.R2d-2b+   03:35:00  02:26:00
70.S5d-4c    03:35:00  02:29:00
71.N*3e      03:35:00  02:29:00
72.B*1c      03:35:00  02:30:00

Here is the bishop drop. Without 61.P1d this would not have been possible.

73.N3ex4c+   03:47:00  02:30:00
74.B1cx2b    03:47:00  02:30:00
75.S*5b      03:47:00  02:30:00
76.R4a-2a    03:47:00  02:49:00
77.+N4c-5c   03:47:00  02:49:00
78.B*2g      03:47:00  02:56:00
79.G*6c      03:47:00  02:56:00
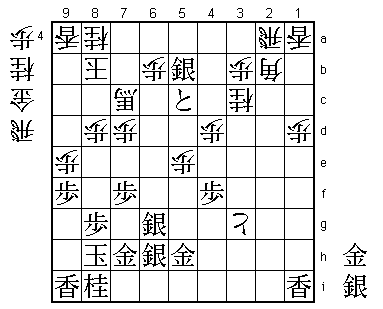
80.P8c-8d!?  03:47:00  02:59:00

It is hard to call this a good move, because the post-mortem analysis showed that
80.R*3i was probably better. However, Suzuki Daisuke (8-dan) called this the move
that showed that Kubo was in super form. Despite being down in the match, he has
the patience to look for good defensive moves instead of trying to rush his attack.
The pawn push to 8d seems slow, but square 8c can now be used to place a promoted
bishop (as we will see in the game). With the promoted bishop on 8c, it is impossible
to get quick access to the white king, giving white a number of moves to attack.

81.G6cx7b    03:48:00  02:59:00
82.B2gx7b+   03:48:00  02:59:00
83.P6f-6e    03:54:00  02:59:00
84.+B7b-8c   03:54:00  03:04:00
85.P6ex6d    03:54:00  03:04:00
86.S7cx6d    03:54:00  03:08:00
87.+N5c-6c   03:54:00  03:08:00
88.S6d-7c    03:54:00  03:08:00
89.P*5d      03:54:00  03:08:00
90.P*6b      03:54:00  03:11:00
91.+N6cx7c   03:54:00  03:11:00
92.+B8cx7c   03:54:00  03:11:00
93.P5d-5c+   03:54:00  03:11:00
94.P9d-9e!   03:54:00  03:15:00

This edge attack was considered to be devastating. Murayama actually had predicted
it already when black played the silver to 6h in the early middle game. Most
professionals in the press room thought that white was winning here, but Sato
actually shows that things are still quite complicated.

95.P9fx9e    03:54:00  03:15:00
96.P*9g      03:54:00  03:15:00
97.L9ix9g    03:55:00  03:15:00
98.N*8e      03:55:00  03:18:00
99.G*9f      03:55:00  03:18:00
100.N8ex9g+  03:55:00  03:20:00
101.G9fx9g   03:55:00  03:20:00
102.L*9b     03:55:00  03:21:00
103.P*6c     03:58:00  03:21:00
104.L9bx9e   03:58:00  03:24:00
105.P*9f     03:58:00  03:24:00
106.L9ex9f   03:58:00  03:25:00
107.G9gx9f   03:58:00  03:25:00
108.L9ax9f   03:58:00  03:25:00
109.P6cx6b+  03:58:00  03:25:00
110.R*9h     03:58:00  03:29:00
111.K8h-7g   03:58:00  03:29:00
112.P8d-8e   03:58:00  03:29:00

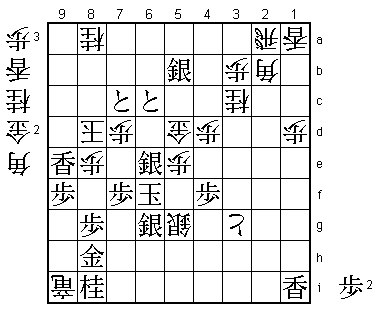
113.+P5c-6c? 03:59:00  03:29:00

A big mistake under a lot of time pressure. Correct was 113.S5b-6c= and after 114.+B8d
+P7b K9c P*9e +Bx9e K6f G*6d S*6e N7c +Px7c +Bx7c Sx6d +Bx6d G*6e +Bx5c Sx7d+ K9d P*5d
the front of the king is defended very well and white cannot get to the black king.
With 113.+P5c-6c, Sato gives white the square 5d, which will be very important.

114.+B7c-8d  03:59:00  03:30:00
115.+P6b-7b  03:59:00  03:30:00
116.K8b-8c   03:59:00  03:32:00
117.G7h-8h   03:59:00  03:32:00
118.R9h-9i+  03:59:00  03:32:00
119.P*9g     03:59:00  03:32:00
120.P*6f     03:59:00  03:34:00
121.P9gx9f   03:59:00  03:34:00
122.P6fx6g+  03:59:00  03:37:00
123.G5hx6g   03:59:00  03:37:00
124.P*6f     03:59:00  03:44:00
125.N*9e     03:59:00  03:44:00
126.K8c-9c   03:59:00  03:44:00
127.L*9d     03:59:00  03:44:00
128.K9cx9d   03:59:00  03:45:00
129.S*8c     03:59:00  03:45:00
130.+B8dx8c  03:59:00  03:45:00
131.N9ex8c+  03:59:00  03:45:00
132.P6fx6g+  03:59:00  03:45:00
133.S6hx6g   03:59:00  03:45:00
134.S*6e     03:59:00  03:47:00
135.L*9e     03:59:00  03:47:00
136.K9dx8c   03:59:00  03:47:00
137.+P7b-7c  03:59:00  03:47:00
138.K8c-8d   03:59:00  03:48:00
139.B*6f     03:59:00  03:48:00
140.S6ex6f   03:59:00  03:49:00
141.K7gx6f   03:59:00  03:49:00
142.G*5d     03:59:00  03:50:00

The reason why 113.+P5c-6c was bad. This gold drop stops the black king from escaping
up the board and white wins.

143.S*6e     03:59:00  03:50:00
144.S*5g     03:59:00  03:50:00
Resigns      03:59:00  03:50:00

Mate after 145.K7g B*5i K7h B6h+ or 145.Kx5g B*3i K6h +Rx8h etc. Kubo dodges a bullet,
as he was in real danger of being a double titleholder for only two days. Sato will
rue the missed opportunity to win the Kio title back, but he will get another chance
to dethrone Kubo. His opening preparation against Kubo's Quick Ishida or Gokigen
Nakabisha will be vital.
