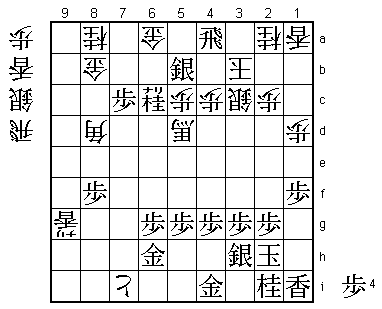
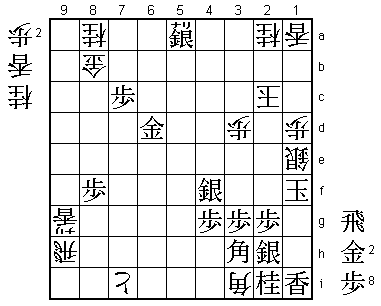
35th Kio Match Game 3
[Black "Kubo Toshiaki, Kio"]
[White "Sato Yasumitsu, Challenger"]
[Event "35th Kio-sen, Game 3"]
[Date "March 7th 2010"]
1.P7g-7f     00:00:00  00:00:00
2.P3c-3d     00:00:00  00:00:00
3.P7f-7e     00:01:00  00:00:00
4.P8c-8d     00:01:00  00:01:00
5.R2h-7h     00:01:00  00:01:00

Kubo is black in this game, so of course the Quick Ishida opening.

6.P8d-8e     00:01:00  00:01:00
7.K5i-4h     00:01:00  00:01:00
8.S7a-6b     00:01:00  00:01:00
9.R7h-7f     00:01:00  00:01:00
10.B2bx8h+   00:01:00  00:08:00
11.S7ix8h    00:01:00  00:08:00
12.K5a-4b    00:01:00  00:09:00
13.P7e-7d    00:08:00  00:09:00
14.G6a-7b    00:08:00  00:22:00
15.K4h-3h    00:14:00  00:22:00
16.K4b-3b    00:14:00  00:34:00
17.P1g-1f    00:26:00  00:34:00
18.P1c-1d    00:26:00  01:04:00
19.R7f-3f    00:36:00  01:04:00

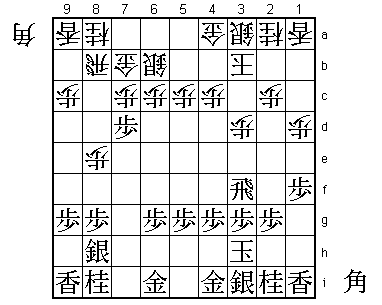
An interesting point in the opening. Black has created tension on the 7th file
with 13.P7d, but now voluntarily leaves this file and moves the rook to 3f, threatening
the pawn on 3d. The point is that white has no good way to defend this pawn here.
After 20.B*4e, black can play Px7c+ followed by R6f and the bishop on 4e becomes a
target for attack. Therefore, white has to give up a pawn here, trying to get
compensation by using the extra moves that black needs to use to bring back the
rook to safety.

20.S3a-2b    00:36:00  01:06:00
21.R3fx3d    00:37:00  01:06:00
22.S2b-3c    00:37:00  01:06:00
23.P7dx7c+   00:39:00  01:06:00
24.S6bx7c    00:39:00  01:06:00
25.R3d-3f    00:39:00  01:06:00
26.S7c-6d    00:39:00  01:06:00
27.R3f-7f    00:45:00  01:06:00
28.P9c-9d!   00:45:00  01:36:00

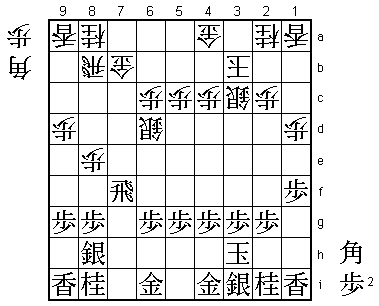
This move shows that Sato is determined to play positively. The simple plan is to
push this pawn on 9e, drop the bishop on 5d and start an attack on the 8th and 9th
file. Of course this is not a bad idea, but the white pieces are still all over the
place and black has the strong counter of B*7a at any time. Kubo chooses to first
castle his king to make the difference in king position even greater than it is now
(also putting as much distance as possible between the king and the fight on the
other side of the board). Only after his castle formation is finished, he plays B*7a.

29.G6i-6h    01:11:00  01:36:00
30.P9d-9e    01:11:00  01:58:00
31.R7f-7h    01:12:00  01:58:00
32.B*5d      01:12:00  01:59:00
33.K3h-2h    01:22:00  01:59:00
34.P9e-9f    01:22:00  02:04:00
35.S3i-3h    01:24:00  02:04:00
36.P8e-8f    01:24:00  02:19:00
37.P8gx8f    01:25:00  02:19:00
38.P9fx9g+   01:25:00  02:24:00
39.L9ix9g    01:29:00  02:24:00
40.P*9f      01:29:00  02:26:00
41.B*7a      01:41:00  02:26:00

Finally, Kubo decides it is time to play this move.

42.S6d-7c    01:41:00  02:29:00

No choice, because 42.R9b fails to P*9c. Black gets a rook in hand, which seems
like a huge advantage with the scattered generals in the white camp. However, it
seems that this position is an exception and that white still has the better chances
here.

43.B7ax8b+   01:48:00  02:29:00
44.G7bx8b    01:48:00  02:29:00
45.L9gx9f    01:52:00  02:29:00
46.L9ax9f    01:52:00  02:29:00
47.P*9g      01:58:00  02:29:00
48.B5d-9h+   01:58:00  02:30:00
49.N8i-7g    02:02:00  02:30:00
50.P*8g      02:02:00  02:32:00
51.S8h-7i    02:12:00  02:32:00
52.L9fx9g+   02:12:00  02:33:00
53.N7g-6e    02:27:00  02:33:00
54.P8g-8h+   02:27:00  02:33:00
55.R7h-7e    02:27:00  02:33:00
56.B*6d      02:27:00  02:47:00
57.N6ex7c+   02:29:00  02:47:00
58.B6dx7e    02:29:00  02:47:00

59.+N7cx6c   02:36:00  02:47:00

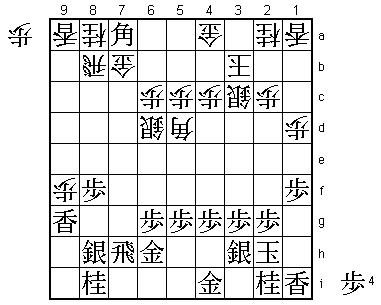
Here the general opinion in the press room was that black had the better position.
After all, 59.+Nx8b strongly threatens R*7b next, forking king and bishop. However,
white can defend against this threat with 60.B6d!, a move that hits the weak spot of
the Mino castle as well. With the bishop on the long diagonal, black cannot afford
to give white a knight so 61.+Nx8a seems the only move. Then simply 62.+Px7i and Kubo
said after the game that the promoted bishop works too well in this simple position.
He added that here he realized that his optimism about his own position faded. In the
end he decided to leave the bad gold on 8b and move towards the opponent king
with 59.+Nx6c.

60.B7e-8d!   02:36:00  03:07:00

Looks like a quiet move, but it is vital for white to defend against the rook drop on
6b. Black can still drop the rook in the white position, but this is not so dangerous
anymore.

61.R*6a      02:53:00  03:07:00

Of course, 61.P8e is simply answered by 62.B9e to keep defending 6b.

62.R*5a      02:53:00  03:10:00
63.R6ax5a+   02:55:00  03:10:00
64.G4ax5a    02:55:00  03:10:00
65.R*7a      03:01:00  03:10:00
66.+B9h-5d   03:01:00  03:43:00
67.P*7c      03:03:00  03:43:00
68.R*6a      03:03:00  03:49:00
69.R7ax6a+   03:07:00  03:49:00
70.G5ax6a    03:07:00  03:49:00
71.S*5b      03:08:00  03:49:00
72.+P8hx7i   03:08:00  03:58:00
73.R*4a      03:11:00  03:58:00

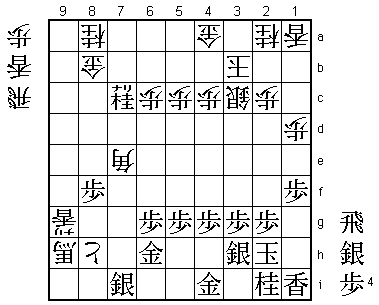
Black seemed to be making progress by dropping the rook twice and driving the gold
away from the king. This has created space for the rook drop on 4a, which looks
very threatening.

74.S*5a!!    03:11:00  03:58:00

This is the only move that keeps the white position together. Black cannot take
this silver with 75.Sx5a+ because of 76.+Bx6c and there is no defense against +Bx4a
next, and without the rook there is no good attack for black.

75.S5bx6a+   03:24:00  03:58:00

Kubo decides to give up the rook immediately, forcing the king closer to the attacking
pieces.

76.K3bx4a    03:24:00  03:58:00
77.+S6ax5a   03:24:00  03:58:00
78.K4a-3b!   03:24:00  03:58:00

This quick escape ends the black attacking chances. It now takes too long for black
to get to the white king, while the black king can be attacked quite effectively as
we will see in the rest of the game.

79.G*6d      03:25:00  03:58:00
80.+B5d-4e   03:25:00  03:58:00
81.+N6cx5c   03:26:00  03:58:00
82.R*9h      03:26:00  03:58:00
83.G6h-5h    03:26:00  03:58:00
84.P*5f      03:26:00  03:58:00
85.P5gx5f    03:27:00  03:58:00
86.R*7h      03:27:00  03:58:00
87.P6g-6f    03:28:00  03:58:00
88.K3b-2b    03:28:00  03:59:00
89.+N5cx4c   03:33:00  03:59:00
90.S3c-3d    03:33:00  03:59:00
91.S*4f      03:33:00  03:59:00
92.+B4ex5f   03:33:00  03:59:00
93.G5h-5g    03:33:00  03:59:00
94.+B5fx6f   03:33:00  03:59:00
95.G5gx6f    03:34:00  03:59:00
96.B8dx6f    03:34:00  03:59:00
97.B*4d      03:34:00  03:59:00
98.B6fx4d    03:34:00  03:59:00
99.+N4cx4d   03:34:00  03:59:00
100.G*4h     03:34:00  03:59:00
101.+N4dx3d  03:38:00  03:59:00
102.G4hx4i   03:38:00  03:59:00
103.K2h-1g   03:38:00  03:59:00
104.G*2e     03:38:00  03:59:00
105.+N3dx2c  03:39:00  03:59:00
106.K2bx2c   03:39:00  03:59:00
107.B*6g     03:39:00  03:59:00
108.P*3d     03:39:00  03:59:00
109.B6gx4i   03:43:00  03:59:00
110.R7hx3h+  03:43:00  03:59:00
111.B4ix3h   03:43:00  03:59:00
112.B*3i     03:43:00  03:59:00
113.S*2h     03:43:00  03:59:00
114.G2ex1f   03:43:00  03:59:00
115.K1gx1f   03:43:00  03:59:00
116.S*1e     03:43:00  03:59:00
Resigns      03:43:00  03:59:00

Mate after 117.K1g L*1f or 117.K2e N3c K3f N*2d (it is interesting that the lance
and knights are used to mate the black king, which is rather unusual). Although
Sato admitted after the game that he had no idea who was better until he saw 74.S*5a,
it looks like he was rewarded for his positive play in the opening and middle game.
He now has two chances to win back the title he lost to Kubo last year.
