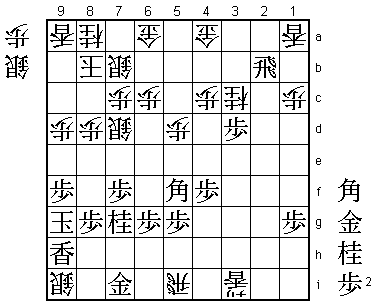
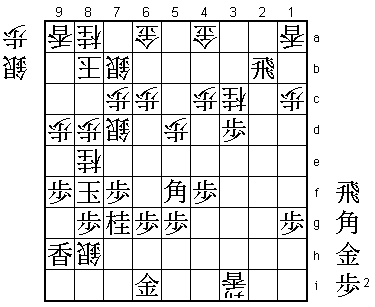
35th Kio Match Game 2
[Black "Sato Yasumitsu, Challenger"]
[White "Kubo Toshiaki, Kio"]
[Event "35th Kio-sen, Game 2"]
[Date "February 27th 2010"]
1.P7g-7f     00:00:00  00:00:00
2.P3c-3d     00:00:00  00:00:00
3.P2g-2f     00:00:00  00:00:00
4.P5c-5d     00:00:00  00:00:00
5.P2f-2e     00:00:00  00:00:00
6.R8b-5b     00:00:00  00:00:00
7.B8hx2b+    00:00:00  00:00:00
8.S3ax2b     00:00:00  00:00:00
9.G6i-7h     00:00:00  00:00:00
10.K5a-6b    00:00:00  00:01:00
11.S3i-3h    00:00:00  00:01:00
12.K6b-7b    00:00:00  00:02:00
13.P4g-4f    00:00:00  00:02:00
14.S2b-3c    00:00:00  00:03:00
15.K5i-6h    00:00:00  00:03:00
16.K7b-8b    00:00:00  00:06:00
17.K6h-7g    00:01:00  00:06:00
18.S7a-7b    00:01:00  00:07:00
19.K7g-8h    00:02:00  00:07:00
20.P9c-9d    00:02:00  00:10:00
21.P9g-9f    00:12:00  00:10:00
22.P8c-8d    00:12:00  00:12:00
23.S3h-4g    00:13:00  00:12:00
24.R5b-2b    00:13:00  00:17:00
25.L9i-9h    00:21:00  00:17:00

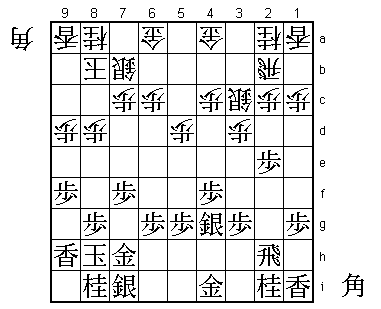
For this game, Sato is aiming at a slow development. White has made a Mino castle
and the general opinion among professionals is that if black can move into the Anaguma
without being challenged, the difference in the strength of the castle should give
black the upper hand.

26.P2c-2d    00:21:00  00:33:00

The threat of a strategic defeat forces Kubo to act. White can break through on
the second file, but the price is going to be high...

27.P2ex2d    00:21:00  00:33:00
28.S3cx2d    00:21:00  00:33:00
29.B*7g      01:14:00  00:33:00

An important move as we will see soon.

30.B*3c      01:14:00  00:41:00
31.B7gx3c+   01:35:00  00:41:00
32.N2ax3c    01:35:00  00:42:00

It seems that by exchanging the bishops, black has helped white to develop the
knight on 2a. However, the important thing is that the knight on 3c is very
vulnerable to an attack with P3f-P3e.

33.P3g-3f    01:36:00  00:42:00
34.S2d-2e    01:36:00  01:06:00
35.P3f-3e    01:45:00  01:06:00
36.P*2g      01:45:00  02:00:00
37.R2hx2g    01:46:00  02:00:00
38.S2e-2f    01:46:00  02:00:00
39.R2g-2h    01:47:00  02:00:00
40.S2f-2g=   01:47:00  02:01:00
41.R2h-4h    01:48:00  02:01:00
42.S2g-3f+   01:48:00  02:14:00
43.S4gx3f    01:49:00  02:14:00
44.R2bx2i+   01:49:00  02:14:00

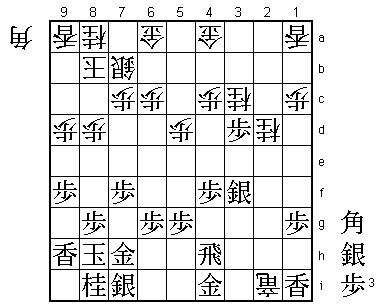
White has promoted the rook, but was forced to give up a silver and also has no
pawns in hand. Combined with the weakness of the knight on 3c, it seems clear that
black has the advantage here. Both Kubo (who wasn't happy about his position) and
Sato (who thought he had the easier position here) agreed.

45.P3ex3d    01:51:00  02:14:00
46.N*2d      01:51:00  02:17:00

Looks good, because white can attack strongly after 47.S4g N2e, saving the knight
with tempo, but Sato has a strong reply.

47.B*4g!     02:44:00  02:17:00

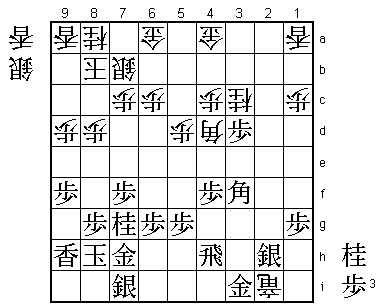
This bishop drop defends the silver, attacks the promoted rook and also sets up an
attack by looking straight into the white castle through the opening on 8c.

48.B*4d      02:44:00  02:31:00
49.N8i-7g    02:51:00  02:31:00
50.+R2ix1i   02:51:00  02:53:00
51.S*2h!     02:58:00  02:53:00

This is not a nice square to drop a silver, but neutralizing the promoted rook is
more important here. Without this piece, white has no effective way to attack.

52.N2dx3f    02:58:00  02:58:00
53.B4gx3f    02:58:00  02:58:00
54.+R1i-2i   02:58:00  03:09:00
55.G4i-3i?   03:15:00  03:09:00

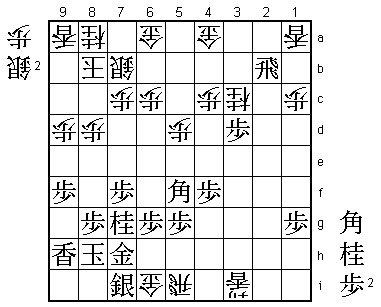
An important mistake that turns the game around. Sato should have been a little
more patient and play 55.B4g instead. Then after 56.+Rx1h, black calmly takes the
knight with 57.Px3c+. If white takes this promoted pawn with 58.Bx3c, then 59.N*5c
G4a-5a Nx6a+ Gx6a G*2i wins the promoted rook while weakening the white defense.
Sato was not immediately convinced, but Kubo thought that 59.N*5c was too much, so
he planned to play 59.G4a-5b, leaving black with a valuable tokin on 3c. During the
game, Kubo thought that this would be a long, unclear fight, but the conclusion of
the post-mortem analysis was that black would have had the better position here.

56.+R2ix3i   03:15:00  03:15:00
57.S2hx3i    03:15:00  03:15:00
58.B4dx1g+   03:15:00  03:15:00
59.R4h-4i    03:21:00  03:15:00
60.L*3e!     03:21:00  03:18:00

Sato may have underestimated this lance drop. With it, white gets three pieces for
the rook, giving white the better position.

61.B3f-4g    03:21:00  03:18:00
62.L3ex3i+   03:21:00  03:18:00
63.R4i-6i    03:22:00  03:18:00
64.G*4h      03:22:00  03:29:00
65.B4g-5f    03:23:00  03:29:00
66.G4h-5h    03:23:00  03:32:00
67.P*1h      03:33:00  03:32:00
68.G5hx6i    03:33:00  03:35:00
69.P1hx1g    03:33:00  03:35:00
70.R*5i      03:33:00  03:42:00
71.R*2b      03:52:00  03:42:00

This looks like a strong attack. Because the bishop is still looking into the white
castle, white cannot afford to give up a gold, because this could be used on 8c,
immediately deciding the game. However, Kubo has found a perfect solution.

72.G6ix7i    03:52:00  03:49:00
73.G7hx7i    03:52:00  03:49:00
74.S*9i      03:52:00  03:49:00
75.K8h-9g    03:52:00  03:49:00
76.S*7d!     03:52:00  03:49:00

This closes the bishop diagonal to 8c and makes sure that the black king cannot
escape up the board. White has a winning position here, but needs one more finesse
to finish the game quickly.

77.N*6i      03:57:00  03:49:00

Trying to buy time.

78.R5ix6i+!  03:57:00  03:53:00

This rook sacrifice sets up a nice hisshi.

79.G7ix6i    03:57:00  03:53:00
80.N*8e      03:57:00  03:53:00
81.K9g-8f    03:57:00  03:53:00
82.S9i-8h=   03:57:00  03:53:00
Resigns      03:59:00  03:53:00

Threatens mate with both Sx7g= and S*9g. The only defense against both mating threats
seems 83.P7e, but then 84.Sx7g= K7f N*6d is a simple mate. An interesting game where
Sato seems to have set himself up for a 2-0 lead in the match, but one small mistake
reversed the tables and Kubo just blew Sato away after that. With both players winning
a game with the white pieces, this match is now very hard to predict.
