35th Kio Match Game 1
[Black "Kubo Toshiaki, Kio"]
[White "Sato Yasumitsu, Challenger"]
[Event "35th Kio-sen, Game 1"]
[Date "February 5th 2010"]
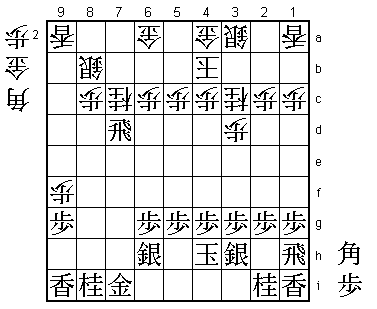
1.P7g-7f 00:01:00 00:00:00
This first game of the Kio match was played in Shanghai and it was only the second
time a game in the Kio tournament was played overseas. The first time marked the
start of the Kio tournament, so that was already 34 years ago. Choosing Shanghai
is not really a coincidence, because it probably has the biggest shogi population
outside Japan as an estimated 500,000 people play shogi here. There are also a lot
of children playing and one of the best even tried to pass the exam for the Shoreikai
last year and failed by the narrowest of margins. For Sato it was the second time to
play in Shanghai, as the third game of the 50th Oza match in 2002 he played against
Habu was played at the same location (Habu won that game and the match 3-0). Sato was
amazed at how many new buildings there were around the tournament venue. With the
Universal Exposition in Shanghai coming up, it seems like the Chinese government
has put a lot of money in the development of the city. This game was going to be a
test of Sato's mental toughness. On the night before he got on the plane to Shanghai,
he lost his game in the 8th round of the Junisen against Fujii, which meant he was
relegated to the B1 class for the first time since he promoted to the A class 14 years
ago. Quite a tough loss to take and followed by a tiring trip without any significant
rest. What opening to pick under such circumstances?
2.P3c-3d 00:01:00 00:00:00
3.P7f-7e 00:01:00 00:00:00
This was expected, as Kubo's way of playing the opening is no secret.
4.B2bx8h+ 00:01:00 00:00:00
Despite the tough schedule, Sato doesn't shy away from a very sharp opening. He has
played this before against Kubo, namely in the Osho league game they played in
November 2005.
5.R2hx8h 00:08:00 00:00:00
6.B*4e 00:08:00 00:02:00
7.B*7f 00:08:00 00:02:00
Because the black bishop has more freedom than the white bishop, this opening line
was considered suspect for white. However, Sato has an even sharper opening idea
in mind.
8.K5a-4b 00:08:00 00:04:00
9.S3i-3h 00:08:00 00:04:00
This allows white to play the sharpest variation, but black has not much choice.
9.G3h would have prevented the later bishop drop on 2h, but then black can no longer
build a Mino castle, which is an important disadvantage.
10.B4e-5d 00:08:00 00:06:00
11.R8h-7h 00:12:00 00:06:00
12.B5dx7f 00:12:00 00:11:00
13.R7hx7f 00:12:00 00:11:00
14.B*2h 00:12:00 00:11:00
15.B*5e 00:27:00 00:11:00
16.N2a-3c 00:27:00 00:17:00
17.P7e-7d 00:30:00 00:17:00
18.P7cx7d 00:30:00 00:17:00
19.B5ex8b+ 00:34:00 00:17:00
20.S7ax8b 00:34:00 00:17:00
21.R*1h 00:34:00 00:17:00
22.B*3i 00:34:00 00:18:00
23.S7i-6h 01:31:00 00:18:00
24.N8a-7c 01:31:00 00:57:00

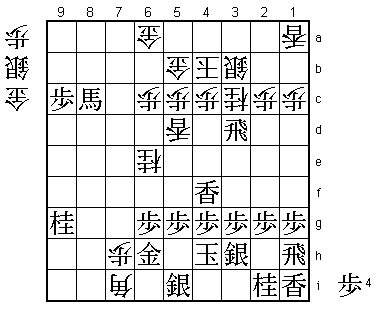
Up until 23.S6h, the moves are almost forced. Still, Sato had only used 18 minutes
before he played 24.N7c, suggesting that he had studied this line at home. Actually,
the position after 22.B*3i was never played in an official game, but it appeared
during the post mortem analysis of the game between Tobe and Kitahama in the Kisei
tournament last December. After this, it was picked up by Katagami, who discussed
it in his article series in Shukan Shogi. Therefore, this variation was generally
known, but the conclusion was that if white is forced to drop a bishop on 3i to
stay in the game, nothing good could come of this for white. Sato clearly seems to
have a different opinion and it seems that the position is indeed very complicated.

25.G4ix3i    01:57:00  00:57:00

A good plan for black seems 26.P3f, threatening S3g next. However, after 27.N4e R5f
N6e Rx2h Bx2h+ B*5e +Bx5e Rx5e R*7e the position is very difficult. Black runs the
risk of being suddenly overrun, while white has to worry if the double knight attack
is really strong enough.

26.B2hx3i+   01:57:00  00:57:00
27.B*4h      01:57:00  00:57:00
28.+B3ix4h   01:57:00  01:02:00
29.K5ix4h    01:57:00  01:02:00
30.B*6e      01:57:00  01:09:00
31.R7f-3f    02:19:00  01:09:00
32.B6ex8g+   02:19:00  01:10:00
33.G6i-7i    02:19:00  01:10:00
34.P9c-9d    02:19:00  01:43:00
35.B*7f      02:24:00  01:43:00
36.+B8gx7f   02:24:00  01:47:00
37.R3fx7f    02:24:00  01:47:00
38.P9d-9e    02:24:00  01:49:00
39.R7fx7d    02:31:00  01:49:00
40.P9e-9f    02:31:00  01:50:00
41.R7dx3d 02:33:00 01:50:00
Both Sato and Aono (who was the arbiter for this game) were very surprised that
Kubo didn't make any effort to develop the rook on 1h. Both expected 41.P1f to
bring the rook into play, but Kubo said after the game that he never intended this.
He didn't think that the rook was so weak, because it could play an important defensive
role. Furthermore, Kubo feared that the rook might become a target when he would push
the edge pawn to try and develop it. Aono commented that it showed the depth of shogi
that professional players could think so differently about the use of the rook.
42.P9fx9g+ 02:33:00 02:00:00
43.L9ix9g 02:47:00 02:00:00
44.L9ax9g+ 02:47:00 02:02:00
45.N8ix9g 02:47:00 02:02:00
46.P*7f 02:47:00 02:06:00
47.L*4f 03:05:00 02:06:00
48.G4a-5b 03:05:00 02:23:00
49.P*9c 03:13:00 02:23:00
50.N7c-6e 03:13:00 02:59:00
51.B*5e 03:15:00 02:59:00
52.S3a-3b 03:15:00 03:01:00
53.B5ex8b+ 03:16:00 03:01:00
54.P7f-7g+ 03:16:00 03:01:00
55.+B8bx8c 03:21:00 03:01:00
56.P*7h 03:21:00 03:10:00
57.G7i-6i 03:29:00 03:10:00
58.+P7gx6h 03:29:00 03:10:00
59.G6ix6h 03:29:00 03:10:00
60.B*7i 03:29:00 03:10:00
61.S*5i 03:29:00 03:10:00
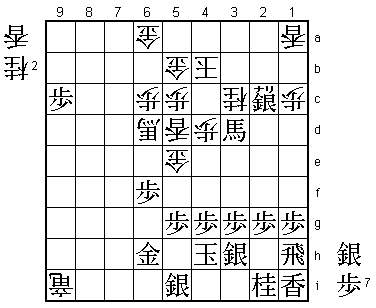
62.L*5d? 03:29:00 03:12:00
As play continued, it seems like Sato was the one who judged the position best. Kubo
thought he came out of the opening on top, but after the game he had to admit that he
had been a little bit too optimistic. Sato may have the better position, but 62.L*5d
is a mistake. The idea is to hamper in the rook and win it with S*2e next, but Sato
has underestimated Kubo's counter to this. Correct would have been the surprising
62.G*6i! which was overlooked by both players. The point of this crude gold drop is
that after 63.Gx6i Bx5g+ K4i +Bx6g is a fork on king and rook. Then K3i +Bx3d +Bx6a
G5a is good for white.
63.+B8cx6e 03:30:00 03:12:00
64.S*2e 03:30:00 03:16:00
65.N*2f! 03:30:00 03:16:00
This is the move that Sato underestimated. It seems that white still slightly has the
upper hand, but the game now becomes very close.
66.S2ex3d 03:30:00 03:24:00
67.N2fx3d 03:30:00 03:24:00
68.K4b-4a 03:30:00 03:24:00
69.+B6e-6f 03:33:00 03:24:00
70.B7ix9g+ 03:33:00 03:26:00
71.N3d-2b+ 03:34:00 03:26:00
72.R*8i 03:34:00 03:39:00
73.S*3d 03:38:00 03:39:00
74.G*5e 03:38:00 03:41:00
75.+B6f-7f 03:41:00 03:41:00
76.+B9g-6d 03:41:00 03:49:00
77.P6g-6f 03:47:00 03:49:00
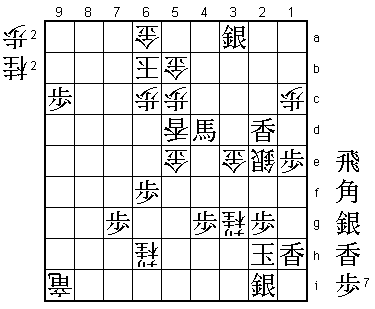
78.P4c-4d! 03:47:00 03:50:00

This pawn push at the head of the king surprised Kubo, but he admitted that it was a
very strong move.

79.L4fx4d    03:50:00  03:50:00

The alternative 79.+B6g P4e Lx4e Nx4e +Nx3b Kx3b Sx4e is also not good enough for black
after K4b.

80.P*4c      03:50:00  03:50:00
81.+B7f-6g   03:50:00  03:50:00
82.P4cx4d    03:50:00  03:50:00
83.+B6gx7h   03:50:00  03:50:00
84.R8i-9i+   03:50:00  03:50:00
85.+N2bx3b   03:50:00  03:50:00
86.K4ax3b    03:50:00  03:50:00
87.S3dx2c+   03:51:00  03:50:00
88.K3b-4b    03:51:00  03:50:00
89.+B7h-3d   03:51:00  03:50:00
90.L*3a!     03:51:00  03:50:00

This is the start of a nice one-two defensive combination.

91.S*2b      03:51:00  03:50:00

First, white forces black to drop a silver which is the only way to increase the
pressure on 3c.

92.K4b-5a    03:51:00  03:50:00

Then, the time gained by dropping the lance on 3a is used for an early escape with
the king, which finds a safe haven on the right side of the board. Note that 92.N4e
is bad because of +B2d and the white king cannot escape.

93.S2bx3a=   03:51:00  03:50:00
94.N3c-4e    03:51:00  03:50:00

The knight escapes, attacks the black king and the line of the promoted bishop on 3d
is blocked. There is no way to get access to the white king and the black king cannot
be defended. From here on, Kubo desperately tries to find a way to escape up the board,
but Sato easily succeeds in driving the king back.

95.L*5h      03:56:00  03:50:00
96.K5a-6b    03:56:00  03:53:00
97.+B3dx4d   03:56:00  03:53:00
98.+B6d-8f   03:56:00  03:53:00
99.P*7g      03:56:00  03:53:00
100.+B8f-8e  03:56:00  03:53:00
101.P1g-1f   03:58:00  03:53:00
102.N*6g     03:58:00  03:54:00
103.K4h-3i   03:58:00  03:54:00
104.N6gx5i+  03:58:00  03:54:00
105.K3i-2h   03:58:00  03:54:00
106.+N5ix5h  03:58:00  03:54:00
107.K2h-1g   03:58:00  03:54:00
108.+N5hx6h  03:58:00  03:54:00
109.+B4dx1a  03:59:00  03:54:00
110.+B8e-5h  03:59:00  03:56:00
111.L*2f     03:59:00  03:56:00
112.+B5hx5g  03:59:00  03:56:00
113.P1f-1e   03:59:00  03:56:00
114.+B5g-3e  03:59:00  03:57:00
115.K1g-1f   03:59:00  03:57:00
116.+B3e-3d  03:59:00  03:57:00
117.L2f-2e   03:59:00  03:57:00
118.G*3e     03:59:00  03:57:00
119.N2i-1g   03:59:00  03:57:00
120.S*2h     03:59:00  03:58:00
121.+S2c-2d  03:59:00  03:58:00
122.+B3dx2d  03:59:00  03:58:00
123.L2ex2d   03:59:00  03:58:00
124.S2hx1g+  03:59:00  03:58:00
125.K1fx1g   03:59:00  03:58:00
126.S*2e     03:59:00  03:58:00
127.+B1a-4d  03:59:00  03:58:00
128.L*1f     03:59:00  03:58:00
129.K1g-2h   03:59:00  03:58:00
130.L1fx1h+  03:59:00  03:58:00
131.L1ix1h   03:59:00  03:58:00
132.R*2i     03:59:00  03:58:00
133.S3hx2i   03:59:00  03:58:00
134.N4ex3g+  03:59:00  03:58:00
Resigns      03:59:00  03:58:00
Mate after 134.Kx3g +R3i or 134.K1g +Nx2g Kx2g +Rx2i or 134.K1i +Rx2i etc., so Kubo
resigned here. A huge win for Sato with the white pieces and only a day after his
relegation from the A class. Last year he basically lost the Kio match in the first
two games although he managed to pull back to 2-2 before succumbing in the final game.
It is still early days, but if Sato manages to win back the Kio title, the reason for
this will be this victory against the odds in the first game. Kubo now needs to win
with white as well in the second game to snuff out the huge morale boost Sato will
have gotten from this game.