34th Kio Match Game 5
[Black "Sato Yasumitsu, Kio"]
[White "Kubo Toshiaki, Challenger"]
[Event "34th Kio-sen, Game 5"]
[Date "March 30th 2009"]
1.P7g-7f 00:00:00 00:00:00
For the fourth time in this season (April to March), Unoki (3-dan) is throwing
the pawns in a decisive title match game. This time the result is four pawns,
so Kio Sato starts the game.
2.P3c-3d 00:00:00 00:00:00
3.P2g-2f 00:00:00 00:00:00
4.P5c-5d 00:00:00 00:01:00
5.P2f-2e 00:00:00 00:01:00
6.R8b-5b 00:00:00 00:02:00
The Gokigen Nakabisha is no surprise. It is one of the best ways white has to
get active play.
7.B8hx2b+ 00:05:00 00:02:00
The Maruyama Vaccine, taking the attacking sting out of the Gokigen Nakabisha
opening, and leading to a strategic game.
8.S3ax2b 00:05:00 00:02:00
9.G6i-6h 00:05:00 00:02:00
It is unusual to play this gold here. Sato has tried it before twice (against
Kubo and against Tanigawa), but lost both games and after this shelved it for
more than five years. It is clear that he has prepared something new.
10.K5a-6b 00:05:00 00:04:00
11.S3i-3h 00:05:00 00:04:00
12.K6b-7b 00:05:00 00:07:00
13.P4g-4f 00:05:00 00:07:00
14.K7b-8b 00:05:00 00:12:00
15.K5i-6i 00:05:00 00:12:00
16.S7a-7b 00:05:00 00:13:00
17.K6i-7h 00:05:00 00:13:00
18.P9c-9d 00:05:00 00:13:00
19.P9g-9f 00:05:00 00:13:00
20.S2b-3c 00:05:00 00:14:00
21.S3h-4g 00:10:00 00:14:00
22.P8c-8d 00:10:00 00:19:00
23.G4i-5h 00:20:00 00:19:00
24.S7b-8c 00:20:00 00:21:00
25.P6g-6f 00:26:00 00:21:00
26.G6a-7b 00:26:00 00:21:00
27.S4g-5f 00:26:00 00:21:00
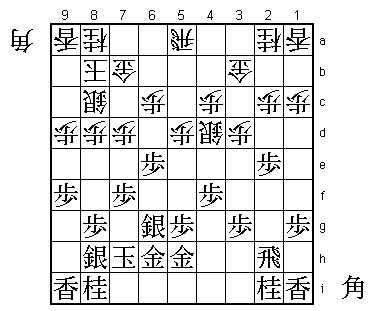
28.P7c-7d 00:26:00 00:24:00
29.S5f-6g 00:40:00 00:24:00
30.R5b-5a 00:40:00 00:40:00
31.S7i-8h 00:50:00 00:40:00
32.G4a-3b 00:50:00 00:45:00
33.P6f-6e 00:51:00 00:45:00
This vanguard pawn position is Sato's new idea. It aims at strengthening the
center and pushing back against the central rook from there.
34.S3c-4d 00:51:00 00:51:00
35.S8h-7g 00:51:00 00:51:00
36.N8a-7c 00:51:00 01:09:00
37.S7g-6f 00:54:00 01:09:00
38.S4d-5e 00:54:00 01:09:00
39.S6fx5e 01:01:00 01:09:00
40.P5dx5e 01:01:00 01:09:00
41.N8i-7g 01:01:00 01:09:00
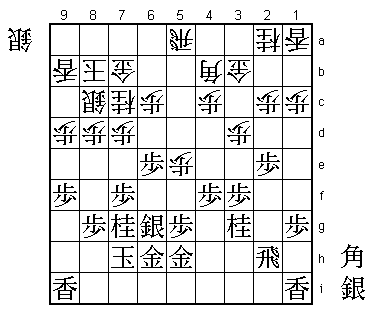
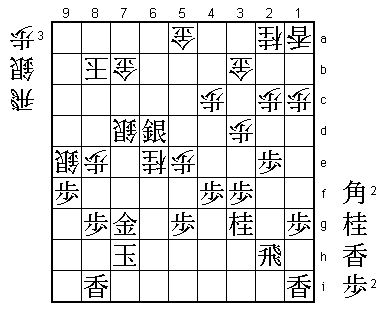
42.B*3c! 01:01:00 01:40:00
This bishop drop after the silver exchanges starts a phase of high level
strategic technique by Kubo. The white idea is to switch the rook to the 9th
file, because the edge is the weakness of the black position. To support this
attack, white wants to get the bishop on the 9g-3a line and the best position
would be to drop the bishop on 4b. However, if white plays 42.B*4b here, black
has the strong 43.S*5b! and after both 44.Rx5b B*4a or 44.R8a B*5d, black has
the advantage.
43.P3g-3f 01:18:00 01:40:00
44.L9a-9b 01:18:00 01:40:00
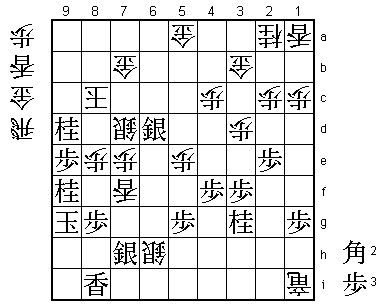
45.N2i-3g 01:57:00 01:40:00
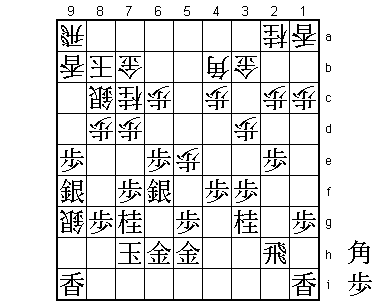
46.B3c-4b 01:57:00 01:47:00
Now Kubo pulls back the bishop to 4b. At first glance, it seems that there is
no difference, but after 47.S*5b Rx5b B*4a R6b Bx3b+ B1e! white has a fork on
the promoted bishop and knight. Losing a move to force black to play N3g and
then play B4b is a very high class technique. Now Kubo has the bishop where he
wants it and starts his edge attack.

47.S6g-6f    02:26:00  01:47:00
48.P9d-9e    02:26:00  02:02:00
49.P9fx9e    02:44:00  02:02:00
50.R5a-9a    02:44:00  02:02:00
51.S*9f      02:44:00  02:02:00

The other possible defense is 51.S*8f, but after 52.Bx8f Px8f Lx9e white breaks
through on the edge.

52.S*9g      02:44:00  02:15:00
This silver looks heavy, but it is probably the best way to attack for white.
First playing 52.P3e Px3e to create a hole at the head of the knight is a common
tactic, but Kubo didn't like to give his opponent the extra pawn.

53.P7f-7e    02:48:00  02:15:00
54.L9bx9e    02:48:00  02:17:00
55.S9fx9e    02:55:00  02:17:00
56.R9ax9e    02:55:00  02:17:00
57.B*8f!     02:55:00  02:17:00

Strong defense, but Sato felt like he was already taking desperate measures here.

58.S9gx8f=   02:55:00  02:20:00
59.L9ix9e    02:55:00  02:20:00
60.B*9f      02:55:00  02:25:00

This is mating threat and now it is clear that Kubo has the upper hand.

61.L*8i      03:12:00  02:25:00
62.P7dx7e!   03:12:00  02:38:00

Strong move. Alternatives are 62.Sx9e and 62.P*9g, but after 62.Sx9e P*9g or
62.P*9g Px7d P9h+ Px7c+ Kx7c L9c+ the white position is not as good as in the
game. It takes some flexibility to play 62.Px7e, because it is easy to get
fixated on the edge attack.

63.P*7d      03:13:00  02:38:00
64.N7c-8e    03:13:00  02:54:00
65.N7gx8e    03:26:00  02:54:00
66.P8dx8e    03:26:00  02:54:00
67.P6e-6d    03:32:00  02:54:00
68.P6cx6d    03:32:00  03:06:00
69.R*6a      03:58:00  03:06:00
70.S8fx9e    03:58:00  03:21:00
71.S6fx7e    03:58:00  03:21:00
72.L*6e!     03:58:00  03:31:00
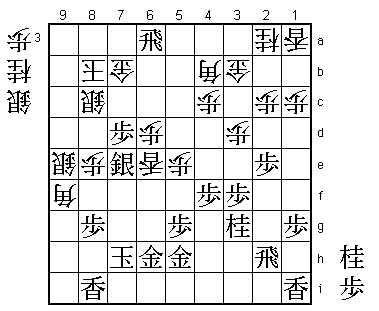
Another good move by Kubo. He realizes that going for an all-out attack with
72.L*7f K6i N*7g K5i Nx8i+ Sx6d saves the bishop, but chases the king too far
away. Instead, he turns to defense, sacrificing the bishop for a gold, which
can be used to eliminate the black rook. This makes the white king much more
safe. Still, 72.L*6e is a move that is difficult to spot because it seems like
black can just counter this with 73.P*6e. However, white can then play 74.N*6c
and Nx7e next picks up a silver and puts the knight in a perfect attacking position.

73.P*9g      03:58:00  03:31:00
74.L6ex6h+   03:58:00  03:32:00
75.G5hx6h    03:58:00  03:32:00
76.G*5a      03:58:00  03:32:00
77.R6ax6d+   03:58:00  03:32:00

Or 77.Px9f Gx6a Px9e R*9h is good for white.

78.B4bx6d    03:58:00  03:34:00
79.S7ex6d    03:58:00  03:34:00
80.S8cx7d    03:58:00  03:38:00
81.P9gx9f    03:58:00  03:38:00
82.P*7g      03:58:00  03:39:00
83.G6hx7g    03:58:00  03:39:00
84.N*6e      03:58:00  03:39:00
85.N*9d?     03:58:00  03:39:00

In time trouble (only two minutes left) Sato plays a reflex move that is very
bad. Here 85.P*7c would have been best. After 86.Nx7g+ Kx7g P*7f K8h Gx7c (after
G8c P7b+ Kx7b B*4e K8b Px9e is good for black) N*9d K7b (or K8c B*9a) Sx7c+ Kx7c
and either B*8b or B*9a and black keeps the pressure on the white king. Sato still
wasn't confident in this position, but it clearly offers more opportunities for his
opponent to make a mistake than what he played. Even the simple 85.Px9e Nx7g+ Kx7g
P*7f K8h S*7g K9i would have been better than 85.N*9d.

86.K8b-8c    03:58:00  03:41:00

Now it is suddenly very difficult to get to the white king. Kubo uses the extra
time he is given to make sure that his attack is decisive.

87.P9fx9e    03:59:00  03:41:00
88.N6ex7g+   03:59:00  03:41:00
89.K7hx7g    03:59:00  03:41:00
90.P*7f      03:59:00  03:41:00
91.K7gx7f    03:59:00  03:41:00
92.R*7i      03:59:00  03:42:00
93.S*7h      03:59:00  03:42:00
94.P*7e      03:59:00  03:42:00
95.K7f-7g    03:59:00  03:42:00
96.R7ix1i+   03:59:00  03:42:00
97.R2h-6h    03:59:00  03:42:00
98.L*7f      03:59:00  03:46:00
99.K7g-8h    03:59:00  03:46:00
100.S*7i     03:59:00  03:46:00
101.K8h-9g   03:59:00  03:46:00
102.S7ix6h=  03:59:00  03:46:00
103.L*8d     03:59:00  03:46:00
104.K8cx8d   03:59:00  03:47:00
105.N*9f     03:59:00  03:47:00
106.K8d-8c   03:59:00  03:47:00
Resigns      03:59:00  03:47:00
Still no way to get to the white king, while white threatens mate with R*9i B*9h
Rx9h+ Kx9h P*9g Kx9g B*7i etc. Even if black defends against this threat, white
can just continue making mating threats from which there is no ultimate escape.
In his 5th try, Kubo finally manages to take his first title. It will have helped
that he played Sato instead of Habu this time, but his mental attitude really seems
to have changed. Even when he lost two games after winning the first two, which
would have most people thinking bad things, Kubo said he just enjoyed the idea of
being able to play five games at the big stage. Enjoying the experience instead of
worrying about the result might have been the reason for his strong play in this
final game.