34th Kio Match Game 1
[Black "Sato Yasumitsu, Kio"]
[White "Kubo Toshiaki, Challenger"]
[Event "34th Kio-sen, Game 1"]
[Date "February 8th 2009"]
1.P7g-7f     00:00:00  00:00:00

This is the first time Sato and Kubo face each other in a title match. After a year
of title matches with at least one of the players being Habu this really feels new.
This is the fifth time Kubo plays for a major title. He lost all four previous
matches against Habu, so he will be happy to see a different face across the board.
Still, regardless of the opponent Kubo will play Furibisha, so the only question is
where he is going to put the rook for this first game. Of course, Sato is famous for
his opening experiments, so the other point of interest is what he will play against
Kubo's Furibisha.

2.P3c-3d     00:00:00  00:00:00
3.P2g-2f     00:00:00  00:00:00
4.P5c-5d     00:00:00  00:00:00
5.S3i-4h     00:02:00  00:00:00
6.P5d-5e     00:02:00  00:01:00
7.K5i-6h     00:02:00  00:01:00
8.R8b-5b     00:02:00  00:01:00
9.K6h-7h     00:02:00  00:01:00
10.K5a-6b    00:02:00  00:01:00
11.G4i-5h    00:02:00  00:01:00
12.K6b-7b    00:02:00  00:01:00
13.S7i-6h    00:04:00  00:01:00
14.B2b-3c    00:04:00  00:01:00
15.P3g-3f    00:11:00  00:01:00
16.S3a-4b    00:11:00  00:02:00
17.S4h-3g    00:11:00  00:02:00
18.P4c-4d    00:11:00  00:19:00
19.S3g-4f    00:17:00  00:19:00

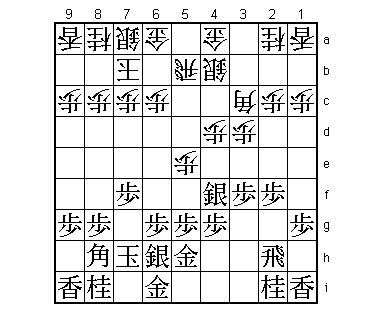
The stage is set. Kubo has selected the Nakabisha opening and Sato has answered this
with a slow build-up where the fashionable way to play is to exchange the bishops
early. This plan with S3g-S4f is the strategy of choice of Goda (9-dan) and the plan
is simply to put pressure on the white position. It invites the following attack
against the silver on 4f...

20.P4d-4e    00:17:00  00:21:00
21.S4fx4e    00:17:00  00:21:00
22.S4b-4c    00:17:00  00:21:00

The silver on 4e now has no place to go, but as long as white has no pawn to drop
on 4d, this silver cannot be easily captured. Having the silver at a high position
on the board with the threat of being lost already creates quite some tension.

23.P4g-4f    00:28:00  00:21:00
24.G4a-3b    00:28:00  00:29:00
25.G5h-4g    01:17:00  00:29:00
26.B3c-2b    01:17:00  00:41:00
27.P9g-9f    01:22:00  00:41:00
28.N2a-3c    01:22:00  00:52:00
29.N2i-3g    01:22:00  00:52:00
30.K7b-8b    01:22:00  00:59:00
31.P9f-9e    01:45:00  00:59:00
32.G6a-7b    01:45:00  01:12:00
33.P2f-2e    01:46:00  01:12:00
34.P1c-1d    01:46:00  01:14:00

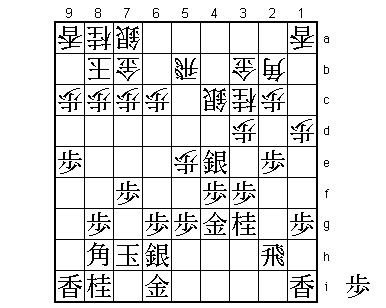
White can take the silver on 4e with the knight at any time, which is a small material
advantage. However, this would also allow black to develop its knight to 4e, where
it keeps pressure on the white position, so white really doesn't want to take on 4e.

35.P5g-5f!?  02:06:00  01:14:00

Sato forces white to take the silver on 4e, because 36.Px5f Sx5f frees the silver.
Still, pushing the pawn on the central file where the opponent rook is makes this
a double-edged move. The position now gets very sharp.

36.N3cx4e    02:06:00  01:23:00
37.N3gx4e    02:06:00  01:23:00
38.S4c-5d    02:06:00  01:54:00
39.P5fx5e    02:14:00  01:54:00
40.S5d-6e    02:14:00  01:55:00
41.P2e-2d    02:39:00  01:55:00
42.P2cx2d    02:39:00  01:55:00
43.R2hx2d    02:39:00  01:55:00
44.P*2c      02:39:00  01:56:00
45.R2d-2h    02:39:00  01:56:00

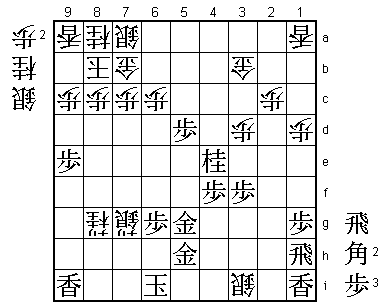
Here it seems that black has gotten the better position. The attack P3e followed by
Px3d is unstoppable, so white has to move quickly. However, there seems to be no
way for white to open the position for the major pieces. For example, 45.Sx7f is
answered by 46.G5f and 45.Bx5e by 46.P*5c. What can Kubo do?

46.R5bx5e    02:39:00  02:22:00
47.B8hx5e    02:45:00  02:22:00
48.B2bx5e    02:45:00  02:22:00
49.S6h-7g    02:45:00  02:22:00

White has opened the position for his major pieces (sabaki), but here the general
opinion in the press room was that black has the strong threat R*5b next, so white
is in trouble. However, we will now see why Kubo's nickname is "The Sabaki Artist".

50.B*4d!     02:45:00  02:29:00

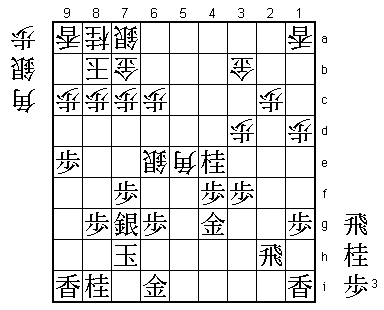
This bishop drop is the only way to keep the position interesting for white. It is
very hard to see that this is a good move, because the aim of this drop (attacking
the head of the king) seems too simple to work. Kubo has seen that simple defences
like 51.N*6f or 51.G6h fail to 52.S*5f and the black position is impossible to defend.

51.P*5d      03:22:00  02:29:00

Sato also felt that the white attack is too simple and that he could stop it. Therefore,
he prepares for a counter attack.

52.B5ex7g+   03:22:00  02:41:00
53.N8ix7g    03:22:00  02:41:00
54.S6ex7f    03:22:00  02:41:00
55.N*8i      03:25:00  02:41:00
56.B4dx7g+   03:25:00  02:56:00
57.N8ix7g    03:25:00  02:56:00
58.N*7e      03:25:00  02:56:00

The attack may be simple, but it is not so easy to stop. Sato may have
underestimated its power.

59.G6i-5h    03:36:00  02:56:00

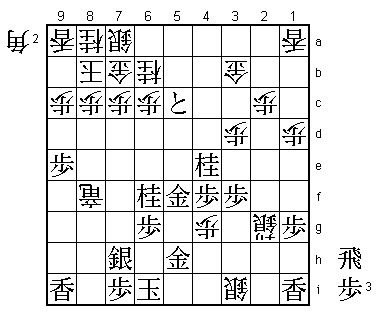
60.S*3i?!    03:36:00  03:06:00

Not the best move. Murata (4-dan) found the following sequence in the press
room: 60.P*5g G4gx5g Nx8g+ K6i +Nx7g P5c+ N*6e B*6a K9b! which is very strong
because it defends against the black mating threat and black cannot give white a
bishop in hand (for example with Bx7b+ Sx7b) because he will then be mated. The
reason Kubo played 60.S*3i is clear. With 59.G5h Sato aims at escaping with the
king to the right and the silver drop on 3i makes this much more difficult, while
at the same time pestering the black rook.

61.R2h-1h    03:43:00  03:06:00
62.P*5g      03:43:00  03:13:00
63.G4gx5g    03:48:00  03:13:00
64.N7ex8g+   03:48:00  03:16:00
65.K7h-6i    03:48:00  03:16:00
66.S7fx7g+   03:48:00  03:17:00

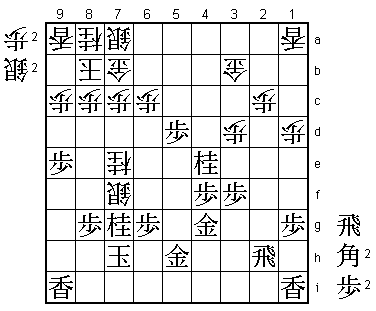
This now threatens both N*2f and S*2g. If white gets a rook in hand, mating the black
king will become easy (R*7i is already a mating threat), so this is Sato's only chance
to start a counter attack.

67.B*2f?     03:59:00  03:17:00

Looks like the natural move, because it attacks the white king, defends the black king
and stops the knight drop on 2f. However, the attacking power of this bishop is not
enough. Sato's best chance would have been 67.P*8d. For example, 68.+N7h K5i N*3g is
a mating threat, but after Px8c+ Gx8c R*5b S7b B*8f black can defend. After the game
Kubo said that he intended to play 68.Px8d after 67.P*8d, but this seriously weakens
the head of the white king, so this position is not clear.

68.S*2g      03:59:00  03:27:00
69.P*7i      03:59:00  03:27:00
70.S2gx1h=   03:59:00  03:28:00
71.B*4d      03:59:00  03:28:00
72.N*6b      03:59:00  03:28:00
73.P5d-5c+   03:59:00  03:28:00
74.S1h-2g+   03:59:00  03:41:00

Now the outcome of the game is decided. Black cannot play 75.+Px6b because of 76.+Sx2f,
so he has to give up his hopes of an attack.

75.B2f-5i    03:59:00  03:41:00
76.P*5f      03:59:00  03:44:00
77.G5gx5f    03:59:00  03:44:00
78.R*7f      03:59:00  03:44:00
79.B5ix7g    03:59:00  03:44:00
80.+N8gx7g   03:59:00  03:44:00
81.B4dx7g    03:59:00  03:44:00
82.R7fx7g+   03:59:00  03:44:00
83.S*7h      03:59:00  03:44:00
84.+R7g-8f   03:59:00  03:44:00
85.N*6f      03:59:00  03:44:00
86.P*4g      03:59:00  03:45:00
Resigns      03:59:00  03:45:00

And 87.Px4h+ next is decisive. However, black cannot take this pawn with 87.Gx4g because
of 88.B*3h. Also, 87.+Px6b is simply answered with 88.Sx6b, so the black position is
hopeless and Sato resigned here. After dropping the opening game in each of his four
previous title matches, Kubo finally starts with a victory. It is no wonder that he was
the one doing most of the talking after the game. Sato needs a win with the white pieces
in the second game, which will not be easy against an opponent suddenly brimming with
confidence.
