33rd Kio Match Game 5
[Black "Sato Yasumitsu, Kio"]
[White "Habu Yoshiharu, Challenger"]
[Event "33rd Kio-sen, Game 5"]
[Date "March 28th 2008"]
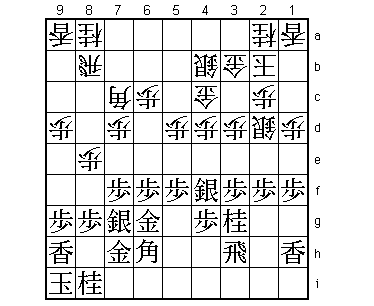
1.P7g-7f 00:00:00 00:00:00
The last 12 Kio title match games have all been won by black, so one could say that
Sato won the furigoma here. The game starts as a classic Yagura, which almost seems
old fashioned after the hypermodern Gokigen Nakabisha and Kakugawari with tempo loss
of the previous games.
2.P8c-8d 00:00:00 00:00:00
3.S7i-6h 00:02:00 00:00:00
4.P3c-3d 00:02:00 00:00:00
5.P6g-6f 00:02:00 00:00:00
6.S7a-6b 00:02:00 00:00:00
7.P5g-5f 00:02:00 00:00:00
8.P5c-5d 00:02:00 00:03:00
9.S3i-4h 00:02:00 00:03:00
10.S3a-4b 00:02:00 00:04:00
11.G6i-7h 00:02:00 00:04:00
12.G4a-3b 00:02:00 00:04:00
13.K5i-6i 00:02:00 00:04:00
14.K5a-4a 00:02:00 00:06:00
15.G4i-5h 00:02:00 00:06:00
16.G6a-5b 00:02:00 00:06:00
17.S6h-7g 00:03:00 00:06:00
18.S4b-3c 00:03:00 00:07:00
19.B8h-7i 00:06:00 00:07:00
20.B2b-3a 00:06:00 00:08:00
21.P3g-3f 00:06:00 00:08:00
22.P4c-4d 00:06:00 00:08:00
23.S4h-3g 00:08:00 00:08:00
24.B3a-6d 00:08:00 00:13:00
25.G5h-6g 00:10:00 00:13:00
26.P7c-7d 00:10:00 00:13:00
27.B7i-6h 00:15:00 00:13:00
28.G5b-4c 00:15:00 00:15:00
29.K6i-7i 00:15:00 00:15:00
30.K4a-3a 00:15:00 00:15:00
31.K7i-8h 00:16:00 00:15:00
32.K3a-2b 00:16:00 00:15:00
33.S3g-4f 00:17:00 00:15:00
34.S6b-5c 00:17:00 00:16:00
35.N2i-3g 00:17:00 00:16:00
36.P9c-9d 00:17:00 00:16:00
37.P2g-2f 00:17:00 00:16:00
38.S3c-2d 00:17:00 00:16:00
39.P1g-1f 00:19:00 00:16:00
40.P1c-1d 00:19:00 00:17:00
41.L1i-1h 00:27:00 00:17:00
42.B6d-7c 00:27:00 00:20:00
43.R2h-3h 00:27:00 00:20:00
44.P8d-8e 00:27:00 00:26:00
45.L9i-9h 00:39:00 00:26:00
46.S5c-4b 00:39:00 00:56:00
47.K8h-9i 00:42:00 00:56:00
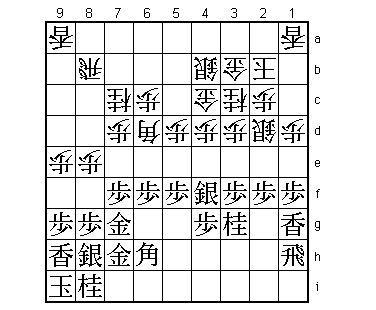
Moving from the Yagura into the Anaguma formation has been made fashionable by young
players like Watanabe who prefer to fight with the stronger Anaguma than taking a
chance in the mutual fight with the Yagura. This makes sense, because it is always
better to open the game when your defence is stronger than the defence of the opponent.
Therefore, the general opinion is that white cannot allow black to complete the Yagura
with S7g-8h and G6g-7g.
48.N2a-3c?! 00:42:00 00:59:00
As he does often, Habu goes against common sense. The joseki here is to move out the
bishop with 48.B6d, so that 49.S8h can be answered with 50.P8f Px8f Bx8f. Therefore,
black cannot easily complete the Anaguma castle. With 48.N3c Habu says he doesn't care.
He is counting on black running out of moves, but he has overlooked a hidden attack.
49.S7g-8h 00:49:00 00:59:00
50.B7c-6d 00:49:00 01:01:00
51.G6g-7g 01:07:00 01:01:00
52.N8a-7c 01:07:00 01:01:00
53.L1h-1g! 01:32:00 01:01:00
After seeing this move, it becomes kind of obvious, because white has weakened the edge
by playing 48.N3c. The Suzume-sashi attacking formation L1g-R1h is therefore a good
attacking plan here. The reason that Habu probably overlooked this is that black
already played the lance up to 1h earlier. Playing it up again, going to a square
in two moves where it could have gone in one move is inefficient and therefore a
move that a professional player can easily overlook. Still, these types of moves
that go against common shogi sense are supposed to be Habu's forte, not Sato's.
Tasting a little of his own medicine in this game is going to be a painful experience
for Habu.
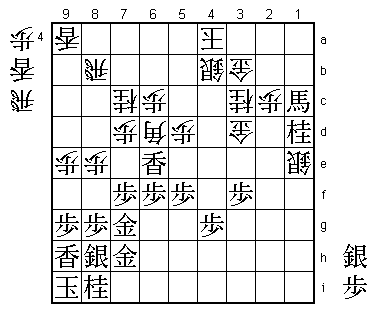
54.P9d-9e 01:32:00 01:11:00
55.R3h-1h 01:32:00 01:11:00
56.P4d-4e    01:32:00  01:49:00

Opening the game with the black king much better defended than the white king is
suicidal, but white has not much else. Black threatens strongly P5e Px5e P1e Px1e
P3e Px3e Sx3e which is a classic breakthrough attack that will be easily converted
by Yagura specialist Sato.

57.N3gx4e    01:32:00  01:49:00
58.N3cx4e    01:32:00  01:49:00
59.S4fx4e    01:32:00  01:49:00
60.N*3c      01:32:00  01:50:00
61.P1f-1e    02:01:00  01:50:00
62.P1dx1e    02:01:00  01:56:00
63.P*1b      02:35:00  01:56:00
64.L1ax1b    02:35:00  02:01:00
65.S4ex3d    02:47:00  02:01:00
66.G4cx3d    02:47:00  02:05:00
67.P3f-3e    02:47:00  02:05:00
68.S2dx3e    02:47:00  02:29:00
69.L1gx1e    02:47:00  02:29:00
70.L1bx1e    02:47:00  02:29:00
71.R1hx1e    02:47:00  02:29:00
72.S*2d      02:47:00  02:29:00
73.P*3f      03:02:00  02:29:00
74.S3ex2f    03:02:00  02:38:00
75.R1e-1f    03:04:00  02:38:00

76.S2f-1e? 03:04:00 03:12:00
Makes things worse. It seems like Habu had already given up on this game here,
despite the fact that it is the final game of this match so there is no second
chance after this. The best fighting chance would have been 76.S2g=. Then for
example 77.R1d P*1c N*2f Px1d Nx3d K1c Nx4b+ Rx4b and after the obvious L*3e
white can play Rx4g+ and because of the power of the white dragon this is not
an easy position to win for black.
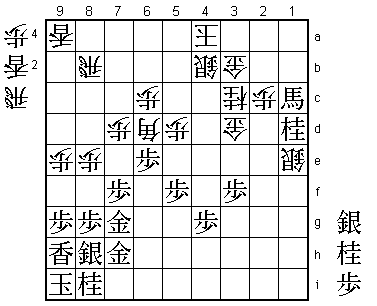
77.R1fx1e 03:23:00 03:12:00
78.S2dx1e 03:23:00 03:12:00
79.N*1d 03:23:00 03:12:00
80.K2b-3a 03:23:00 03:12:00
Not a real mistake, but 80.K1b would have been better here because it gives Sato
a chance to make a mistake. For example, 81.S*4a is not good after 82.K2a and
Sx3b+ is answered by Kx3b and now the white king can run to 4c where it is hard
to catch. The right way to play for black after 80.K1b would have been 81.S*1c
K2a B4f. It is doubtful that Sato would have played it this way, because he felt
that the silver on 1c and the knight on 1d were not working well when in fact
they are.
81.B6h-1c+ 03:29:00 03:12:00
82.K3a-4a 03:29:00 03:12:00
83.L*6e! 03:37:00 03:12:00
A well-known endgame tactic in this type of position. This lance aims at disrupting
the N7c-B6d combination. Without the knight on 7c the white attack is much weakened.
Furthermore, without the knight on 7c, this square becomes available for a piece drop
to pester the white rook. We will see this a little bit later. Note that black has
to be careful with the timing of this lance drop. It is easy to become greedy here
and play 83.N2b+ first, because after 84.G4c the lance drop on 6e is even stronger
than in the game. However, white can play 84.P9f instead and after 85.Px9f P*9g Sx9g
P*9e Px9e P*9f Sx9f R*2i the bishop on 6d is peeking straight into the Anaguma and
the position is unclear.

84.N7cx6e    03:37:00  03:38:00
85.P6fx6e    03:37:00  03:38:00
86.B6dx9g+?  03:37:00  03:38:00

The second time that Habu seems to have given up on this game too early. This bishop
promotion clearly comes up short and Sato doesn't even have to play particularly
difficult moves to show this. The last opportunity to hope for a mistake was to be
patient with 86.B5c. The point is that after the normal 87.N2b+ P9f Px9f P*9g Sx9g
P*9e +Nx3b Kx3b the most obvious move seems to be N*3e to avoid the king escape to
4c, but this is not so easy after Gx3e. It seems like black has no way to stop the
white king from running away to 4c, but in the post-mortem analysis Habu explained
how to do it: by playing N*5e! This prevents K4c and after Px5e black has S*5d next,
which again prevents the king from running away and attacks the bishop on 5c at the
same time. For example, Px9f G*2b K4a +Bx2c K5a Sx5c+ Px9g+ B*7c N*6b Lx9g and the
black win is obvious. Still, Sato was very surprised by N*5e and admitted that he
wasn't sure that he would have found it in the game. For Habu, this was a case where
seeing too much was a handicap. By the way: 86.Bx9g+ was received by shouts of surprise
by the professionals in the press room. These were so loud that they actually could
be heard by the players. A clear breach of etiquette.

87.L9hx9g    03:41:00  03:38:00
88.L*9c      03:41:00  03:38:00
89.B*7c      03:45:00  03:38:00

Not so difficult, but very strong. R7b fails to Bx9a+, R9b to N*8d and R8a to B6b+.

90.P9e-9f    03:45:00  03:39:00
91.B7cx8b+   03:45:00  03:39:00
92.P9fx9g+   03:45:00  03:40:00
93.N8ix9g    03:45:00  03:40:00
94.L9cx9g=   03:45:00  03:40:00
95.S8hx9g    03:45:00  03:40:00
96.L9ax9g+   03:45:00  03:42:00
97.R*9a      03:47:00  03:42:00

Again, easy but strong. This takes out the promoted lance on 9g after which there
is no way to win for white.

98.L*5a      03:47:00  03:43:00
99.R9ax9g+   03:47:00  03:43:00
100.S1e-2d   03:47:00  03:48:00
101.+B1c-1b  03:50:00  03:48:00
102.R*6i     03:50:00  03:51:00
103.L*7i     03:50:00  03:51:00
104.S*6h     03:50:00  03:56:00
105.+B8b-4f  03:51:00  03:56:00

Another "abandon all hope" move. This promoted bishop works very well.

106.S6hx7g=  03:51:00  03:56:00
107.G7hx7g   03:51:00  03:56:00
108.L*4d     03:51:00  03:57:00
109.S*2a     03:52:00  03:57:00
110.P*3a     03:52:00  03:59:00
111.+R9g-9b  03:52:00  03:59:00
112.N*6b     03:52:00  03:59:00
113.+R9bx6b  03:53:00  03:59:00
114.G*5b     03:53:00  03:59:00
115.N*5c     03:53:00  03:59:00
116.S4bx5c   03:53:00  03:59:00
117.S2ax3b+  03:53:00  03:59:00
118.P3ax3b   03:53:00  03:59:00
119.S*4c     03:53:00  03:59:00
Resigns      03:53:00  03:59:00
Here Habu resigned. 120.Gx4c or 120.Gx6b are mate after 121.G*3a Kx3a N2b+ K4a +Nx3b.
Also mate is 120.S*4b G*3a Sx3a Sx5b+ Lx5b G*5b K4b +Rx5b. A surprisingly one-sided
game at the end of a very exciting Kio match. It could be argued that this match was
decided by one move: Habu's blunder S*8g in the second game. Of course, Sato was very
happy about the defence of his Kio title, especially since "it has been a while since
I won a title match against Habu". Actually, the last time he won a title match against
Habu was the 2005 Kisei match. After that, he had lost six title matches in a row.
Coming back from 2-1 behind makes this title defence even sweeter.