33rd Kio Match Game 4
[Black "Sato Yasumitsu, Kio"]
[White "Habu Yoshiharu, Challenger"]
[Event "33rd Kio-sen, Game 4"]
[Date "March 19th 2008"]
1.P7g-7f     00:00:00  00:00:00
2.P3c-3d     00:00:00  00:00:00
3.P2g-2f     00:00:00  00:00:00
4.P5c-5d     00:00:00  00:00:00
5.S3i-4h     00:02:00  00:00:00
6.P5d-5e     00:02:00  00:02:00
7.K5i-6h     00:03:00  00:02:00
8.R8b-5b     00:03:00  00:03:00

The battle in the Gokigen Nakabisha continues. This same opening was also played
in the 2nd and 3rd game. It was no real surprise that Habu played it again. In the
second game he reached a won position before blundering in the endgame.

9.K6h-7h     00:03:00  00:03:00
10.K5a-6b    00:03:00  00:03:00
11.G4i-5h    00:03:00  00:03:00
12.K6b-7b    00:03:00  00:03:00
13.S7i-6h    00:03:00  00:03:00
14.K7b-8b    00:03:00  00:05:00
15.P4g-4f    00:03:00  00:05:00
16.S7a-7b    00:03:00  00:06:00
17.S4h-4g    00:03:00  00:06:00
18.P9c-9d    00:03:00  00:08:00
19.P9g-9f    00:07:00  00:08:00
20.B2b-3c    00:07:00  00:14:00
21.S4g-3f    00:18:00  00:14:00

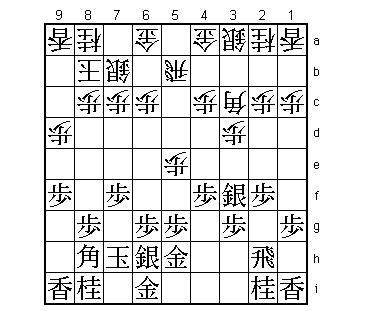
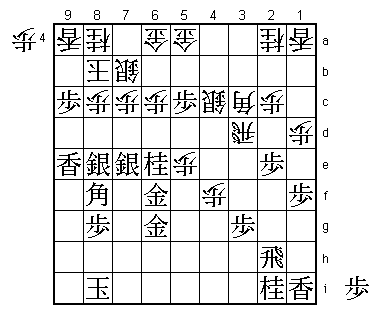
More or less a new move in this position. It was actually played once before, in
the game between Amateur Amano and Hirose in the Asahi Open tournament in 2005, but
in that game the pawns on the edge were not pushed. So, although the idea is not new,
it is a new move in this position. Normal here is 21.S7g to threaten to attack the
central pawn with S6f next.

22.P5e-5f    00:18:00  00:22:00

Of course. This is the only way to show that moving the silver out to 3f is a bad move.

23.P6g-6f    00:19:00  00:22:00
24.P5fx5g+   00:19:00  00:30:00
25.G5hx5g    00:22:00  00:30:00
26.P6c-6d    00:22:00  01:31:00
27.S3f-4e    00:57:00  01:31:00
28.P6d-6e    00:57:00  01:34:00

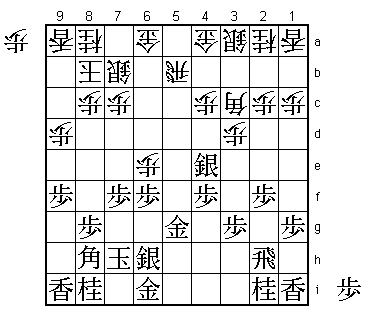
29.P*5f!?    01:29:00  01:34:00

This is definitely a new idea by Sato. The earlier game continued S5f Px6f P*5e.
After the game, Sato said that he had studied this game and decided to try P*5f
here, although he was not sure if it was any good. This game shows that it might
be worth investigating further.

30.S3a-3b    01:29:00  01:54:00

After the game Sato said that he was mostly worried about 30.Px6f Gx6f P*6e G5e
because the shape with the gold and silver in front of the pawns is not good.
However, Habu pointed out that after G5h next, there is nothing much that white
can do. This was a move that Sato admitted he had overlooked. Still, 30.S3b is
not the solution, as we will see next.

31.S6h-7g    01:32:00  01:54:00
32.P6ex6f    01:32:00  02:04:00
33.S7gx6f    01:32:00  02:04:00
34.P3d-3e    01:32:00  02:05:00
35.G6i-6h    01:36:00  02:05:00
36.B3c-2b    01:36:00  02:12:00
37.P5f-5e    02:08:00  02:12:00
38.P4c-4d    02:08:00  02:19:00
39.S4e-5f    02:10:00  02:19:00
40.S3b-4c    02:10:00  02:19:00
41.P2f-2e    02:10:00  02:19:00
42.B2b-3c    02:10:00  02:19:00
43.P1g-1f    02:16:00  02:19:00
44.P1c-1d    02:16:00  02:26:00
45.S5f-6e    02:23:00  02:26:00
46.P*6c      02:23:00  02:27:00

It is painful to have to drop back the pawn on 6c after it was pushed forward so
strongly earlier. However, Habu felt he had no choice because if black would drop
a pawn on 6d, this would be an attacking base that is too strong.

47.B8h-7g    02:27:00  02:27:00
48.R5b-5a    02:27:00  02:31:00
49.B7g-8f    02:47:00  02:31:00
50.G4a-5b    02:47:00  02:39:00
51.N8i-7g    02:53:00  02:39:00
52.P*5c      02:53:00  02:45:00

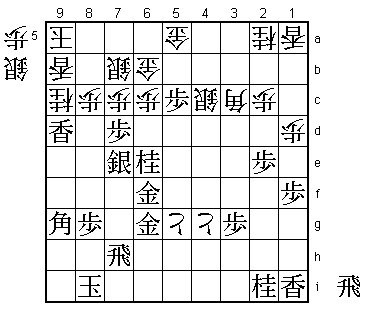
And here white drops back the second pawn that was pushed forward early. Again not
a move of choice, but of necessity because after a move like 52.P8d, black can play
53.P2d Bx2d P*2b N3c P2a+ Rx2a S5d and the white position crumbles. This being said,
after P*5c, Habu finds himself in a terrible mess only very rarely seen in games at
this level. If we only count the moves that white has lost by pushing the pawns on
the 5th and 6th file and then dropping them back on 5c and 6c, white has lost eight
moves. Habu's opening play has been a complete failure and his position is about to
get worse.

53.P7f-7e    02:53:00  02:45:00
54.B3c-4b    02:53:00  02:45:00
55.P7e-7d    03:01:00  02:45:00
56.P7cx7d    03:01:00  02:45:00
57.S6ex7d    03:01:00  02:45:00
58.P*7c      03:01:00  02:45:00
59.S7d-8e    03:01:00  02:45:00

Black strongly switches this silver to start a devastating edge attack.

60.R5a-3a    03:01:00  02:49:00
61.P9f-9e    03:04:00  02:49:00
62.P9dx9e    03:04:00  02:55:00
63.P*9c      03:05:00  02:55:00
64.P3e-3f    03:05:00  02:56:00
65.P3gx3f    03:05:00  02:56:00
66.R3ax3f    03:05:00  02:59:00
67.P*3g      03:05:00  02:59:00
68.R3f-3d    03:05:00  02:59:00
69.L9ix9e    03:11:00  02:59:00
70.P4d-4e    03:11:00  03:00:00

Habu has found a way to get some counter play here. This rook works sideways in
defence and the threat is P8d next, after white would be back in the game.

71.S6f-7e    03:20:00  03:00:00

Sato also shows some flexible thinking here. This silver blocks the bishop and
is therefore quite heavy, but preventing P8d is more important in this position.

72.P5c-5d    03:20:00  03:15:00
73.N7g-6e    03:28:00  03:15:00
74.P5dx5e    03:28:00  03:19:00
75.P*5c      03:29:00  03:19:00
76.G5b-5a    03:29:00  03:19:00

Habu moves the gold further back, because taking this pawn would give black the
opportunity to bring the bishop back into play. Habu is being very patient here,
but his pieces are running out of board here.

77.G5g-6f    03:31:00  03:19:00
78.B4b-3c    03:31:00  03:20:00
79.G6h-6g    03:44:00  03:20:00
80.P4ex4f    03:44:00  03:39:00
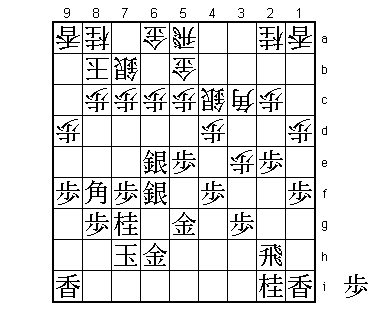
81.K7h-8i!   03:48:00  03:39:00

A surprise to the professionals in the press room (because this game was played
at the Shogi Renmei headquarters there was an unusual high number of them). With
all the generals high up the board, it was expected that Sato's king would move up
instead of down. However, looking for a safe way to win is not Sato's style. It
seems that he prefers to win a game with one move difference. When looking from
that perspective, K8i makes sense. The king is moved away from where the battle is
going to take place. Although it has no defenders, it will take white some time to
get to the king. The immediate black threat is of course R9h, after which the
breakthrough on the edge will lead to a quick victory.

82.P*9g      03:48:00  03:40:00
83.R2h-7h    03:52:00  03:40:00

Because the king moved to 8i, this line is now another option for the rook.

84.G6a-6b    03:52:00  03:40:00
85.P9c-9b+   03:53:00  03:40:00
86.L9ax9b    03:53:00  03:40:00
87.L9ex9b+   03:53:00  03:40:00
88.K8bx9b    03:53:00  03:40:00
89.L*9f      03:53:00  03:40:00
90.K9b-8b    03:53:00  03:41:00
91.P*9b      03:53:00  03:41:00
92.L*9c      03:53:00  03:47:00
93.P9b-9a+   03:53:00  03:47:00
94.K8bx9a    03:53:00  03:47:00
95.L9fx9c+   03:53:00  03:47:00
96.N8ax9c    03:53:00  03:47:00
97.L*9f      03:53:00  03:47:00
98.L*9b      03:53:00  03:48:00
99.S8e-9d    03:53:00  03:48:00
100.R3dx9d   03:53:00  03:49:00
101.L9fx9d   03:53:00  03:49:00
102.P4f-4g+  03:53:00  03:49:00
103.B8fx9g   03:55:00  03:49:00
104.P5e-5f   03:55:00  03:53:00
105.P*7d     03:56:00  03:53:00
106.P5f-5g+  03:56:00  03:56:00

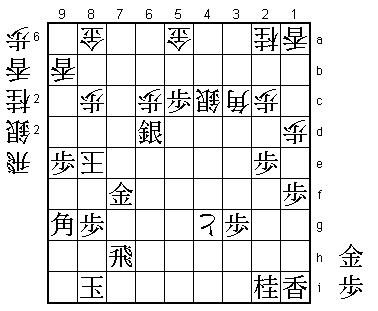
It seems like Habu has fought himself back into this game. +Px6g next will be a
mating threat, so if he can just survive a little longer, white might turn the
tables. By the way, notice the interesting route that the central white pawn made
in this game: P5c-5d-5e-5f-P*5c-5d-5e-5f-5g+. A very unusual pawn promotion in
two attempts.

107.P7dx7c+  03:57:00  03:56:00
108.+P5gx6g  03:57:00  03:56:00
109.G6fx6g   03:57:00  03:56:00

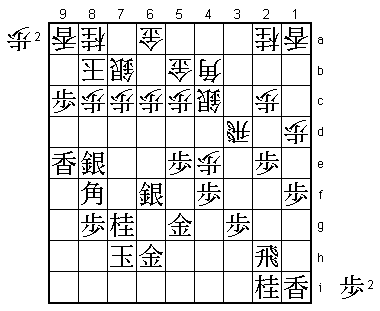
Suddenly it seems like black has to be very careful. The bishop on 3c is also
eyeing the black king, so if black gives up a rook here, there is mate in one
with R*9i! However, after the game Sato coolly said that he had seen it all the
way to the end here.

110.S7bx7c   03:57:00  03:56:00
111.N6ex7c+  03:57:00  03:56:00
112.G6bx7c   03:57:00  03:56:00
113.R*7a     03:58:00  03:56:00
114.G*8a     03:58:00  03:56:00

The general opinion in the press room now was that after 115.Rx7c+ S*8b the
game would go on for a while. By the way, 114.N*8a fails to 115.S6d! and after
Px6d S*8b Kx8b R7ax7c+ Nx7c G*7b is mate.

115.S*8b!    03:59:00  03:56:00
116.K9ax8b   03:59:00  03:56:00
117.R7ax7c+  03:59:00  03:56:00
118.K8bx7c   03:59:00  03:56:00

There is no mate after 118.K9a, but then 119.G*7a is also an easy win for black.

119.S7e-6d   03:59:00  03:56:00
120.K7c-8b   03:59:00  03:56:00

Or 120.K8d R7d! and mate.

121.L9dx9c+  03:59:00  03:56:00
122.K8bx9c   03:59:00  03:56:00
123.N*8e     03:59:00  03:56:00
124.K9c-9d   03:59:00  03:57:00
125.P*9e     03:59:00  03:57:00
126.K9dx8e   03:59:00  03:57:00
127.G6g-7f   03:59:00  03:57:00
Resigns      03:59:00  03:57:00

Mate after 128.Kx9e G*8e K9f G8e-8f Kx9g R9h or 128.K8d B7e. A complete victory
for Sato although in the end it looked pretty close. With this victory, Sato ties
the match at 2-2 and for the second year in a row the Kio match goes the full
distance. Also, this is now the 12th consecutive victory for black in the Kio
match. It is common practice that the players pretend not to care about and usually
don't even look at the outcome of the pawn toss, but I am sure that it will be hard
for them this time not to take a peek.
