33rd Kio Match Game 3
[Black "Habu Yoshiharu, Challenger"]
[White "Sato Yasumitsu, Kio"]
[Event "33rd Kio-sen, Game 3"]
[Date "March 8th 2008"]
1.P7g-7f 00:00:00 00:00:00
2.P3c-3d 00:00:00 00:00:00
3.P2g-2f 00:03:00 00:00:00
4.P5c-5d 00:03:00 00:02:00
5.P2f-2e 00:07:00 00:02:00
6.R8b-5b 00:07:00 00:02:00
7.G4i-5h 00:08:00 00:02:00
8.P5d-5e 00:08:00 00:05:00
9.P2e-2d 00:09:00 00:05:00
This leads to the sharpest variation of the Gokigen Nakabisha. Neither side takes
the time to castle and goes for an all-out attack. According to Ouchi (9-dan), it
is doubtful if this is the right idea for black. After all, it is the Furibisha
side who initiates the fight and trying to trump this with an even sharper attack
could easily be an overplay. It will take a while before a final conclusion is
reached, but this game is definitely no evidence that 9.P2d is bad for black.
10.P2cx2d 00:09:00 00:05:00
11.R2hx2d 00:09:00 00:05:00
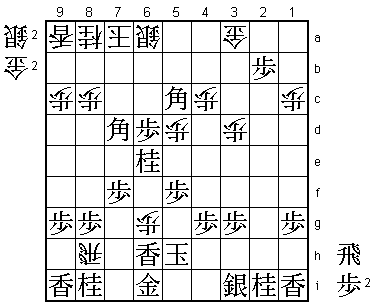
12.P5e-5f 00:09:00 00:05:00
13.P5gx5f 00:11:00 00:05:00
14.B2bx8h+ 00:11:00 00:05:00
15.S7ix8h 00:11:00 00:05:00
16.B*3c 00:11:00 00:05:00
17.R2dx2a+ 00:12:00 00:05:00
18.B3cx8h+ 00:12:00 00:05:00
19.N*5e 00:12:00 00:05:00
20.K5a-6b 00:12:00 00:05:00
21.+R2ax1a 00:13:00 00:05:00
22.P*5d 00:13:00 00:21:00
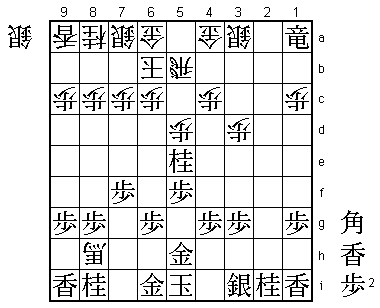
Here is Sato's "brilliant blunder" again (a term coined by Yonenaga). At first
glance, this is a terrible move, because after 23.Nx6c+ Kx6c the move L*6f seems
perfect for black. Not only has white no pawns to defend against this check, but
the lance on 6f also blocks the attack of the promoted bishop on the rook on 1a.
Therefore, this would normally be very good for black, but the results by black
were actually very good. That is, until Habu introduced a brilliant new move in
the second game of the Osho match against Kubo earlier this year.
23.N5ex6c+ 00:18:00 00:21:00
24.K6bx6c 00:18:00 00:21:00
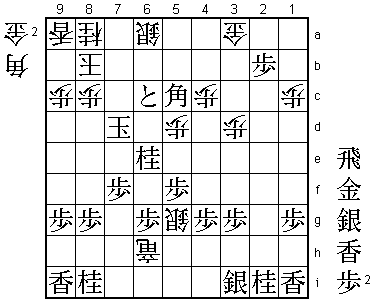
25.B*9f! 00:18:00 00:21:00
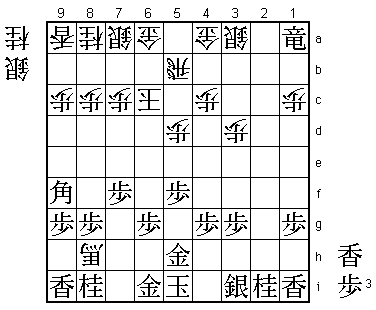
Until further study shows otherwise, this move will be known as "Habu's famous
bishop". No one ever considered dropping a bishop here and it is another example
of Habu's ability to think out of the box.
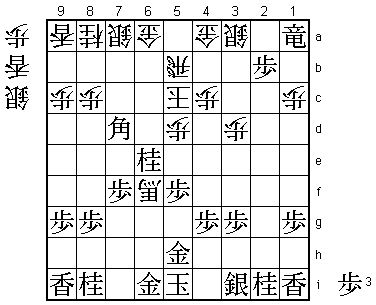
26.K6c-5c 00:18:00 00:46:00
Kubo took almost two hours before playing 26.P7d and lost without a chance after
27.L*6f +Bx6f Px6f S*9e +Rx1c. Sato tries 26.K5c instead, although in the post-mortem
analysis of the Osho game, Kubo indicated that he had looked at it, but that he felt
that there was no way to win for white. Interestingly, Sato said after the game that
he didn't know about this comment and that "if Kubo said so, probably it is true that
K5c is not good". A smokescreen to give the impression that he will never play his
brilliant blunder move again?
27.L*6f 00:32:00 00:46:00
28.N*7d 00:32:00 00:56:00
29.P*2b 00:35:00 00:56:00
A strong move that both blocks the diagonal of the bishop and threatens to make a
tokin on 2a.
30.N7dx6f 00:35:00 01:35:00
31.P6gx6f 00:36:00 01:35:00
32.P7c-7d 00:36:00 01:42:00
33.B9fx7d 00:40:00 01:42:00
34.+B8hx6f 00:40:00 02:04:00
35.N*6e 01:26:00 02:04:00
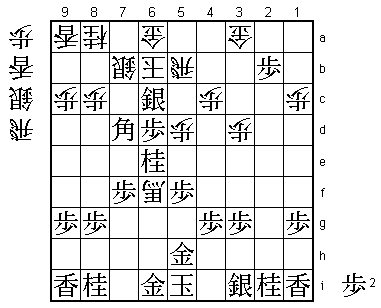
36.K5c-6b    01:26:00  02:20:00

A big surprise to the professionals in the press room. This looks bad because of
the obvious 37.P*6d, so everybody expected Sato to play 36.K4b here. However, Sato
correctly assessed that after 37.P2a+ +Bx1a +Px1a the promoted pawn on 4b is
dangerously close to white king. Black has given up the rook, but the black position
at the moment is quite well-protected against a rook drop and it takes time to set
up a strong attack against the black king. Sato therefore saw nothing else but to
play 36.K6b. He actually had an interesting additional comment that gives an insight
in the professional's mind in this kind of position: "In this type of position the
winning pattern for white is to attack the king by taking the silver on 3i with the
promoted bishop. There is no way to win if this promoted bishop is exchanged against
the promoted rook on 1a".

37.P*6d      01:45:00  02:20:00
38.S7a-7b    01:45:00  02:22:00
39.+R1ax3a   01:46:00  02:22:00
40.G4ax3a    01:46:00  02:22:00
41.S*6c      01:46:00  02:22:00
42.K6b-7a?   01:46:00  03:12:00

Another surprise, but this is probably based on a miscalculation. The natural move
is of course 42.K5a. After 43.Sx5b+ Gx5b Bx5b+ Kx5b G*5c K4a G4c black is threatening
mate after N5c=. White can defend with S*5b, but then R*7a S*6a N5c= K5a Nx6a+ S7bx6a
S*5g and both players agreed that this looks good for black. However, this variation
is not so clear as what happened in the actual game, so Sato should have tried 42.K5a
instead of 42.K7a. The fact that he took 50 minutes for this move shows that he was
not sure what was best here.

43.S6cx5b=   01:46:00  03:12:00
44.L*6g      01:46:00  03:19:00
45.G5hx6g    02:12:00  03:19:00
46.+B6fx6g   02:12:00  03:19:00
47.S5bx6a+   02:12:00  03:19:00
48.S7bx6a    02:12:00  03:19:00
49.G*5h      02:12:00  03:19:00
50.+B6gx5h   02:12:00  03:32:00

A move that comes to mind is 50.R*5g, but in this position it is not even a mating
threat, so black easily wins after 51.N5c=.

51.K5ix5h    02:13:00  03:32:00
52.R*8h      02:13:00  03:57:00
53.L*6h      02:36:00  03:57:00
54.P*6g      02:36:00  03:59:00
55.B*5c      02:43:00  03:59:00
56.K7a-8b    02:43:00  03:59:00

Sato didn't explain after the game why he selected 42.K7a over 42.K5a, but Ouchi
expressed an interesting opinion as to what went wrong. Sato probably thought that
he could defend with 56.S*6b here and that 54.P*6g is therefore winning. However,
after 56.S*6b, black has a rather long and complicated mate: 57.Bx6b+ Sx6b S*7b
Kx7b B6c+ Sx6c Px6c+ Kx6c R*5c K6b S*6c K7a R5a+ and whatever white drops in between
leads to mate. The point here is that if white could drop a pawn on 6a, there would
be no mate, but because of the pawn on 6g, this is not possible.

57.P6d-6c+   02:44:00  03:59:00

The decisive move. The black king has a safe route to 6d, while the white king
has no defence.

58.P6gx6h+   02:44:00  03:59:00
59.G6ix6h    02:44:00  03:59:00
60.S*6g      02:44:00  03:59:00
61.K5hx6g    02:47:00  03:59:00
62.L*6f      02:47:00  03:59:00
63.K6gx6f    02:49:00  03:59:00
64.R8hx6h+   02:49:00  03:59:00
65.P*6g      02:49:00  03:59:00
66.S*5g      02:49:00  03:59:00
67.K6f-7e    02:49:00  03:59:00
68.G*8d      02:49:00  03:59:00
69.K7e-6d    02:49:00  03:59:00
70.G8dx7d    02:49:00  03:59:00
71.K6dx7d    02:49:00  03:59:00
Resigns      02:49:00  03:59:00
The only check left is 72.B*8e, but after K6d there is no continuation. On the
other hand, white has no defence, so Sato resigned here. This seems like a straight
victory for black, confirming the power of Habu's new move B*9f, but there are still
a lot of close variations and it is probably too early to throw Sato's "brilliant
blunder" P*5d out of the window. Habu takes a 2-1 lead in this best-of-five match,
so the pressure is on Sato to deliver with the black pieces in game 4.