33rd Kio Match Game 1
[Black "Habu Yoshiharu, Challenger"]
[White "Sato Yasumitsu, Kio"]
[Event "33th Kio-sen, Game 1"]
[Date "February 13th 2008"]
1.P7g-7f     00:00:00  00:00:00
2.P3c-3d     00:00:00  00:00:00
3.P2g-2f     00:01:00  00:00:00
4.G4a-3b     00:01:00  00:00:00
5.P2f-2e     00:02:00  00:00:00
6.B2bx8h+    00:02:00  00:01:00

The Furigoma has given Sato the white pieces and he chooses the Kakugawari
with tempo loss opening, which is very popular among professionals. Sato is
famous for his opening preparation, and every game there is a great anticipation
among the audience about what he will come up with this time.

7.S7ix8h     00:02:00  00:01:00
8.S3a-2b     00:02:00  00:01:00
9.S3i-4h     00:03:00  00:01:00
10.S2b-3c    00:03:00  00:01:00
11.P1g-1f    00:04:00  00:01:00
12.P1c-1d    00:04:00  00:07:00
13.P3g-3f    00:08:00  00:07:00
14.G6a-5b    00:08:00  00:18:00
15.S8h-7g    00:14:00  00:18:00
16.S7a-6b    00:14:00  00:18:00
17.K5i-6h    00:14:00  00:18:00
18.P6c-6d    00:14:00  00:24:00
19.S4h-3g    00:46:00  00:24:00
20.P4c-4d    00:46:00  00:32:00
21.S3g-4f    00:49:00  00:32:00
22.G5b-4c    00:49:00  00:33:00
23.P3f-3e    00:50:00  00:33:00
24.P4d-4e    00:50:00  00:33:00
25.S4fx4e    00:50:00  00:33:00
26.P3dx3e    00:50:00  00:33:00
27.P4g-4f    00:50:00  00:33:00
28.K5a-4b    00:50:00  00:45:00
29.G4i-5h    00:51:00  00:45:00
30.P5c-5d    00:51:00  00:48:00
31.S4e-5f    01:09:00  00:48:00
32.S6b-5c    01:09:00  00:55:00

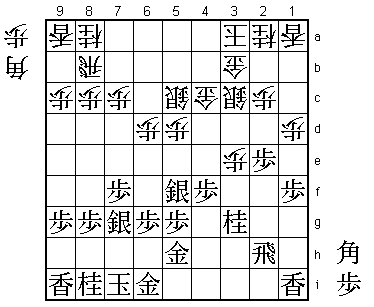
Nothing especially freakish, but also in this game Sato comes with a new idea.
He played a similar opening strategy in the A class Junisen against Maruyama,
but this is an improvement. In the Kakugawari opening, the silver usually first
moves to 6c and then to 5d, but Sato puts the silver on 5c instead.

33.K6h-7i    01:09:00  00:55:00
34.K4b-3a    01:09:00  00:56:00
35.N2i-3g!?  01:18:00  00:56:00

Sato kind of invited this move, but it is not one for the feint at heart. The head
of the knight (square 3f) looks very weak.

36.P*4d!     01:18:00  01:30:00

A move like this usually doesn't deserve an exclamation mark, but Sato shows great
restraint here. Of course, a professional never likes to drop a pawn in defence,
especially in the middle game. Sato admitted after the game that he never intended
to play P*4d, more or less admitting that Habu had exposed a hole in his opening
preparation. The obvious move here is 36.P3f, but after 37.N4e P3g+ Nx5c+ +Px2h +Nx4c
Gx4c B*6a white has won the rook, but this is of little importance in this position.
The black position is well-protected against a rook drop and because the white pawn
is still on 8c, white has no attack at the head of the black king. Therefore, white
will lose a mutual attacking game. Fortunately for Sato, 36.P*4d is good enough for
white, because black still has to deal with the weakness on 3f.

37.S5f-4g    01:22:00  01:30:00
38.G4c-3d    01:22:00  01:48:00
39.R2h-2f    01:35:00  01:48:00
40.P9c-9d    01:35:00  01:50:00
41.P4f-4e    02:06:00  01:50:00
42.P4dx4e    02:06:00  02:00:00
43.P1f-1e    02:07:00  02:00:00
44.P1dx1e    02:07:00  02:01:00
45.B*7a      02:08:00  02:01:00
46.R8b-5b    02:08:00  02:02:00
47.P*4f      02:27:00  02:02:00
48.S5c-4b    02:27:00  02:10:00
49.N3gx4e    02:31:00  02:10:00
50.R5b-7b    02:31:00  02:14:00
51.B7a-5c+   02:33:00  02:14:00
52.S4bx5c    02:33:00  02:14:00
53.N4ex5c+   02:33:00  02:14:00
54.P7c-7d    02:33:00  02:16:00
55.P4f-4e    02:35:00  02:16:00
56.B*3g      02:35:00  02:44:00
57.R2f-2i    02:36:00  02:44:00
58.P7d-7e    02:36:00  02:44:00
59.P7fx7e    02:37:00  02:44:00

60.N8a-9c?   02:37:00  02:55:00

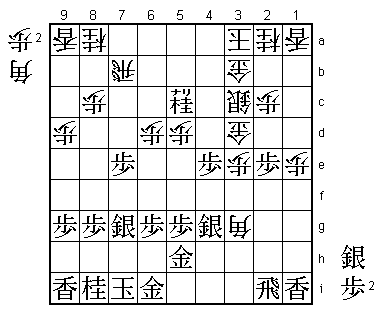
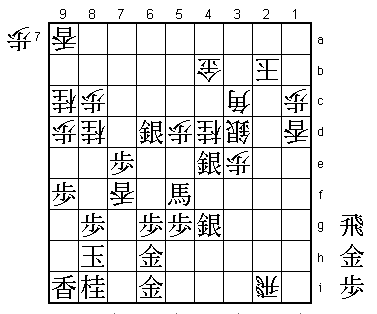
Sato has managed to get the upper hand. Riding the bishop drop on 7a, he has managed
to activate the rook and the slow-looking attack on the 7th file is actually quite
effective. However, 60.N9c is a mistake. White should have played 60.P*7f here. Then
61.Sx7f B5e+ P6f (S*6f +Bx4e is good for white) R7c! +N5b (now S*4c is no longer
possible) +Bx6f S*7g +B5e is good for white.

61.S*4f!     03:04:00  02:55:00

Sato underestimated this move. He probably thought it would fail to 62.N8e S7f
Bx4f+ Sx4f S*7g but here he realised that black has B*8h! and there is no good
way to continue the attack.

62.R7b-7c    03:04:00  03:24:00
63.S4fx3g    03:13:00  03:24:00
64.R7cx5c    03:13:00  03:24:00
65.S3g-4f    03:14:00  03:24:00
66.P*7f      03:14:00  03:29:00
67.S7gx7f    03:24:00  03:29:00
68.N*8d      03:24:00  03:34:00

White attacks strongly, but black has a perfect counter.

69.S7f-6e!   03:24:00  03:34:00

The first of a number of flashy moves that will make this game one for the ages.

70.K3a-2b?    03:24:00  03:49:00

Taking the silver with 70.Px6e seems to fail easily to 71.B*6d, but actually
the situation is a little more complicated than that. After 71.B*6d S4b Bx5c+
Sx5c R*5a K4b black still needs to make an important decision. A mistake would
be Rx2a+ G3a +Rx1a B*3c +Rx1d S*8h K7h N7f and white wins. Correct is Rx9a+
instead and after N8e the situation is unclear. With 70.K2b it seems that Sato
is throwing the towel and a quick end to this game was expected by the professionals
in the press room. Habu clearly has the advantage, but the good stuff has just started.
Fasten your seatbelts, here we go.

71.S6ex6d    03:26:00  03:49:00
72.R5c-4c    03:26:00  03:49:00
73.B*5b      03:37:00  03:49:00
74.S3c-4b    03:37:00  03:54:00
75.B5bx4c+   03:44:00  03:54:00
76.G3bx4c    03:44:00  03:56:00
77.P4e-4d    03:44:00  03:56:00
78.G3dx4d    03:44:00  03:56:00
79.P2e-2d    03:46:00  03:56:00
80.P2cx2d    03:46:00  03:56:00
81.P*2e      03:46:00  03:56:00
82.P2dx2e    03:46:00  03:57:00
83.P*1b      03:55:00  03:57:00
84.L1ax1b    03:55:00  03:57:00
85.P*1c      03:55:00  03:57:00
86.N2ax1c    03:55:00  03:57:00
87.P*1d      03:55:00  03:57:00
88.B*3c      03:55:00  03:58:00
89.L1ix1e    03:56:00  03:58:00
90.B3cx1e    03:56:00  03:59:00
91.P1dx1c+   03:56:00  03:59:00
92.L1bx1c    03:56:00  03:59:00
93.R2ix2e    03:56:00  03:59:00
94.P*2c      03:56:00  03:59:00
95.P*1d      03:58:00  03:59:00
96.L1cx1d    03:58:00  03:59:00
97.N*2f      03:58:00  03:59:00
98.P*1c      03:58:00  03:59:00
99.P*4e      03:58:00  03:59:00
100.L*7f!    03:58:00  03:59:00

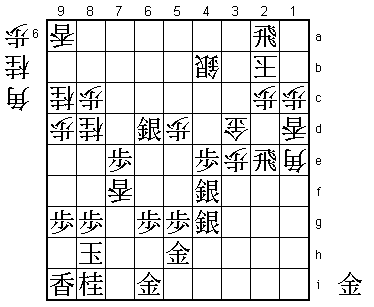
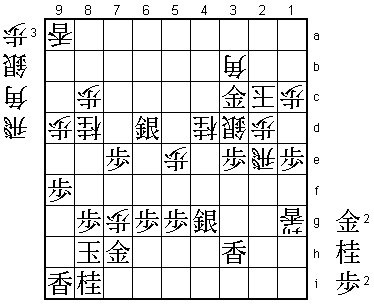
This is the type of move that shows how good these players really are. In byoyomi
Sato plays a check that seems to kill his attacking potential, because the knight
can no longer jump to 7f. However, in a few moves we will see how important this
lance drop is.

101.K7i-8h   03:58:00  03:59:00
102.G4d-3d   03:58:00  03:59:00
103.N2fx3d   03:59:00  03:59:00
104.G4cx3d   03:59:00  03:59:00
105.R*2a     03:59:00  03:59:00

And white resigned...or not?

106.K2bx2a   03:59:00  03:59:00
107.R2ex2c+  03:59:00  03:59:00
108.B*2b     03:59:00  03:59:00

This is check! Because of 100.L*7f, the king is now on 8h instead of 7i. Another
rule of thumb in shogi is that countering a check with a check in the endgame
usually means that you are winning. However, here Habu shows why he is even a
better endgame player than Sato. He must have seen 100.L*7f and calculated that
he could still allow the counter check. This all in one minute of byoyomi...

109.P4e-4d   03:59:00  03:59:00

The point. Black now threatens simply G*1b or G*3b which cannot be defended at
the same time. Surely black must be winning now! Not so fast...

110.R*3b     03:59:00  03:59:00
111.G*1b     03:59:00  03:59:00
112.K2a-3a   03:59:00  03:59:00
113.G1bx2b   03:59:00  03:59:00
114.R3bx2b   03:59:00  03:59:00
115.+R2cx3d  03:59:00  03:59:00
116.S4b-3c   03:59:00  03:59:00

Sato is playing Houdini here. He doesn't want to drop any pieces in defence to
keep the pressure on the black king. This leaves the king very vulnerable to
devastating checks, but even in byoyomi Sato correctly calculates that there is
no easy win for black here. It is no longer clear who is winning here...

117.P*2c     03:59:00  03:59:00
118.S3cx3d   03:59:00  03:59:00
119.P2cx2b+  03:59:00  03:59:00
120.K3ax2b   03:59:00  03:59:00
121.B*4a     03:59:00  03:59:00

According to Tanigawa, this was probably the only clear mistake in this long
endgame. Without giving any detailed variations, he claims 121.R*4a would have
won here. Still, it is hard to criticize 121.B*4a, because it has a deep meaning
in itself.

122.N*3b     03:59:00  03:59:00
123.P9g-9f!  03:59:00  03:59:00

It is moves like the one-two punch 121.B*4a and 122.P9f that make Habu a giant
among men in the endgame. First, black forces the knight drop on 3b with B*4a.
This bishop also covers square 8e, and after 123.P9f the king can escape to 9g
without being bothered by N8e. Note that it is important that B*4a not only covers
8e, but also forces the knight drop on 3b, so that this knight can no longer be
dropped on 8e. Habu saw all of this in 60 seconds. Amazing, but we have one final
jaw dropper coming up.

124.R*2i     03:59:00  03:59:00
125.G5h-6h   03:59:00  03:59:00
126.G*4b     03:59:00  03:59:00
127.B4a-7d+  03:59:00  03:59:00
128.B1e-3c   03:59:00  03:59:00
129.+B7d-5f  03:59:00  03:59:00
130.P*4e     03:59:00  03:59:00
131.S4fx4e   03:59:00  03:59:00
132.N3bx4d   03:59:00  03:59:00

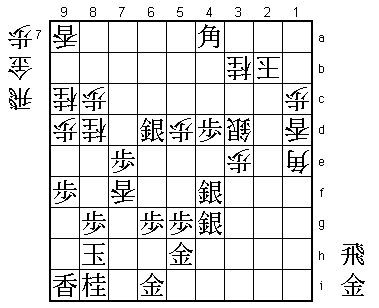
Sato probably felt that he was winning here. The normal continuation would be 133.Sx3d
Nx5f Sx3c+ Gx3c (or Kx3c) and white can escape up the board. Note that in this variation
the knight that was forced to be dropped on 3b, making the escape move 123.P9f possible,
now has moved to 5f to take part in the attack. Just one of the many twists in this
incredible endgame.

133.+B5f-5e! 03:59:00  03:59:00

A stunning end to this game. Habu gives up the promoted bishop just to stop the line of
the bishop on 3c and to keep the knight on 4d. Sato keeps on fighting for another
entertaining 50 moves, but he doesn't get another chance.

134.P5dx5e   03:59:00  03:59:00
135.S4ex3d   03:59:00  03:59:00
136.N9c-8e   03:59:00  03:59:00
137.P*2c     03:59:00  03:59:00
138.R2ix2c+  03:59:00  03:59:00
139.S*3a     03:59:00  03:59:00
140.K2b-1b   03:59:00  03:59:00
141.S3dx2c=  03:59:00  03:59:00
142.K1bx2c   03:59:00  03:59:00
143.R*2f     03:59:00  03:59:00
144.P*2d     03:59:00  03:59:00
145.S3ax4b=  03:59:00  03:59:00
146.B3cx4b   03:59:00  03:59:00
147.R*6c     03:59:00  03:59:00
148.S*3c     03:59:00  03:59:00
149.R6c-4c+  03:59:00  03:59:00
150.S*3d     03:59:00  03:59:00
151.+R4cx4b  03:59:00  03:59:00
152.S3cx4b   03:59:00  03:59:00
153.B*4a     03:59:00  03:59:00
154.B*3b     03:59:00  03:59:00
155.B4ax8e+  03:59:00  03:59:00
156.P2d-2e   03:59:00  03:59:00
157.+B8e-5b  03:59:00  03:59:00
158.S4b-3c   03:59:00  03:59:00
159.R2fx2e   03:59:00  03:59:00
160.S3dx2e   03:59:00  03:59:00
161.+B5bx2e  03:59:00  03:59:00
162.P*2d     03:59:00  03:59:00
163.+B2ex3e  03:59:00  03:59:00
164.P*3d     03:59:00  03:59:00
165.+B3e-4e  03:59:00  03:59:00
166.R*2e     03:59:00  03:59:00
167.P*3e     03:59:00  03:59:00
168.L1d-1g+  03:59:00  03:59:00
169.P*1e     03:59:00  03:59:00
170.P*7g     03:59:00  03:59:00
171.S*4b     03:59:00  03:59:00
172.P7g-7h+  03:59:00  03:59:00
173.G6ix7h   03:59:00  03:59:00
174.L7fx7h+  03:59:00  03:59:00
175.G6hx7h   03:59:00  03:59:00
176.G*2b     03:59:00  03:59:00
177.S4bx3c=  03:59:00  03:59:00
178.G2bx3c   03:59:00  03:59:00
179.S*4b     03:59:00  03:59:00
180.S*2b     03:59:00  03:59:00
181.L*3h     03:59:00  03:59:00
182.P*7g     03:59:00  03:59:00
183.S4bx3c+  03:59:00  03:59:00
184.S2bx3c   03:59:00  03:59:00
185.+B4ex3d  03:59:00  03:59:00
186.S3cx3d   03:59:00  03:59:00
187.G*3c     03:59:00  03:59:00
Resigns      03:59:00  03:59:00

Mate after 188.Kx3c Px3d K4b G*5c K3a S*2b Kx2b P3c+ etc. An awesome game to start
this Kio match. After the game, there was a big roar of applause by the audience.
Yes, not only was this game played at an exceptionally high level under time pressure,
it was also played in a big hall in front of a sell-out crowd of a few hundred people
instead of in a closed-off room with only the players and the record keeper. Just
thinking about the concentration needed to play at such an incredible level for
such a long time in front of so many people makes your head spin. I am sure that
even Sato appreciated being part of this game. He may have lost it, but he can take
comfort in the fact that black has now won 9 consecutive games in the Kio and that
he has a game with the black pieces coming up.
