32nd Kio Match Game 4
[Black "Moriuchi Toshiyuki, Kio"]
[White "Sato Yasumitsu, Challenger"]
[Event "32nd Kio-sen, Game 4"]
[Date "March 23rd 2007"]
1.P7g-7f 00:00:00 00:00:00
2.P3c-3d 00:00:00 00:00:00
3.P2g-2f 00:00:00 00:00:00
4.P9c-9d 00:00:00 00:00:00
5.P2f-2e 00:01:00 00:00:00
6.P9d-9e 00:01:00 00:00:00
7.S3i-4h 00:02:00 00:00:00
8.B2bx8h+ 00:02:00 00:01:00
9.S7ix8h 00:02:00 00:01:00
10.S3a-2b 00:02:00 00:01:00
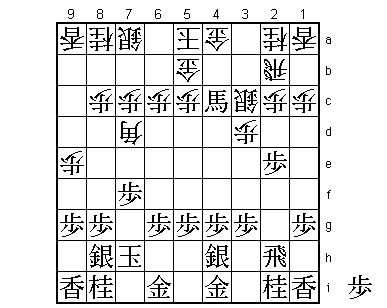
11.K5i-6h 00:09:00 00:01:00
12.S2b-3c 00:09:00 00:01:00
13.K6h-7h 00:09:00 00:01:00
14.R8b-2b 00:09:00 00:03:00
15.B*6e 00:21:00 00:03:00
The position is slightly different than in the 7th game of the Osho match
that was played a couple of days earlier, but the theme is the same. White
doesn't defend against this fork, but things don't seem so easy.
16.B*7d 00:21:00 00:05:00
17.B6ex4c+ 00:21:00 00:05:00
18.G6a-5b 00:21:00 00:05:00
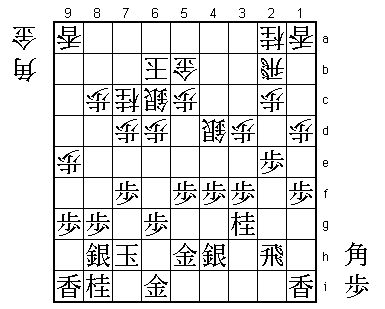
19.+B4cx5b! 00:23:00 00:05:00
The alternative is 19.P7e Gx4c Px7d Px7d and the white position seems to be
hard to play with the rook close to the generals (white might have to return
with the rook to 8b and play a Yagura!). However, Moriuchi didn't like the
loss of tempo and the hole at the head of the king and decided to play 19.+Bx5b
instead.
20.G4ax5b 00:23:00 00:13:00
21.G*7e 00:23:00 00:13:00
22.P6c-6d 00:23:00 00:24:00
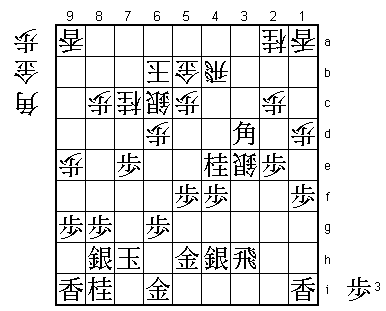
23.G7ex7d 00:35:00 00:24:00
24.P7cx7d 00:35:00 00:24:00
The equation seems simple: white has a gold in hand to drop and black has an
extra pawn, so it is hard to say who is better. However, white has the serious
problem that without the gold, his defensive formation is pretty weak. If white
can find a way to attack without letting black in, the gold in hand is very
powerful, but if not (like in this game) the weakness of the king will be the
Achilles' heel.
25.P3g-3f 00:58:00 00:24:00
26.K5a-6b 00:58:00 00:40:00
27.P4g-4f 01:12:00 00:40:00
28.S7a-7b 01:12:00 00:43:00
29.N2i-3g 01:17:00 00:43:00
30.S7b-6c 01:17:00 01:02:00
31.G4i-5h 01:19:00 01:02:00
32.N8a-7c 01:19:00 01:05:00
33.P1g-1f 01:37:00 01:05:00
34.S3c-4d 01:37:00 01:21:00
35.P5g-5f 01:58:00 01:21:00
36.P1c-1d!? 01:58:00 01:46:00
Sato is not happy with his position and tries to confuse the issue. Defending
at the edge took Moriuchi completely by surprise. This "come and get me" tactic
is often used at the top level. It seems all straightforward: 37.P1e Px1e P*1b
Lx1b P2d Px2d B*1a and after R4b Rx2d black is clearly better. However, Sato's
plan was to answer 37.P1e with 38.P3e Px3e Sx3e and attack the head of the
knight. Despite this, Sato said he also didn't have much confidence in this
variation. Still, Moriuchi stops in his tracks and thinks for almost an hour...

37.N3g-4e!   02:56:00  01:46:00

Thinking long in a complicated position often leads to a bad move, but not
in this case. Moriuchi said he played this because white was waiting for the
edge attack, but this is also a very strong move. Without the knight on 3g,
the attack with P3e is meaningless, so now black strongly threatens P1e next.

38.P3d-3e    02:56:00  03:28:00

Sato decides to attack on the third file anyway, but that fact that he thought
101 minutes (of a total of 4 hours) about this move shows that it was not a
move he liked to play. "Pushing forward where the knight has just left is
strange", Sato admitted.

39.P3fx3e    03:15:00  03:28:00
40.P7d-7e    03:15:00  03:28:00
41.P7fx7e    03:36:00  03:28:00
42.R2b-4b    03:36:00  03:29:00
43.B*3d      03:37:00  03:29:00

Actually, Moriuchi was not so sure about his position here. He didn't want
to drop the bishop at this awkward spot, but the post-mortem analysis seemed
to show that white could not take advantage of this.

44.S4dx3e    03:37:00  03:30:00
45.R2h-3h!   03:43:00  03:30:00
Now white is in trouble. For example, 45.P*3f is answered by 46.Bx2c+ and
now B*2i R3i Bx5f+ is impossible because of Nx5c+.
46.B*4d? 03:43:00 03:52:00
"Now it all went terribly wrong" commented Sato after the game. He had looked
at 46.P*3f Bx2c+ G4c, but saw that after P*3c he can't hold his position
together. His best option was 46.P*3g Sx3g N6e which looks strong, but can
be answered by P6f. Then B*2i P*3i (R3i is now not possible because Bx5f+ is
a check) Bx3h+ Px3h R*4i Px6e Rx1i+ S7g and the black position is very solid.
"I hadn't thought about this much, but compared to the game P*3g is clearly
better" (Sato).
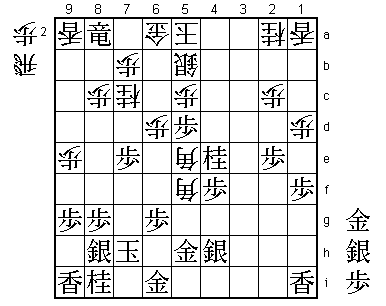
47.B3dx5b+! 03:53:00 03:52:00
48.S6cx5b 03:53:00 03:52:00
49.G*5e! 03:53:00 03:52:00
Game over. Black can promote the rook and the white position collapses.
50.S3ex4f 03:53:00 03:53:00
51.R3h-3a+ 03:55:00 03:53:00
52.S4fx5e 03:55:00 03:57:00
53.+R3ax4b 03:55:00 03:57:00
54.G*5a 03:55:00 03:57:00
55.R*8b 03:57:00 03:57:00
56.P*7b 03:57:00 03:57:00
57.+R4bx5a 03:57:00 03:57:00
58.K6bx5a 03:57:00 03:57:00
59.P5fx5e 03:57:00 03:57:00
60.B*5f 03:57:00 03:59:00
61.R8b-8a+ 03:57:00 03:59:00
62.G*6a 03:57:00 03:59:00
63.P*4f 03:58:00 03:59:00
64.B4dx5e 03:58:00 03:59:00
65.P*5d 03:58:00 03:59:00
Resigns 03:58:00 03:59:00
If 66.Px5d P*5c is just too much and not taking on 5d is also not an option,
so Sato resigned. It is very rare that Sato folds so easily, as he is known
for his fighting ability in worse positions, but maybe this opening is just a
little too daring. So, black wins four games in this Kio match and it is clear
that the Furigoma to decide the first player to move will be watched most
eagerly by players and followers.